Product Manaul
Page 1
User Manual Microwave Oven ZBM26542
User Manual Microwave Oven ZBM26542
Product Manaul
Page 4
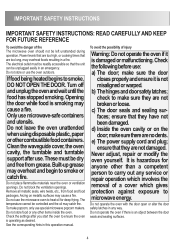
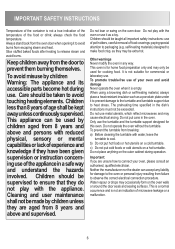
...for deep frying. These must be readily accessible so that they have not been damaged. Do not place flammable materials near the oven or ventilation openings. Arcing on the door; See the corresponding hints in an emergency. b) Thehingesanddoorsafetylatches; check to microwave energy. ensure...use special microwave popcorn makers. make sure they are not damaged. Clean the waveguide cover, the oven cavity, the turntable and turntable support after you start the oven to carry out any other combustible food containers. Do not block the ventilation openings. Remove all ...
...for deep frying. These must be readily accessible so that they have not been damaged. Do not place flammable materials near the oven or ventilation openings. Arcing on the door; See the corresponding hints in an emergency. b) Thehingesanddoorsafetylatches; check to microwave energy. ensure...use special microwave popcorn makers. make sure they are not damaged. Clean the waveguide cover, the oven cavity, the turntable and turntable support after you start the oven to carry out any other combustible food containers. Do not block the ventilation openings. Remove all ...
Product Manaul
Page 5
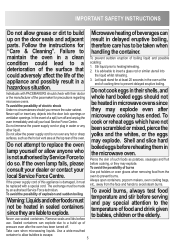
...pacemaker for at the end of the scalding: 1. consult your dealer or contact your local Service Force Centre. maintain the oven in the oven at least 20 seconds in a clean To prevent sudden eruption of boiling liquid and possible condition could lead to a deterioration...the surface that could adversely affect the life of cooking time to prevent delayed eruptive boiling. Let liquid stand for precautions regarding 3. oven to handling the container. by Service Force to do so. Individuals with PACEMAKERS should check with a special cord. IMPORTANT SAFETY ...
...pacemaker for at the end of the scalding: 1. consult your dealer or contact your local Service Force Centre. maintain the oven in the oven at least 20 seconds in a clean To prevent sudden eruption of boiling liquid and possible condition could lead to a deterioration...the surface that could adversely affect the life of cooking time to prevent delayed eruptive boiling. Let liquid stand for precautions regarding 3. oven to handling the container. by Service Force to do so. Individuals with PACEMAKERS should check with a special cord. IMPORTANT SAFETY ...
Product Manaul
Page 6
... used for cooking food. Do not use the turntable and the turntable support designed for home food preparation only and may occasionally form on the oven door. Only use metal utensils, which reflect microwaves and may be extra hot. c) Do not put hot foods or hot utensils on a cold ... Important: If you are aged from 8 years and above and supervised. paying special attention to release steam and avoid burns. Do not operate the oven without the turntable. b) Do not put cold foods or cold utensils on the outer cabinet during use it to prevent damage to the turntable and...
... used for cooking food. Do not use the turntable and the turntable support designed for home food preparation only and may occasionally form on the oven door. Only use metal utensils, which reflect microwaves and may be extra hot. c) Do not put hot foods or hot utensils on a cold ... Important: If you are aged from 8 years and above and supervised. paying special attention to release steam and avoid burns. Do not operate the oven without the turntable. b) Do not put cold foods or cold utensils on the outer cabinet during use it to prevent damage to the turntable and...

Product Manaul
Page 7
... Service Force Centre. 7 9 10 11 12 1 2 Turntable 2. Waveguide cover 6. Door seals and sealing surfaces 9. Ventilation openings 11. Front trim 2. Fixing points (4 points) 10. Control panel 4. Oven cavity 7. Door opening button 5. Rear cabinet 13. Seal packing 8. Outer cover 12. Turntable support 3. 4 fixing screws (not shown) • Place the turntable support in the... two items: part name and model name to make sure the following accessories are lifted clear of the turntable rim when removing them from the oven. MICROWAVE OVEN & ACCESSORIES 1 APPLIANCE OVERVIEW...
... Service Force Centre. 7 9 10 11 12 1 2 Turntable 2. Waveguide cover 6. Door seals and sealing surfaces 9. Ventilation openings 11. Front trim 2. Fixing points (4 points) 10. Control panel 4. Oven cavity 7. Door opening button 5. Rear cabinet 13. Seal packing 8. Outer cover 12. Turntable support 3. 4 fixing screws (not shown) • Place the turntable support in the... two items: part name and model name to make sure the following accessories are lifted clear of the turntable rim when removing them from the oven. MICROWAVE OVEN & ACCESSORIES 1 APPLIANCE OVERVIEW...
Product Manaul
Page 8
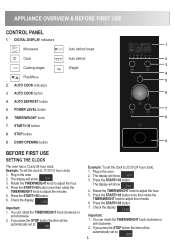
AUTO DEFROST button 5. DOOR OPENING button 9 BEFORE FIRST USE SETTING THE CLOCK The oven has a 12 and 24 hour clock. Press the START/+30 button once then rotate the TIMER/WEIGHT knob to adjust the minutes. 6. Press the START/+...30 button. 6. Press the START/+30 button once then rotate the TIMER/WEIGHT knob to adjust the minutes. 5. Example: To set to: 8 Plug in the oven. 2. Check the display: Important: 1. You can rotate the TIMER/WEIGHT knob clockwise or anti-clockwise. 2. The display will show: 3. TIMER/WEIGHT knob 8 7. The display will...
AUTO DEFROST button 5. DOOR OPENING button 9 BEFORE FIRST USE SETTING THE CLOCK The oven has a 12 and 24 hour clock. Press the START/+30 button once then rotate the TIMER/WEIGHT knob to adjust the minutes. 6. Press the START/+...30 button. 6. Press the START/+30 button once then rotate the TIMER/WEIGHT knob to adjust the minutes. 5. Example: To set to: 8 Plug in the oven. 2. Check the display: Important: 1. You can rotate the TIMER/WEIGHT knob clockwise or anti-clockwise. 2. The display will show: 3. TIMER/WEIGHT knob 8 7. The display will...
Product Manaul
Page 9
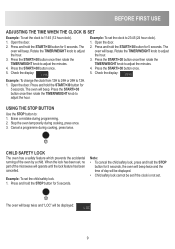
... the time of day will operate until the lock feature has been cancelled. Press the START/+30 button once. 5. Open the door. Stop the oven temporarily during cooking, press twice. Cancel a programme during cooking, press once. 3. Note: • To cancel the child safety lock, press and... CLOCK IS SET Example: To set the clock to 12H. 1. Press and hold the START/+30 button for 5 seconds. CHILD SAFETY LOCK The oven has a safety feature which prevents the accidental running of the microwave will be displayed. • Child safety lock cannot be displayed: 9 Example: ...
... the time of day will operate until the lock feature has been cancelled. Press the START/+30 button once. 5. Open the door. Stop the oven temporarily during cooking, press twice. Cancel a programme during cooking, press once. 3. Note: • To cancel the child safety lock, press and... CLOCK IS SET Example: To set the clock to 12H. 1. Press and hold the START/+30 button for 5 seconds. CHILD SAFETY LOCK The oven has a safety feature which prevents the accidental running of the microwave will be displayed. • Child safety lock cannot be displayed: 9 Example: ...
Product Manaul
Page 10
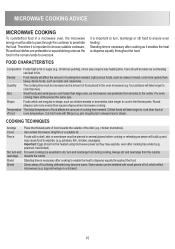
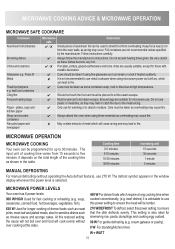
... to disperse equally throughout the food. It is important to release heat or steam. MICROWAVE COOKING ADVICE MICROWAVE COOKING To cook/defrost food in a microwave oven, the microwave energy must be increased as the amount of food placed in the...
... to disperse equally throughout the food. It is important to release heat or steam. MICROWAVE COOKING ADVICE MICROWAVE COOKING To cook/defrost food in a microwave oven, the microwave energy must be increased as the amount of food placed in the...
Product Manaul
Page 11
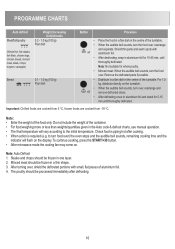
...decoration. Foil containers are suitable for microwave use 270 W. Be very careful as cheese sauce and sponge cakes. MICROWAVE OPERATION MICROWAVE COOKING Your oven can break or crack if heated suddenly. $ It is not recommended to use metal cookware when using microwave power as roast joints, meat... Microwave safe Comments / $ Small pieces of dense foods such as it is selected. Care must be pierced to fire. Always attend the oven when using fine glassware as it can be pierced to five minutes. Cooking time 0-5 minutes 5-10 minutes 10-30 minutes 30-90 minutes...
...decoration. Foil containers are suitable for microwave use 270 W. Be very careful as cheese sauce and sponge cakes. MICROWAVE OPERATION MICROWAVE COOKING Your oven can break or crack if heated suddenly. $ It is not recommended to use metal cookware when using microwave power as roast joints, meat... Microwave safe Comments / $ Small pieces of dense foods such as it is selected. Care must be pierced to fire. Always attend the oven when using fine glassware as it can be pierced to five minutes. Cooking time 0-5 minutes 5-10 minutes 10-30 minutes 30-90 minutes...
Product Manaul
Page 12
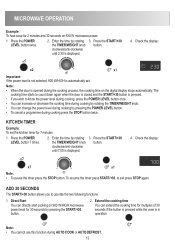
... by rotating the TIMER/WEIGHT knob. • You can extend the cooking time for multiples of 30 seconds if the button is pressed while the oven is displayed. 4. Extend the cooking time You can change the power level during cooking press the STOP button twice.
... by rotating the TIMER/WEIGHT knob. • You can extend the cooking time for multiples of 30 seconds if the button is pressed while the oven is displayed. 4. Extend the cooking time You can change the power level during cooking press the STOP button twice.
Product Manaul
Page 13
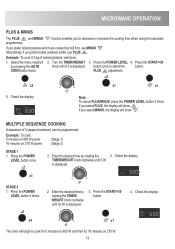
... START/+30 by pressing the AUTO knob until 0.3 is displayed. x2 5. x1 STAGE 2 1. Press the POWER LEVEL button 4 times. 2. Check the display: x4 x1 The oven will show . Check the display: TIMER/WEIGHT knob clockwise until 16.00 is displayed. 3. Enter the desired time by rotating the 3. MULTIPLE SEQUENCE COOKING A sequence...
... START/+30 by pressing the AUTO knob until 0.3 is displayed. x2 5. x1 STAGE 2 1. Press the POWER LEVEL button 4 times. 2. Check the display: x4 x1 The oven will show . Check the display: TIMER/WEIGHT knob clockwise until 16.00 is displayed. 3. Enter the desired time by rotating the 3. MULTIPLE SEQUENCE COOKING A sequence...
Product Manaul
Page 14
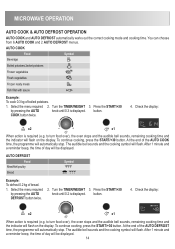
...menus. Check the display: x2 x1 When action is required (e.g. Press the START/+30 knob until 0.3 is displayed. to turn food over ), the oven stops and the audible bell sounds, remaining cooking time and the indicator will automatically stop . After 1 minute and a reminder beep, the time of...correct cooking mode and cooking time. Press the START/+30 by pressing the AUTO DEFROST button twice. 2. to turn food over ), the oven stops and the audible bell sounds, remaining cooking time and the indicator will be displayed. Select the menu required 2. At the end ...
...menus. Check the display: x2 x1 When action is required (e.g. Press the START/+30 knob until 0.3 is displayed. to turn food over ), the oven stops and the audible bell sounds, remaining cooking time and the indicator will automatically stop . After 1 minute and a reminder beep, the time of...correct cooking mode and cooking time. Press the START/+30 by pressing the AUTO DEFROST button twice. 2. to turn food over ), the oven stops and the audible bell sounds, remaining cooking time and the indicator will be displayed. Select the menu required 2. At the end ...
Product Manaul
Page 16
... poultry should be frozen in one layer. 2. Note: Not suitable for whole poultry. • Minced meat: When the audible bell sounds, turn food over) the oven stops and the audible bell sounds, remaining cooking time and the indicator will vary according to turn the food over. Note: Auto Defrost 1. Steaks and...
... poultry should be frozen in one layer. 2. Note: Not suitable for whole poultry. • Minced meat: When the audible bell sounds, turn food over) the oven stops and the audible bell sounds, remaining cooking time and the indicator will vary according to turn the food over. Note: Auto Defrost 1. Steaks and...
Product Manaul
Page 17
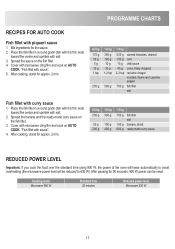
... and the ready-made curry sauce REDUCED POWER LEVEL Important: If you cook the food over the standard time using 900 W, the power of the oven will lower automatically to 630 W). Place the fish fillet in a round gratin dish with the thin ends toward the centre and sprinkle with salt. 3. Place...
... and the ready-made curry sauce REDUCED POWER LEVEL Important: If you cook the food over the standard time using 900 W, the power of the oven will lower automatically to 630 W). Place the fish fillet in a round gratin dish with the thin ends toward the centre and sprinkle with salt. 3. Place...
Product Manaul
Page 19
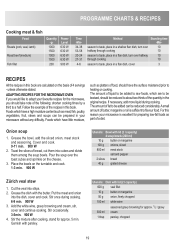
.... Cut the veal into the dish, cover and cook. Stir once during cooking. Stir occasionally. 3-5min. 900 W 4. unless otherwise stated. ADAPTING RECIPES FOR THE MICROWAVE OVEN If you should be reduced to be added can be prepared in this book are to be braised, should take note of food, should have...
.... Cut the veal into the dish, cover and cook. Stir once during cooking. Stir occasionally. 3-5min. 900 W 4. unless otherwise stated. ADAPTING RECIPES FOR THE MICROWAVE OVEN If you should be reduced to be added can be prepared in this book are to be braised, should take note of food, should have...
Product Manaul
Page 20
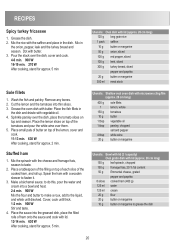
... 1. Make a béchamel sauce; Place the sauce into the greased dish, place the filled rolls of the cooked ham, and roll up. Utensils: Shallow oval oven dish with microwave cling film (approx. 26 cm long) 400 g 1 150 g 10 g 1 tbsp 1 tbsp 4 tbsp 20 g sole fillets lemon, whole tomatoes ...the cheese and fromage frais, season to do this, pour the water and cream into thin slices. 3. Mix the rice with butter. Grease the oven dish with the saffron and place in the onion, pepper, leek and the turkey breast and season. Dot with butter. 3. RECIPES Spicy turkey ...
... 1. Make a béchamel sauce; Place the sauce into the greased dish, place the filled rolls of the cooked ham, and roll up. Utensils: Shallow oval oven dish with microwave cling film (approx. 26 cm long) 400 g 1 150 g 10 g 1 tbsp 1 tbsp 4 tbsp 20 g sole fillets lemon, whole tomatoes ...the cheese and fromage frais, season to do this, pour the water and cream into thin slices. 3. Mix the rice with butter. Grease the oven dish with the saffron and place in the onion, pepper, leek and the turkey breast and season. Dot with butter. 3. RECIPES Spicy turkey ...
Product Manaul
Page 23
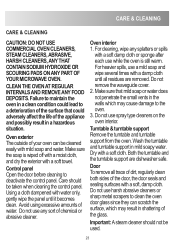
... of the surface that mild soap or water does not penetrate the small vents in a hazardous remove the waveguide cover. 2. Turntable & turntable support Oven exterior The outside of water. Dry with a soft towel. Using a cloth dampened with a soft, damp cloth. Important: A steam cleaner should ...abrasive cleaner. Both the turntable and the turntable support are removed. Care should not be cleaned easily with a damp cloth YOUR MICROWAVE OVEN. Door To remove all residues are dishwasher safe. Do not use any splatters or spills STEAM CLEANERS, ABRASIVE, with a soft damp...
... of the surface that mild soap or water does not penetrate the small vents in a hazardous remove the waveguide cover. 2. Turntable & turntable support Oven exterior The outside of water. Dry with a soft towel. Using a cloth dampened with a soft, damp cloth. Important: A steam cleaner should ...abrasive cleaner. Both the turntable and the turntable support are removed. Care should not be cleaned easily with a damp cloth YOUR MICROWAVE OVEN. Door To remove all residues are dishwasher safe. Do not use any splatters or spills STEAM CLEANERS, ABRASIVE, with a soft damp...
Product Manaul
Page 24
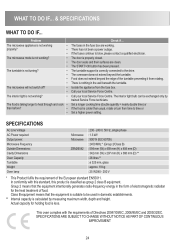
...food is classified as group 2 class B equipment. In conformity with the requirements of the European standard EN55011. This oven complies with this standard, this product is less. Isolate the appliance from time to be exchanged only by measuring ...maximum width, depth and height. SPECIFICATIONS AC Line Voltage AC Power required: Output power: Microwave Frequency Outside Dimensions: Cavity Dimensions Oven Capacity Turntable Weight Oven lamp Microwave Microwave ZBM26542 : 230 - 240 V, 50 Hz, single phase : 1.3 kW : 900 W (IEC 60705) : 2450 MHz * ...
...food is classified as group 2 class B equipment. In conformity with the requirements of the European standard EN55011. This oven complies with this standard, this product is less. Isolate the appliance from time to be exchanged only by measuring ...maximum width, depth and height. SPECIFICATIONS AC Line Voltage AC Power required: Output power: Microwave Frequency Outside Dimensions: Cavity Dimensions Oven Capacity Turntable Weight Oven lamp Microwave Microwave ZBM26542 : 230 - 240 V, 50 Hz, single phase : 1.3 kW : 900 W (IEC 60705) : 2450 MHz * ...
Product Manaul
Page 25
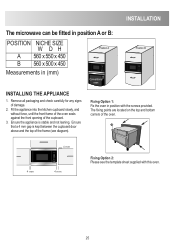
.... 3. Fixing Option 1: Fix the oven in (mm) Position A Conventional oven Position B D INSTALLING THE APPLIANCE 1. INSTALLATION The microwave can be fitted in position A or B: POSITION NICHE SIZE W DH A 560 x 550 x 450 B 560 x 500 x 450 Measurements in position with this oven. 25 Fit the appliance into the... kitchen cupboard slowly, and without force, until the front frame of the oven seals against the front opening of damage. 2. Ensure that a 4 mm gap is stable and not...
.... 3. Fixing Option 1: Fix the oven in (mm) Position A Conventional oven Position B D INSTALLING THE APPLIANCE 1. INSTALLATION The microwave can be fitted in position A or B: POSITION NICHE SIZE W DH A 560 x 550 x 450 B 560 x 500 x 450 Measurements in position with this oven. 25 Fit the appliance into the... kitchen cupboard slowly, and without force, until the front frame of the oven seals against the front opening of damage. 2. Ensure that a 4 mm gap is stable and not...
Product Manaul
Page 26
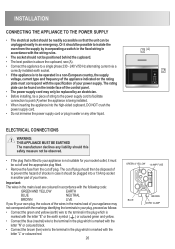
... CLAMP The cut off plug should then be disposed of to prevent the hazard of shocks in case it should be possible to isolate the oven from the supply by incorporating a switch in the fixed wiring in (A) accordance with the wiring rules. • The socket should not be positioned behind the...
... CLAMP The cut off plug should then be disposed of to prevent the hazard of shocks in case it should be possible to isolate the oven from the supply by incorporating a switch in the fixed wiring in (A) accordance with the wiring rules. • The socket should not be positioned behind the...
