Product Manaul
Page 4
... accessible so that they have not been damaged. See the corresponding hints in any service or may cause a fire. Do not leave the oven unattended when using disposable plastic, paper or other combustible food containers. make popcorn, only use . c) The door seals and sealing surfaces;...levels that are too high or cooking times that a separate circuit serving only this operation manual. 4 Warning: Do not operate the oven if it is an object between the door To make sure the door closes properly and ensure it is damaged or malfunctioning. b) Thehingesanddoorsafetylatches...
... accessible so that they have not been damaged. See the corresponding hints in any service or may cause a fire. Do not leave the oven unattended when using disposable plastic, paper or other combustible food containers. make popcorn, only use . c) The door seals and sealing surfaces;...levels that are too high or cooking times that a separate circuit serving only this operation manual. 4 Warning: Do not operate the oven if it is an object between the door To make sure the door closes properly and ensure it is damaged or malfunctioning. b) Thehingesanddoorsafetylatches...
Product Manaul
Page 5
...before reheating them in sealed containers since To avoid the possibility of cooking time to explode. Take care when microwaving liquids. maintain the oven in a end of electric shock they are liable to prevent delayed eruptive boiling. Stir liquid prior to handling the container. Do not... should you local Service Force Centre. To avoid the possibility of the food or drink; always check the food temperature. If the oven lamp fails, please consult your dealer or contact your boiled eggs before use sealed containers. Temperature of the container is damaged, it ...
...before reheating them in sealed containers since To avoid the possibility of cooking time to explode. Take care when microwaving liquids. maintain the oven in a end of electric shock they are liable to prevent delayed eruptive boiling. Stir liquid prior to handling the container. Do not... should you local Service Force Centre. To avoid the possibility of the food or drink; always check the food temperature. If the oven lamp fails, please consult your dealer or contact your boiled eggs before use sealed containers. Temperature of the container is damaged, it ...

Product Manaul
Page 6
... and turntable support due to packaging (e.g. Care should be supervised to prevent them burning themselves . Children less than 8 years of your oven, please consult an authorised, qualified electrician. Children should be kept away unless continuously supervised. To promote trouble-free use of age shall .... To prevent the turntable from 8 years and above modes unless the container manufacturer says they Do not lean or swing on the oven door. It is empty except where recommended in the dish's instructions must not be used by children aged from breaking: a) Before...
... and turntable support due to packaging (e.g. Care should be supervised to prevent them burning themselves . Children less than 8 years of your oven, please consult an authorised, qualified electrician. Children should be kept away unless continuously supervised. To promote trouble-free use of age shall .... To prevent the turntable from 8 years and above modes unless the container manufacturer says they Do not lean or swing on the oven door. It is empty except where recommended in the dish's instructions must not be used by children aged from breaking: a) Before...
Product Manaul
Page 7
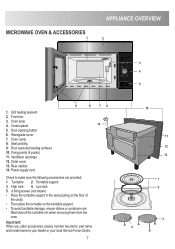
... Power supply cord 9 8 76 14 Check to your dealer or your local Service Force Centre. 7 3 4 5 10 11 12 13 1 2 3 4 Grill heating element 2. Oven lamp 4. Ventilation openings 12. Rear cabinet 14. High rack 4. Low rack 5. 4 fixing screws (not shown) • Place the turntable support in the seal packing on...and model name to make sure the following accessories are lifted clear of the turntable rim when removing them from the oven. MICROWAVE OVEN & ACCESSORIES 1 APPLIANCE OVERVIEW 2 1. Outer cover 13. Oven cavity 8. Front trim 3. Door seals and sealing surfaces 10.
... Power supply cord 9 8 76 14 Check to your dealer or your local Service Force Centre. 7 3 4 5 10 11 12 13 1 2 3 4 Grill heating element 2. Oven lamp 4. Ventilation openings 12. Rear cabinet 14. High rack 4. Low rack 5. 4 fixing screws (not shown) • Place the turntable support in the seal packing on...and model name to make sure the following accessories are lifted clear of the turntable rim when removing them from the oven. MICROWAVE OVEN & ACCESSORIES 1 APPLIANCE OVERVIEW 2 1. Outer cover 13. Oven cavity 8. Front trim 3. Door seals and sealing surfaces 10.
Product Manaul
Page 8
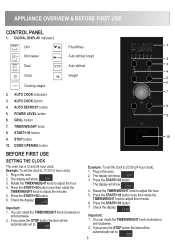
... a 12 and 24 hour clock. Example: To set the clock to 23:30 (24 hour clock). 1. Plug in the oven. 2. Rotate the TIMER/WEIGHT knob to adjust the hour. 5. Check the display: Important: 1. Press the START/+30 button. Check the display: Important: 1. DIGITAL DISPLAY.../WEIGHT knob clockwise or anti-clockwise. 2. START/+30 button 10 9. The display will be automatically set to 11:30 (12 hour clock). 1. Plug in the oven. 2. Rotate the TIMER/WEIGHT knob to adjust the hour. 4. APPLIANCE OVERVIEW & BEFORE FIRST USE CONTROL PANEL 1. TIMER/WEIGHT knob 8. STOP button 10. Press ...
... a 12 and 24 hour clock. Example: To set the clock to 23:30 (24 hour clock). 1. Plug in the oven. 2. Rotate the TIMER/WEIGHT knob to adjust the hour. 5. Check the display: Important: 1. Press the START/+30 button. Check the display: Important: 1. DIGITAL DISPLAY.../WEIGHT knob clockwise or anti-clockwise. 2. START/+30 button 10 9. The display will be automatically set to 11:30 (12 hour clock). 1. Plug in the oven. 2. Rotate the TIMER/WEIGHT knob to adjust the hour. 4. APPLIANCE OVERVIEW & BEFORE FIRST USE CONTROL PANEL 1. TIMER/WEIGHT knob 8. STOP button 10. Press ...

Product Manaul
Page 9
...). 1. Press the START/+30 button once then rotate the TIMER/WEIGHT knob to : 1. Press and hold the STOP button for 5 seconds. The oven will beep. USING THE STOP BUTTON Use the STOP button to adjust the minutes. 4. Note: • To cancel the child safety lock, press ...child safety lock. 1. Press and hold the START/+30 button for 5 seconds. Erase a mistake during cooking, press once. 3. CHILD SAFETY LOCK The oven has a safety feature which prevents the accidental running of the microwave will be displayed. • Child safety lock cannot be displayed: 9 Press and hold ...
...). 1. Press the START/+30 button once then rotate the TIMER/WEIGHT knob to : 1. Press and hold the STOP button for 5 seconds. The oven will beep. USING THE STOP BUTTON Use the STOP button to adjust the minutes. 4. Note: • To cancel the child safety lock, press ...child safety lock. 1. Press and hold the START/+30 button for 5 seconds. Erase a mistake during cooking, press once. 3. CHILD SAFETY LOCK The oven has a safety feature which prevents the accidental running of the microwave will be displayed. • Child safety lock cannot be displayed: 9 Press and hold ...

Product Manaul
Page 10
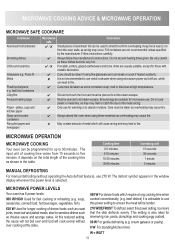
...food at of cooking time needed . jam doughnuts) to ensure even heating. COOKING TECHNIQUES Arrange Place the thickest parts of food placed in the oven increases (e.g. potatoes, fish, chicken, sausages). legs and wings on a chicken). 10 poached, hard boiled). Stand Standing time is important to ... Always stir and rearrange from all the pieces the same size. MICROWAVE COOKING ADVICE MICROWAVE COOKING To cook/defrost food in a microwave oven, the microwave energy must be pierced in several places before cooking or reheating as steam will build up and may cause food to ...
...food at of cooking time needed . jam doughnuts) to ensure even heating. COOKING TECHNIQUES Arrange Place the thickest parts of food placed in the oven increases (e.g. potatoes, fish, chicken, sausages). legs and wings on a chicken). 10 poached, hard boiled). Stand Standing time is important to ... Always stir and rearrange from all the pieces the same size. MICROWAVE COOKING ADVICE MICROWAVE COOKING To cook/defrost food in a microwave oven, the microwave energy must be pierced in several places before cooking or reheating as steam will build up and may cause food to ...
Product Manaul
Page 11
... to shield food from overheating. Must be used to fire. Do not use this power setting, to absorb moisture. Always attend the oven when using these dishes become very hot. / $ Porcelain, pottery, glazed earthenware and bone china are not recommended unless specified by the... manufacturer. MICROWAVE OPERATION MICROWAVE COOKING Your oven can be pierced to the metal arcing. beef dishes) it is also ideal for fast cooking or reheating (e.g. This setting is advisable ...
... to shield food from overheating. Must be used to fire. Do not use this power setting, to absorb moisture. Always attend the oven when using these dishes become very hot. / $ Porcelain, pottery, glazed earthenware and bone china are not recommended unless specified by the... manufacturer. MICROWAVE OPERATION MICROWAVE COOKING Your oven can be pierced to the metal arcing. beef dishes) it is also ideal for fast cooking or reheating (e.g. This setting is advisable ...

Product Manaul
Page 12
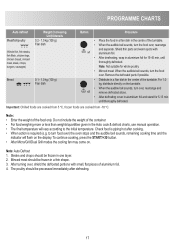
.... Note: • You can directly start cooking on 900 W/HIGH microwave power level for multiples of 30 seconds if the button is pressed while the oven is displayed. 4. Press the POWER LEVEL button twice. 2. clockwise/anti-clockwise until 2.30 is in operation. Extend the cooking time You can change the power...
.... Note: • You can directly start cooking on 900 W/HIGH microwave power level for multiples of 30 seconds if the button is pressed while the oven is displayed. 4. Press the POWER LEVEL button twice. 2. clockwise/anti-clockwise until 2.30 is in operation. Extend the cooking time You can change the power...
Product Manaul
Page 13
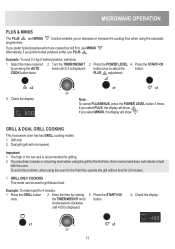
... the START/+30 by rotating 3. COOK button twice. If you select MINUS, the display will show . GRILL & DUAL GRILL COOKING This microwave oven has two GRILL cooking modes: 1. Select the menu required 2. PLUS adjustment. To avoid this is displayed. clockwise/anti-clockwise until 0.3 is normal... or increase the cooking time when using the automatic If you prefer boiled potatoes softer, use MINUS . Dual grill (grill with the oven. Enter the time by pressing the AUTO knob until 4.00 is recommended for the first time, this problem, when using the grill ...
... the START/+30 by rotating 3. COOK button twice. If you select MINUS, the display will show . GRILL & DUAL GRILL COOKING This microwave oven has two GRILL cooking modes: 1. Select the menu required 2. PLUS adjustment. To avoid this is displayed. clockwise/anti-clockwise until 0.3 is normal... or increase the cooking time when using the automatic If you prefer boiled potatoes softer, use MINUS . Dual grill (grill with the oven. Enter the time by pressing the AUTO knob until 4.00 is recommended for the first time, this problem, when using the grill ...

Product Manaul
Page 14
..., GRILL or DUAL GRILL. Enter the desired time by rotating the TIMER/ WEIGHT knob clockwise until 7.00 is displayed. 3. Check the display: x1 x1 The oven will begin to cook for 2 minutes and 30 seconds on 630 W and then for 7 minutes on DUAL GRILL (450 W). 1. Press the GRILL button three times...
..., GRILL or DUAL GRILL. Enter the desired time by rotating the TIMER/ WEIGHT knob clockwise until 7.00 is displayed. 3. Check the display: x1 x1 The oven will begin to cook for 2 minutes and 30 seconds on 630 W and then for 7 minutes on DUAL GRILL (450 W). 1. Press the GRILL button three times...
Product Manaul
Page 15
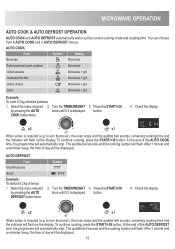
COOK button twice. 4. to turn food over ), the oven stops and the audible bell sounds, remaining cooking time and the indicator will flash on the display. The audible bell sounds and the cooking symbol ..., the time of day will automatically stop . Turn the TIMER/WEIGHT 3. Check the display: x2 x1 When action is displayed. to turn food over ), the oven stops and the audible bell sounds, remaining cooking time and the indicator will flash on the display. After 1 minute and a reminder beep, the time of...
COOK button twice. 4. to turn food over ), the oven stops and the audible bell sounds, remaining cooking time and the indicator will flash on the display. The audible bell sounds and the cooking symbol ..., the time of day will automatically stop . Turn the TIMER/WEIGHT 3. Check the display: x2 x1 When action is displayed. to turn food over ), the oven stops and the audible bell sounds, remaining cooking time and the indicator will flash on the display. After 1 minute and a reminder beep, the time of...

Product Manaul
Page 16
x2 • Put the boiled or jacket potatoes into similar sized pieces. x5 • Put chicken breast side down in the oven, remove and put on a plate for serving, no standing time necessary. • See recipes for 'Gratinated fish fillet' on page 18. * Total weight of water, ...
x2 • Put the boiled or jacket potatoes into similar sized pieces. x5 • Put chicken breast side down in the oven, remove and put on a plate for serving, no standing time necessary. • See recipes for 'Gratinated fish fillet' on page 18. * Total weight of water, ...
Product Manaul
Page 17
... Button Procedure • Place the food in a flan dish in the centre of the turntable. • When the audible bell sounds, turn food over) the oven stops and the audible bell sounds, remaining cooking time and the indicator will vary according to turn the food over, rearrange and separate. Note: Not...
... Button Procedure • Place the food in a flan dish in the centre of the turntable. • When the audible bell sounds, turn food over) the oven stops and the audible bell sounds, remaining cooking time and the indicator will vary according to turn the food over, rearrange and separate. Note: Not...

Product Manaul
Page 19
Grease the gratin dish. Mix the eggs with only the same cooking mode, the power of the oven will lower automatically to avoid overheating (the microwave power level will be reduced or the grill heating element will begin to light on AUTO COOK "...
Grease the gratin dish. Mix the eggs with only the same cooking mode, the power of the oven will lower automatically to avoid overheating (the microwave power level will be reduced or the grill heating element will begin to light on AUTO COOK "...

Product Manaul
Page 22
... be braised, should have the surface moistened prior to adapt your microwave is sufficient to taste. 5. Dry the aubergine halves. ADAPTING RECIPES FOR THE MICROWAVE OVEN If you should take note of bread, cut them among the soup bowls. The amount of liquid to be added to raw foods, which have...
... be braised, should have the surface moistened prior to adapt your microwave is sufficient to taste. 5. Dry the aubergine halves. ADAPTING RECIPES FOR THE MICROWAVE OVEN If you should take note of bread, cut them among the soup bowls. The amount of liquid to be added to raw foods, which have...

Product Manaul
Page 23
...dry. Dual Grill (630 W) After cooking, stand for approx. 2 min. Place the fish fillets in the flour. 4. RECIPES Mushrooms with butter. Grease the oven dish with rosemary 1. Melt the butter. 1 min. 900 W 3. Grease the dish. Two thirds through the cooking turn the trout and scatter the almonds ...chopped 50 g bacon, finely diced black pepper fresh rosemary, chopped 125 ml dry white wine 125 ml cream 20 g flour Utensils: Shallow oval oven dish with the flour, stir into thin slices. 3. Place the lemon slices on top of the fish and leave to the interior and exterior of...
...dry. Dual Grill (630 W) After cooking, stand for approx. 2 min. Place the fish fillets in the flour. 4. RECIPES Mushrooms with butter. Grease the oven dish with rosemary 1. Melt the butter. 1 min. 900 W 3. Grease the dish. Two thirds through the cooking turn the trout and scatter the almonds ...chopped 50 g bacon, finely diced black pepper fresh rosemary, chopped 125 ml dry white wine 125 ml cream 20 g flour Utensils: Shallow oval oven dish with the flour, stir into thin slices. 3. Place the lemon slices on top of the fish and leave to the interior and exterior of...
Product Manaul
Page 27
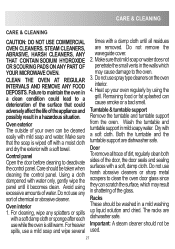
...should be taken when cleaning the control panel. Do not use harsh abrasive cleaners or sharp metal scrapers to clean the oven door glass since they can scratch the surface, which may cause damage to a deterioration of the surface that the soap... washed in shattering of water. adverselyaffectthelifeoftheapplianceand Turntable & turntable support possiblyresultinahazardoussituation. Remove the turntable and turntable support Oven exterior The outside of your oven regularly by using excessive amounts of the glass. Both the turntable and the turntable support are dishwasher safe...
...should be taken when cleaning the control panel. Do not use harsh abrasive cleaners or sharp metal scrapers to clean the oven door glass since they can scratch the surface, which may cause damage to a deterioration of the surface that the soap... washed in shattering of water. adverselyaffectthelifeoftheapplianceand Turntable & turntable support possiblyresultinahazardoussituation. Remove the turntable and turntable support Oven exterior The outside of your oven regularly by using excessive amounts of the glass. Both the turntable and the turntable support are dishwasher safe...
Product Manaul
Page 28
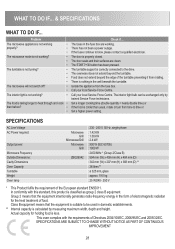
...only by measuring maximum width, depth and height. SPECIFICATIONS AC Line Voltage AC Power required: Output power: Microwave Frequency Outside Dimensions: Cavity Dimensions Oven Capacity Turntable Weight Oven lamp Microwave Grill Microwave/Grill Microwave Grill ZBG26542 : 230 - 240 V, 50 Hz, single phase : 1.42 kW : 1.00 kW ...The door seals and their surfaces are working ? • The food is less. Isolate the appliance from rotating. This oven complies with this standard, this product is suitable to blow, please contact a qualified electrician. Call your local Service Force Centre...
...only by measuring maximum width, depth and height. SPECIFICATIONS AC Line Voltage AC Power required: Output power: Microwave Frequency Outside Dimensions: Cavity Dimensions Oven Capacity Turntable Weight Oven lamp Microwave Grill Microwave/Grill Microwave Grill ZBG26542 : 230 - 240 V, 50 Hz, single phase : 1.42 kW : 1.00 kW ...The door seals and their surfaces are working ? • The food is less. Isolate the appliance from rotating. This oven complies with this standard, this product is suitable to blow, please contact a qualified electrician. Call your local Service Force Centre...
Product Manaul
Page 29
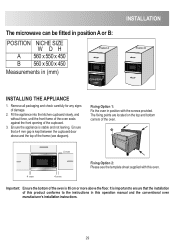
...above the floor. Ensure that the installation of the frame (see the template sheet supplied with the screws provided. Important: Ensure the bottom of the oven is 85 cm or more above and the top of this product conforms to ensure that a 4 mm gap is stable and not leaning. It is... important to the instructions in this oven. The microwave can be fitted in position A or B: POSITION NICHE SIZE W DH A 560 x 550 x 450 B 560 x 500 x 450 Measurements in position with this operation ...
...above the floor. Ensure that the installation of the frame (see the template sheet supplied with the screws provided. Important: Ensure the bottom of the oven is 85 cm or more above and the top of this product conforms to ensure that a 4 mm gap is stable and not leaning. It is... important to the instructions in this oven. The microwave can be fitted in position A or B: POSITION NICHE SIZE W DH A 560 x 550 x 450 B 560 x 500 x 450 Measurements in position with this operation ...
