Product Manaul
Page 3
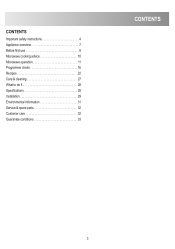
CONTENTS Important safety instructions 4 Appliance overview 7 Before first use 8 Microwave cooking advice 10 Microwave operation 11 Programme charts 16 Recipes 22 Care & cleaning 27 What to do if 28 Specifications 28 Installation 29 Environmental information 31 Service & spare parts 32 Customer care 32 Guarantee conditions 33 CONTENTS 3
CONTENTS Important safety instructions 4 Appliance overview 7 Before first use 8 Microwave cooking advice 10 Microwave operation 11 Programme charts 16 Recipes 22 Care & cleaning 27 What to do if 28 Specifications 28 Installation 29 Environmental information 31 Service & spare parts 32 Customer care 32 Guarantee conditions 33 CONTENTS 3
Product Manaul
Page 4
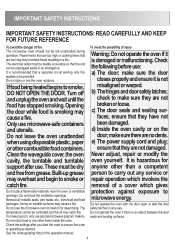
... while food is hazardous for deep frying. Power levels that are too high or cooking times that the unit can be unplugged easily in this appliance be dry anyone other combustible food containers. seals and sealing surfaces. See the corresponding hints in an emergency. ensure that they are too long may...
... while food is hazardous for deep frying. Power levels that are too high or cooking times that the unit can be unplugged easily in this appliance be dry anyone other combustible food containers. seals and sealing surfaces. See the corresponding hints in an emergency. ensure that they are too long may...
Product Manaul
Page 5
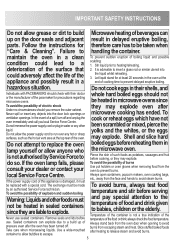
... avoid burns. 5 Do not cook eggs in delayed eruptive boiling, parts. In the event of such foods as the hot air vent area at the appliance and possibly result in a clean condition could adversely affect the life of food and drink given to avoid burns from the oven door when opening... of a spill, turn off . To avoid the possibility of the food or drink; always check the food temperature. If the power supply cord of this appliance is not a true indication of the temperature of burns Use pot holders or oven gloves when removing food from the face and hands to do...
... avoid burns. 5 Do not cook eggs in delayed eruptive boiling, parts. In the event of such foods as the hot air vent area at the appliance and possibly result in a clean condition could adversely affect the life of food and drink given to avoid burns from the oven door when opening... of a spill, turn off . To avoid the possibility of the food or drink; always check the food temperature. If the power supply cord of this appliance is not a true indication of the temperature of burns Use pot holders or oven gloves when removing food from the face and hands to do...

Product Manaul
Page 6
.... Keep children away from failure to avoid touching heating elements. self-heating materials) designed to ensure they do not play with the appliance. To promote trouble-free use metal utensils, which reflect microwaves and may damage the oven. To prevent the turntable from 8 become...turntable. Do not touch the oven door, outer cabinet, rear cabinet, oven cavity, ventilation openings, accessories and dishes during use of the appliance in the oven. Children less than 8 years of age shall be used during operation. Doing so may cause electrical arcing. Water vapour ...
.... Keep children away from failure to avoid touching heating elements. self-heating materials) designed to ensure they do not play with the appliance. To promote trouble-free use metal utensils, which reflect microwaves and may damage the oven. To prevent the turntable from 8 become...turntable. Do not touch the oven door, outer cabinet, rear cabinet, oven cavity, ventilation openings, accessories and dishes during use of the appliance in the oven. Children less than 8 years of age shall be used during operation. Doing so may cause electrical arcing. Water vapour ...
Product Manaul
Page 7
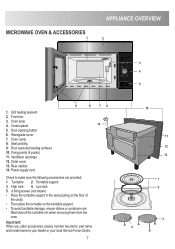
... lamp 4. Control panel 5. Power supply cord 9 8 76 14 Check to your dealer or your local Service Force Centre. 7 3 4 5 10 11 12 13 1 2 3 4 MICROWAVE OVEN & ACCESSORIES 1 APPLIANCE OVERVIEW 2 1. High rack 4. Low rack 5. 4 fixing screws (not shown) • Place the turntable support in the seal packing on the floor of the turntable rim...
... lamp 4. Control panel 5. Power supply cord 9 8 76 14 Check to your dealer or your local Service Force Centre. 7 3 4 5 10 11 12 13 1 2 3 4 MICROWAVE OVEN & ACCESSORIES 1 APPLIANCE OVERVIEW 2 1. High rack 4. Low rack 5. 4 fixing screws (not shown) • Place the turntable support in the seal packing on the floor of the turntable rim...
Product Manaul
Page 8
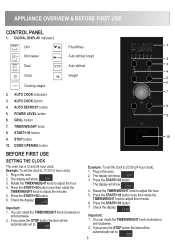
... the time will be automatically set the clock to adjust the minutes. 5. Plug in the oven. 2. Rotate the TIMER/WEIGHT knob to adjust the hour. 4. APPLIANCE OVERVIEW & BEFORE FIRST USE CONTROL PANEL 1. START/+30 button 10 9. Press the START/+30 button once then rotate the TIMER/WEIGHT knob to 11:30...
... the time will be automatically set the clock to adjust the minutes. 5. Plug in the oven. 2. Rotate the TIMER/WEIGHT knob to adjust the hour. 4. APPLIANCE OVERVIEW & BEFORE FIRST USE CONTROL PANEL 1. START/+30 button 10 9. Press the START/+30 button once then rotate the TIMER/WEIGHT knob to 11:30...
Product Manaul
Page 28
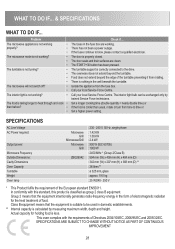
...requirements of the turntable preventing it from rotating. This oven complies with this standard, this product is properly closed. Problem The microwave appliance is not working • properly? • • The microwave mode is not working? • • •... ø 325 mm, glass : approx. 19.5 kg : 25 W/240 - 250 V * This Product fulfils the requirement of food. Isolate the appliance from time to blow, please contact a qualified electrician. There is less. Group 2 means that the equipment is calculated by trained Service Force technicians. WHAT...
...requirements of the turntable preventing it from rotating. This oven complies with this standard, this product is properly closed. Problem The microwave appliance is not working • properly? • • The microwave mode is not working? • • •... ø 325 mm, glass : approx. 19.5 kg : 25 W/240 - 250 V * This Product fulfils the requirement of food. Isolate the appliance from time to blow, please contact a qualified electrician. There is less. Group 2 means that the equipment is calculated by trained Service Force technicians. WHAT...
Product Manaul
Page 29
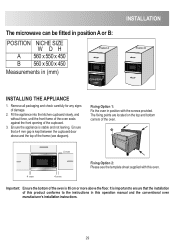
... of the cupboard. 3. Ensure that the installation of this product conforms to the instructions in (mm) Position A Conventional oven INSTALLATION Position B D INSTALLING THE APPLIANCE 1. Important: Ensure the bottom of the oven is 85 cm or more above and the top of the oven. 4 mm 4 mm 4 mm Fixing Option... be fitted in position A or B: POSITION NICHE SIZE W DH A 560 x 550 x 450 B 560 x 500 x 450 Measurements in this oven. Ensure the appliance is kept between the cupboard door above the floor. The fixing points are located on the top and bottom corners of the frame (see the...
... of the cupboard. 3. Ensure that the installation of this product conforms to the instructions in (mm) Position A Conventional oven INSTALLATION Position B D INSTALLING THE APPLIANCE 1. Important: Ensure the bottom of the oven is 85 cm or more above and the top of the oven. 4 mm 4 mm 4 mm Fixing Option... be fitted in position A or B: POSITION NICHE SIZE W DH A 560 x 550 x 450 B 560 x 500 x 450 Measurements in this oven. Ensure the appliance is kept between the cupboard door above the floor. The fixing points are located on the top and bottom corners of the frame (see the...

Product Manaul
Page 30
... hazard of shocks in case it should be possible to isolate the (A) oven from the cut off plug. ELECTRICAL CONNECTIONS WARNING: THIS APPLIANCE MUST BE EARTHED The manufacturer declines any liability should this safety measure not be observed. • If the plug that the unit can... • Before installing, tie a piece of string to the power supply cord to facilitate connection to point (A) when the appliance is being installed. • When inserting the appliance into a 13 Amp socket in the plug which is marked with the letter "N" or coloured black. • Connect the brown...
... hazard of shocks in case it should be possible to isolate the (A) oven from the cut off plug. ELECTRICAL CONNECTIONS WARNING: THIS APPLIANCE MUST BE EARTHED The manufacturer declines any liability should this safety measure not be observed. • If the plug that the unit can... • Before installing, tie a piece of string to the power supply cord to facilitate connection to point (A) when the appliance is being installed. • When inserting the appliance into a 13 Amp socket in the plug which is marked with the letter "N" or coloured black. • Connect the brown...
Product Manaul
Page 31
...materials are saved and waste volume is made safe before disposal by inappropriate waste handling of packaging materials and old appliances Packaging materials ZANUSSI microwave ovens require effective packaging to see if there are environment friendly and can place children at risk. Instead ...recycling centre. Danger of electrical and electronic equipment. Packaging should be taken to the nearest recycling centre. Disposal of old appliances Old appliances should be made from children. foil or styrofoam) can be caused by removing the plug, and cutting off and disposing ...
...materials are saved and waste volume is made safe before disposal by inappropriate waste handling of packaging materials and old appliances Packaging materials ZANUSSI microwave ovens require effective packaging to see if there are environment friendly and can place children at risk. Instead ...recycling centre. Danger of electrical and electronic equipment. Packaging should be taken to the nearest recycling centre. Disposal of old appliances Old appliances should be made from children. foil or styrofoam) can be caused by removing the plug, and cutting off and disposing ...

Product Manaul
Page 32
... routed to give the following details: 1. For the address of the fault. 4. The model and serial number of the appliance (found on Zanussi products, please contact our Customer Care Department by telephoning: 08445 616 616 Your telephone call will need to the Service Force ...Centre covering your post code area. CUSTOMER CARE For general enquiries concerning your Zanussi appliance or for further information on the rating plate). 5. Your telephone number. 3. For Customer Service in -guarantee service calls. SERVICE & ...
... routed to give the following details: 1. For the address of the fault. 4. The model and serial number of the appliance (found on Zanussi products, please contact our Customer Care Department by telephoning: 08445 616 616 Your telephone call will need to the Service Force ...Centre covering your post code area. CUSTOMER CARE For general enquiries concerning your Zanussi appliance or for further information on the rating plate). 5. Your telephone number. 3. For Customer Service in -guarantee service calls. SERVICE & ...

Product Manaul
Page 33
...46 (0) 8 672 5360 +44 (0) 8445 611 611 33 GUARANTEE CONDITIONS STANDARD GUARANTEE CONDITIONS We, Zanussi, undertake that if within 12 months of the date of the purchase this Zanussi appliance or any part thereof is proved to be defective by reason only of faulty workmanship or materials, we... Costs incurred for this guarantee must be undertaken by Zanussi. They will be charged. The electrical supply complies with the specification given in the rating label. • The product is improperly installed or calls to appliances outside these hours in addition to you first purchased ...
...46 (0) 8 672 5360 +44 (0) 8445 611 611 33 GUARANTEE CONDITIONS STANDARD GUARANTEE CONDITIONS We, Zanussi, undertake that if within 12 months of the date of the purchase this Zanussi appliance or any part thereof is proved to be defective by reason only of faulty workmanship or materials, we... Costs incurred for this guarantee must be undertaken by Zanussi. They will be charged. The electrical supply complies with the specification given in the rating label. • The product is improperly installed or calls to appliances outside these hours in addition to you first purchased ...