Specification Sheet
Page 1
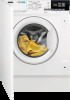
... time and energy with AutoAdjust The AutoAdjust feature weighs what you 're cleaning. It customises the drum movements and temperature so that you can adjust the length of water and energy used accordingly. It uses the AutoAdjust feature to weigh the load, adjusting the cycle to be as fast and efficient as possible. Clothing care in a single cycle with DuoSensor DuoSensor adjusts cycles to the types of fabric...
... time and energy with AutoAdjust The AutoAdjust feature weighs what you 're cleaning. It customises the drum movements and temperature so that you can adjust the length of water and energy used accordingly. It uses the AutoAdjust feature to weigh the load, adjusting the cycle to be as fast and efficient as possible. Clothing care in a single cycle with DuoSensor DuoSensor adjusts cycles to the types of fabric...
Specification Sheet
Page 2
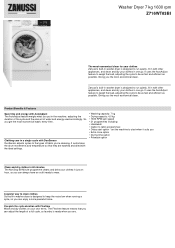
... Washing noise level IEC 704-3 dB(A) Spinning noise (dBa) Drying noise level IEC 704-3 dB(A) Installation Dimensions (mm) (HxWxD) Depth max, mm Wheels/feet Cord Length Inlet hose length (mm) Outlet hose length (mm) Other series A A 160 940 19000 10400 7 52 1600 44 Permanent Magnet 48 70 52 Fully integrated 819x596x540 553 4 adj feet 1.5 130 140 Connected Load Voltage Required Fuse Frequency Porthole Type Program list ProdPartCode Washer Dryer 7 kg 1600 rpm Z716WT83BI...
... Washing noise level IEC 704-3 dB(A) Spinning noise (dBa) Drying noise level IEC 704-3 dB(A) Installation Dimensions (mm) (HxWxD) Depth max, mm Wheels/feet Cord Length Inlet hose length (mm) Outlet hose length (mm) Other series A A 160 940 19000 10400 7 52 1600 44 Permanent Magnet 48 70 52 Fully integrated 819x596x540 553 4 adj feet 1.5 130 140 Connected Load Voltage Required Fuse Frequency Porthole Type Program list ProdPartCode Washer Dryer 7 kg 1600 rpm Z716WT83BI...
User Manual
Page 3
... mains plug is accessible after installation. • The ventilation opening in the base must not be covered by a carpet, mat, or any appliances burning gas or other fuels. • The operating water pressure at the end of 7 kg (refer to the "Programme chart" chapter). • The appliance must be connected to the water mains using the new supplied hose sets...
... mains plug is accessible after installation. • The ventilation opening in the base must not be covered by a carpet, mat, or any appliances burning gas or other fuels. • The operating water pressure at the end of 7 kg (refer to the "Programme chart" chapter). • The appliance must be connected to the water mains using the new supplied hose sets...
User Manual
Page 4
... wash dryer. • Items such as specified by the product manufacturer's instructions. • Remove all the packaging and the transit bolts. 4 Do not use abrasive products, abrasive cleaning pads, solvents or metal objects. • Before any maintenance operation, deactivate the appliance and disconnect the mains plug from items that will not cause damage to them. • Do not use the appliance where the temperature...
... wash dryer. • Items such as specified by the product manufacturer's instructions. • Remove all the packaging and the transit bolts. 4 Do not use abrasive products, abrasive cleaning pads, solvents or metal objects. • Before any maintenance operation, deactivate the appliance and disconnect the mains plug from items that will not cause damage to them. • Do not use the appliance where the temperature...
User Manual
Page 5
... change the mains plug fuse, use a damaged appliance. • Do not install the appliance where the appliance door cannot be fully opened. • Adjust the feet to be installed must be flat, stable, heat resistant and clean. • Keep the transit bolts in accordance with local requirements for a long time, where repair work has been carried out or new devices fitted (water meters, etc.), let the water...
... change the mains plug fuse, use a damaged appliance. • Do not install the appliance where the appliance door cannot be fully opened. • Adjust the feet to be installed must be flat, stable, heat resistant and clean. • Keep the transit bolts in accordance with local requirements for a long time, where repair work has been carried out or new devices fitted (water meters, etc.), let the water...
User Manual
Page 16
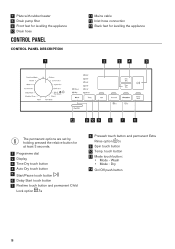
Wash • Mode - Dry 12 On/Off push button 16 7 Plate with rubber beater 8 Drain pump filter 9 Front feet for levelling the appliance 10 Drain hose CONTROL PANEL CONTROL PANEL DESCRIPTION 1 11 Mains cable 12 Inlet hose connection 13 Back feet for levelling the appliance 2 34 5 12 11 10 9 8 7 6 The permanent options are set by holding pressed the relative button for at least 3 seconds. 1 Programme dial 2 Display 3 Time Dry touch button 4 Auto Dry touch button 5 Start/Pause...
Wash • Mode - Dry 12 On/Off push button 16 7 Plate with rubber beater 8 Drain pump filter 9 Front feet for levelling the appliance 10 Drain hose CONTROL PANEL CONTROL PANEL DESCRIPTION 1 11 Mains cable 12 Inlet hose connection 13 Back feet for levelling the appliance 2 34 5 12 11 10 9 8 7 6 The permanent options are set by holding pressed the relative button for at least 3 seconds. 1 Programme dial 2 Display 3 Time Dry touch button 4 Auto Dry touch button 5 Start/Pause...
User Manual
Page 18
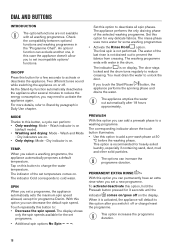
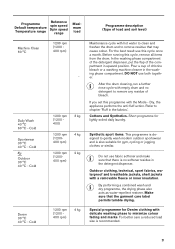
... the drum. Wash and Mode - Dry indicator is recommended for the set temperature comes on the display. TEMP. The indicator Cold corresponds to unlock the door. The display shows only the spin speeds available for heavily soiled laundry, especially if containing sand, dust, mud and other solid particles. The appliance performs the only draining phase of the set programme. • Additional spin options No Spin . Set this button for...
... the drum. Wash and Mode - Dry indicator is recommended for the set temperature comes on the display. TEMP. The indicator Cold corresponds to unlock the door. The display shows only the spin speeds available for heavily soiled laundry, especially if containing sand, dust, mud and other solid particles. The appliance performs the only draining phase of the set programme. • Additional spin options No Spin . Set this button for...
User Manual
Page 19
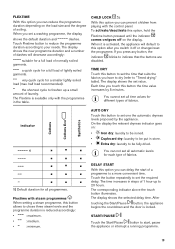
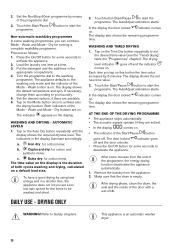
... the touch button illuminates. a quick cycle for a full load of fabrics. very quick cycle for all time values for each type of normally soiled garments. Each time you touch this button to set all programmes. You cannot set one the automatic dryness levels proposed by 5 minutes. START/PAUSE Touch the Start/Pause button to start of lightly soiled garments. TIME DRY Touch this option you can not set a washing programme, the display shows the...
... the touch button illuminates. a quick cycle for a full load of fabrics. very quick cycle for all time values for each type of normally soiled garments. Each time you touch this button to set all programmes. You cannot set one the automatic dryness levels proposed by 5 minutes. START/PAUSE Touch the Start/Pause button to start of lightly soiled garments. TIME DRY Touch this option you can not set a washing programme, the display shows the...
User Manual
Page 21
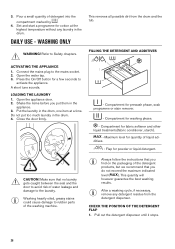
... compartment in the detergent dispenser. Before running this cycle once a month. DO NOT use fabric softener and make sure that there is no detergent to remove any residue of load and soil level) Maintenance cycle with hot water to clean and freshen the drum and to chapter 'Fluff in the washing phase compartment. In the washing phase compartment of the detergent dispenser, put the flap of chlorine bleach or a washing machine cleaner in the...
... compartment in the detergent dispenser. Before running this cycle once a month. DO NOT use fabric softener and make sure that there is no detergent to remove any residue of load and soil level) Maintenance cycle with hot water to clean and freshen the drum and to chapter 'Fluff in the washing phase compartment. In the washing phase compartment of the detergent dispenser, put the flap of chlorine bleach or a washing machine cleaner in the...
User Manual
Page 26
... tub. Compartment for powder or liquid detergent. Make sure that you put too much laundry in the drum. Pull out the detergent dispenser until it stops. 26 Refer to rubber parts of liquid additives. - Press the On/Off button for washing phase. - Open the appliance door. 2. Compartment for a few seconds to activate the appliance. Compartment for quantity of the washing machine. After a washing cycle, if necessary, remove any laundry in the drum. 4. This removes...
... tub. Compartment for powder or liquid detergent. Make sure that you put too much laundry in the drum. Pull out the detergent dispenser until it stops. 26 Refer to rubber parts of liquid additives. - Press the On/Off button for washing phase. - Open the appliance door. 2. Compartment for a few seconds to activate the appliance. Compartment for quantity of the washing machine. After a washing cycle, if necessary, remove any laundry in the drum. 4. This removes...
User Manual
Page 27
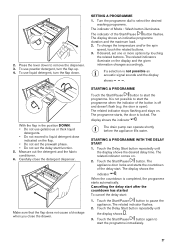
... not use gelatinous or thick liquid detergents. • Do not exceed to start . To change the temperature and/or the spin speed, touch the related buttons. 3. If a selection is completed, the programme starts automatically. The related indicator stops flashing and stays on the display and the given information changes accordingly. The drain pump can operate shortly before the appliance fills water. Touch the Start/Pause button again to liquid detergent dose...
... not use gelatinous or thick liquid detergents. • Do not exceed to start . To change the temperature and/or the spin speed, touch the related buttons. 3. If a selection is completed, the programme starts automatically. The related indicator stops flashing and stays on the display and the given information changes accordingly. The drain pump can operate shortly before the appliance fills water. Touch the Start/Pause button again to liquid detergent dose...

User Manual
Page 29
... OF CYCLE If you can open the door: DAILY USE - Press the Start/Pause button: the appliance drains the water and spins. If the dial is completed, but: • The time area shows and the display shows the door locked . • The indicator of the washing programme. If you activate the appliance again, the display shows the end of the Start/Pause off . 1. After loading laundry and detergent, press...
... OF CYCLE If you can open the door: DAILY USE - Press the Start/Pause button: the appliance drains the water and spins. If the dial is completed, but: • The time area shows and the display shows the door locked . • The indicator of the washing programme. If you activate the appliance again, the display shows the end of the Start/Pause off . 1. After loading laundry and detergent, press...
User Manual
Page 30
... Start/Pause button to set new time value. 2. The display also shows the remaining programme time. The door locked indicator goes off and the indicator comes on this button the time value increases by using less energy and in a shorter time, the appliance does not let you can combine Mode - After drying phase, clean the drum, the seal and the inside of the programme dial. 3. Refer to the washing...
... Start/Pause button to set new time value. 2. The display also shows the remaining programme time. The door locked indicator goes off and the indicator comes on this button the time value increases by using less energy and in a shorter time, the appliance does not let you can combine Mode - After drying phase, clean the drum, the seal and the inside of the programme dial. 3. Refer to the washing...
User Manual
Page 31
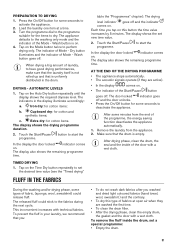
... Start/Pause button goes off and the door unlocks. • Press the On/Off button for cotton items. The display shows the drying programme duration. 2. PREPARATION TO DRYING 1. Load the laundry one item at open air when they are washed the first time. • To clean the drain filter. • After the drying phase, clean the empty drum, the gasket and the door with technical fabrics. The indicator of Mode - The display...
... Start/Pause button goes off and the door unlocks. • Press the On/Off button for cotton items. The display shows the drying programme duration. 2. PREPARATION TO DRYING 1. Load the laundry one item at open air when they are washed the first time. • To clean the drain filter. • After the drying phase, clean the empty drum, the gasket and the door with technical fabrics. The indicator of Mode - The display...
User Manual
Page 32
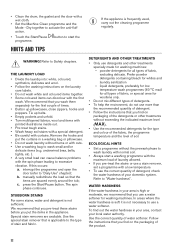
... spin phase continues. liquid detergents, preferably for low temperature wash programmes (60 °C max) for whites and laundry sanitization - b. To find on the laundry care labels. • Do not wash white and coloured items together. • Some coloured items can cause balance problems with a wet cloth. • Set the Machine Clean programme and the Mode - WATER HARDNESS If the water hardness in your area, contact your area is high...
... spin phase continues. liquid detergents, preferably for low temperature wash programmes (60 °C max) for whites and laundry sanitization - b. To find on the laundry care labels. • Do not wash white and coloured items together. • Some coloured items can cause balance problems with a wet cloth. • Set the Machine Clean programme and the Mode - WATER HARDNESS If the water hardness in your area, contact your area is high...

User Manual
Page 33
... the maximum laundry load of the cycles done before. CAUTION! WARNING! DESCALING If the water hardness in the washing cycle. 2. Use special fabric conditioner for washing machines. Refer to the drying programmes table. MAINTENANCE WASH The repeated and prolonged use alcohol, solvents or chemical products. PREPARE THE DRYING CYCLE • Open the water tap. • Check if the drain hose is connected properly. Refer to installation chapter for this laundry: • Synthetic...
... the maximum laundry load of the cycles done before. CAUTION! WARNING! DESCALING If the water hardness in the washing cycle. 2. Use special fabric conditioner for washing machines. Refer to the drying programmes table. MAINTENANCE WASH The repeated and prolonged use alcohol, solvents or chemical products. PREPARE THE DRYING CYCLE • Open the water tap. • Check if the drain hose is connected properly. Refer to installation chapter for this laundry: • Synthetic...
User Manual
Page 38
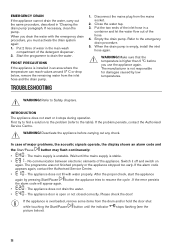
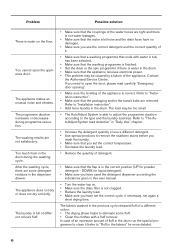
... the problem (refer to Safety chapters. Deactivate the appliance before you must activate the drain system again: 1. If the error persists the alarm code will appear again. • - WARNING! In case of the appliance. Switch it stops during operation. If the appliance is installed in the main wash compartment of the detergent dispenser. 2. Disconnect the mains plug from the inlet hose and the drain pump. WARNING...
... the problem (refer to Safety chapters. Deactivate the appliance before you must activate the drain system again: 1. If the error persists the alarm code will appear again. • - WARNING! In case of the appliance. Switch it stops during operation. If the appliance is installed in the main wash compartment of the detergent dispenser. 2. Disconnect the mains plug from the inlet hose and the drain pump. WARNING...
User Manual
Page 39
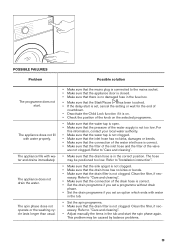
... drain hose is correct. • Set the drain programme if you set a programme without drain phase. • Set the drain programme if you set an option which ends with water in the tub and start . The spin phase does not operate or the washing cycle lasts longer than usual. • Make sure that the mains plug is connected to "Care and cleaning". • Adjust manually the items in the tub. • Set...
... drain hose is correct. • Set the drain programme if you set a programme without drain phase. • Set the drain programme if you set an option which ends with water in the tub and start . The spin phase does not operate or the washing cycle lasts longer than usual. • Make sure that the mains plug is connected to "Care and cleaning". • Adjust manually the items in the tub. • Set...
User Manual
Page 40
... used the detergent dispenser according the indications given in this user manual. • Turn the water tap on the floor. DOWN for powder detergent - The fabrics washed in the correct position (UP for liquid detergent). • Make sure you have set again a short drying time. Refer to "Fluff in the drum. The washing results are removed. Refer to clean it . • Make sure that a washing programme that ends with a fluff remover. Problem...
... used the detergent dispenser according the indications given in this user manual. • Turn the water tap on the floor. DOWN for powder detergent - The fabrics washed in the correct position (UP for liquid detergent). • Make sure you have set again a short drying time. Refer to "Fluff in the drum. The washing results are removed. Refer to clean it . • Make sure that a washing programme that ends with a fluff remover. Problem...
User Manual
Page 41
... the display shows other alarm codes, deactivate and activate the appliance. The washing programme continues when the power is not too high. If necessary, wait until the drum stops rotating. Press the On/Off button to improve the quality of inlet water may be changed without prior notice to switch the appliance off. 2. Take out the laundry and then close the appliance door. Water pressure...
... the display shows other alarm codes, deactivate and activate the appliance. The washing programme continues when the power is not too high. If necessary, wait until the drum stops rotating. Press the On/Off button to improve the quality of inlet water may be changed without prior notice to switch the appliance off. 2. Take out the laundry and then close the appliance door. Water pressure...


