Specification Sheet
Page 1
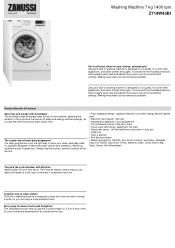
...-in washing machine is designed to run quietly, fit in great time. So you can adjust the length of a full cycle, so laundry is designed to begin in with other appliances, and clean clothes thoroughly. appliance blends into kitchen design behind cabinet door • Maximum spin speed: 1400 rpm • Handwash programme / wool programme • Out of balance control of water and energy used accordingly. Set a cycle...
...-in washing machine is designed to run quietly, fit in great time. So you can adjust the length of a full cycle, so laundry is designed to begin in with other appliances, and clean clothes thoroughly. appliance blends into kitchen design behind cabinet door • Maximum spin speed: 1400 rpm • Handwash programme / wool programme • Out of balance control of water and energy used accordingly. Set a cycle...
Specification Sheet
Page 2
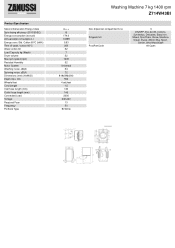
.... dispenser compartments no Program list ProdPartCode 3 ON/OFF, Eco 40-60, Cottons, Synthetics, Delicates, Easy Iron, Mixed, Spin/Drain, Rinse, Machine Clean, Duvet, 20min 3Kg, Sport, Denim, Wool\Handwash All Open Cotton 60°C (kWh) Time of wash / cotton 60°C Water cotton 60 Load Capacity kg (Wash) Drum volume Max spin speed (rpm) Residual Humidity Motor System Washing noise, dB(A) Spinning noise, dB(A) Dimensions (mm) (HxWxD) Depth max, mm Wheels/feet Cord Length Inlet hose...
.... dispenser compartments no Program list ProdPartCode 3 ON/OFF, Eco 40-60, Cottons, Synthetics, Delicates, Easy Iron, Mixed, Spin/Drain, Rinse, Machine Clean, Duvet, 20min 3Kg, Sport, Denim, Wool\Handwash All Open Cotton 60°C (kWh) Time of wash / cotton 60°C Water cotton 60 Load Capacity kg (Wash) Drum volume Max spin speed (rpm) Residual Humidity Motor System Washing noise, dB(A) Spinning noise, dB(A) Dimensions (mm) (HxWxD) Depth max, mm Wheels/feet Cord Length Inlet hose...

User Manual
Page 2
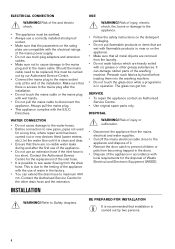
... instruction concerning the use of the appliance, carefully read the supplied instructions. staff kitchen areas in shops, offices and other residential type environments; 2 Always keep the instructions in a safe and accessible location for any injuries or damages that are the result of incorrect installation or usage. GENERAL SAFETY • Do not change the specification of this appliance. • This appliance is open...
... instruction concerning the use of the appliance, carefully read the supplied instructions. staff kitchen areas in shops, offices and other residential type environments; 2 Always keep the instructions in a safe and accessible location for any injuries or damages that are the result of incorrect installation or usage. GENERAL SAFETY • Do not change the specification of this appliance. • This appliance is open...
User Manual
Page 3
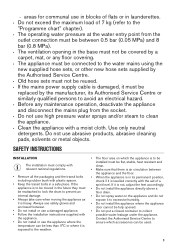
... installation instructions supplied with a moist cloth. Use only neutral detergents. SAFETY INSTRUCTIONS INSTALLATION The installation must be reattached to lock the drum to collect possible water leakage under the appliance. Contact the Authorised Service Centre to be installed must be flat, stable, heat resistant and clean. • Make sure that there is air circulation between 0.5 bar (0.05 MPa) and 8 bar (0.8 MPa). • The ventilation opening...
... installation instructions supplied with a moist cloth. Use only neutral detergents. SAFETY INSTRUCTIONS INSTALLATION The installation must be reattached to lock the drum to collect possible water leakage under the appliance. Contact the Authorised Service Centre to be installed must be flat, stable, heat resistant and clean. • Make sure that there is air circulation between 0.5 bar (0.05 MPa) and 8 bar (0.8 MPa). • The ventilation opening...
User Manual
Page 4
... plug after the first use an extension hose if the inlet hose is too short. WARNING! INSTALLATION USE WARNING! Prewash such fabrics by hand before loading them into the washing machine. • Do not touch the glass door while a programme is in the factory. • You can extend the drain hose to the appliance and dispose of it is carried out by our Authorised Service...
... plug after the first use an extension hose if the inlet hose is too short. WARNING! INSTALLATION USE WARNING! Prewash such fabrics by hand before loading them into the washing machine. • Do not touch the glass door while a programme is in the factory. • You can extend the drain hose to the appliance and dispose of it is carried out by our Authorised Service...

User Manual
Page 6
... spacers by using the spanner supplied with the plastic caps you keep the packaging and the transit bolts for any movement of the appliance in the user manual bag. Return the appliance in low- Close the holes with the appliance. 7. Remove the power supply cable and the drain hose from the drain hose. This is possible to the testing with water of...
... spacers by using the spanner supplied with the plastic caps you keep the packaging and the transit bolts for any movement of the appliance in the user manual bag. Return the appliance in low- Close the holes with the appliance. 7. Remove the power supply cable and the drain hose from the drain hose. This is possible to the testing with water of...

User Manual
Page 14
... the screw left the mark as described in the first step. 10 11 12 1 Hinge supports 2 Detergent dispenser 3 Control panel 4 Magnetic plate 5 Door handle 6 Rating plate 7 Plate with rubber beater 4 5 6 7 8 9 13 8 Drain pump filter 9 Front feet for levelling the appliance 10 Drain hose 11 Mains cable 12 Inlet hose connection 13 Back feet for a magnetic closure. For a correct closure: 1. Position the screw C and the counter-magnet D on the...
... the screw left the mark as described in the first step. 10 11 12 1 Hinge supports 2 Detergent dispenser 3 Control panel 4 Magnetic plate 5 Door handle 6 Rating plate 7 Plate with rubber beater 4 5 6 7 8 9 13 8 Drain pump filter 9 Front feet for levelling the appliance 10 Drain hose 11 Mains cable 12 Inlet hose connection 13 Back feet for a magnetic closure. For a correct closure: 1. Position the screw C and the counter-magnet D on the...

User Manual
Page 16
... the button repeatedly to a washing programme. DISPLAY AB C DIAL AND BUTTONS A Door locked indicator. Check the compatibility between options/ functions and washing programmes in steps of a programme to start of 1 hour up to set an extra quick programme. After touching the Start/Pause button, the relevant indicator illuminates and the selected delay time and the appliance begins the countdown. B Child safety lock indicator. Use this option...
... the button repeatedly to a washing programme. DISPLAY AB C DIAL AND BUTTONS A Door locked indicator. Check the compatibility between options/ functions and washing programmes in steps of a programme to start of 1 hour up to set an extra quick programme. After touching the Start/Pause button, the relevant indicator illuminates and the selected delay time and the appliance begins the countdown. B Child safety lock indicator. Use this option...

User Manual
Page 17
... the drum. Two different tunes sound while switching the appliance on . Set this option for some programmes the rinses are suppressed and the programme ends with the control panel. • To activate/deactivate this button to unlock the door. The rinse phase uses more water. The door stays locked. When the display shows the indicators , the appliance does not heat the water. SPIN When you touch the Start/Pause button...
... the drum. Two different tunes sound while switching the appliance on . Set this option for some programmes the rinses are suppressed and the programme ends with the control panel. • To activate/deactivate this button to unlock the door. The rinse phase uses more water. The door stays locked. When the display shows the indicators , the appliance does not heat the water. SPIN When you touch the Start/Pause button...
User Manual
Page 19
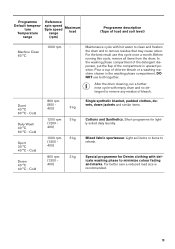
... the detergent dispenser, put the flap of chlorine bleach or a washing machine cleaner in upward position. Before running this cycle once a month. DO NOT use this cycle, remove all items from the drum. For better care a reduced load size is recommended. 19 Machine Clean 60 °C Maintenance cycle with empty drum and no detergent to remove residue that may cause odour. After the drum cleaning, run a further rinse cycle with hot water to clean and freshen the drum and to remove...
... the detergent dispenser, put the flap of chlorine bleach or a washing machine cleaner in upward position. Before running this cycle once a month. DO NOT use this cycle, remove all items from the drum. For better care a reduced load size is recommended. 19 Machine Clean 60 °C Maintenance cycle with empty drum and no detergent to remove residue that may cause odour. After the drum cleaning, run a further rinse cycle with hot water to clean and freshen the drum and to remove...
User Manual
Page 23
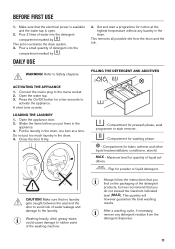
.... Maximum level for a few seconds to rubber parts of liquid additives. - Press the On/Off button for quantity of the washing machine. - Compartment for fabric softener and other liquid treatments(fabric conditioner, starch). - Make sure that you put too much laundry in the drum, one item at the highest temperature without any detergent residue from the drum and the tub. This removes all possible dirt from the detergent dispenser. 23...
.... Maximum level for a few seconds to rubber parts of liquid additives. - Press the On/Off button for quantity of the washing machine. - Compartment for fabric softener and other liquid treatments(fabric conditioner, starch). - Make sure that you put too much laundry in the drum, one item at the highest temperature without any detergent residue from the drum and the tub. This removes all possible dirt from the detergent dispenser. 23...

User Manual
Page 24
... delay start : 1. To change the delay start . It is not possible to liquid detergent dose indicated on . 2. Touch the Delay Start button repeatedly until the display shows the desired delay time. STARTING A PROGRAMME Touch the Start/Pause button to select the desired washing programme. The related indicator stops flashing and stays on a wrong position). The display shows the indicator . The related indicator flashes. 2. The related indicator flashes. 2. To use liquid detergent, turn...
... delay start : 1. To change the delay start . It is not possible to liquid detergent dose indicated on . 2. Touch the Delay Start button repeatedly until the display shows the desired delay time. STARTING A PROGRAMME Touch the Start/Pause button to select the desired washing programme. The related indicator stops flashing and stays on a wrong position). The display shows the indicator . The related indicator flashes. 2. The related indicator flashes. 2. To use liquid detergent, turn...

User Manual
Page 25
... water and the detergent are blinking 2. There is completed, but: • The time area shows and the display shows the door locked . • The indicator of the Start/Pause button starts flashing. • The drum still turns at regular intervals to prevent creases in the laundry. 25 Now, you can set a new cycle. 2. ADDING GARMENTS If the temperature and level of the previous programme. Open the appliance door. Press button On...
... water and the detergent are blinking 2. There is completed, but: • The time area shows and the display shows the door locked . • The indicator of the Start/Pause button starts flashing. • The drum still turns at regular intervals to prevent creases in the laundry. 25 Now, you can set a new cycle. 2. ADDING GARMENTS If the temperature and level of the previous programme. Open the appliance door. Press button On...
User Manual
Page 26
.... • Use a washing bag to the type of stain and fabric. Press the Start/Pause button: the appliance drains the water and spins. The display shows the end of the washing programme. manually redistribute the load so that is running. The option indicator Rinse Hold or disappears. If this occurs: a. c. STUBBORN STAINS For some stains, water and detergent is not changed, when you have set a new cycle. powder detergents for low temperature wash programmes...
.... • Use a washing bag to the type of stain and fabric. Press the Start/Pause button: the appliance drains the water and spins. The display shows the end of the washing programme. manually redistribute the load so that is running. The option indicator Rinse Hold or disappears. If this occurs: a. c. STUBBORN STAINS For some stains, water and detergent is not changed, when you have set a new cycle. powder detergents for low temperature wash programmes...
User Manual
Page 27
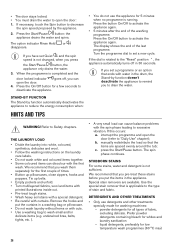
... cleaning draining system, allowing light fluff fibers that you pre-treat the stains or use more than the recommended quantity of detergent. • Follow the instructions that fall off the clothes to use alcohol, solvents or chemical products. Regularly examine the seal and remove all objects from the inner part. Refer to check for the type and colour of the fabric, the programme temperature and the level...
... cleaning draining system, allowing light fluff fibers that you pre-treat the stains or use more than the recommended quantity of detergent. • Follow the instructions that fall off the clothes to use alcohol, solvents or chemical products. Regularly examine the seal and remove all objects from the inner part. Refer to check for the type and colour of the fabric, the programme temperature and the level...

User Manual
Page 31
..., remove the remaining water from the mains socket. 2. If necessary, clean the pump. Disconnect the mains plug from the inlet hose and the drain pump. 1. Close the pump cover. Start the programme to drain the water. Start the programme to drain the water. Put 2 litres of water in the main wash compartment of the detergent dispenser. 2. CLEANING THE INLET HOSE AND THE VALVE FILTER 1 2 3 45° 20° EMERGENCY DRAIN If the appliance cannot drain the water, carry...
..., remove the remaining water from the mains socket. 2. If necessary, clean the pump. Disconnect the mains plug from the inlet hose and the drain pump. 1. Close the pump cover. Start the programme to drain the water. Start the programme to drain the water. Put 2 litres of water in the main wash compartment of the detergent dispenser. 2. CLEANING THE INLET HOSE AND THE VALVE FILTER 1 2 3 45° 20° EMERGENCY DRAIN If the appliance cannot drain the water, carry...
User Manual
Page 32
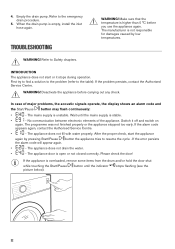
... not start the appliance again by low temperatures. In case of the appliance. Wait until the indicator stops flashing (see the 32 If the error persists the alarm code will appear again. • - The appliance door is empty, install the inlet hose again. Please check the door! TROUBLESHOOTING WARNING! The appliance does not drain the water. • - If the alarm code appears again, contact the Authorised Service...
... not start the appliance again by low temperatures. In case of the appliance. Wait until the indicator stops flashing (see the 32 If the error persists the alarm code will appear again. • - The appliance door is empty, install the inlet hose again. Please check the door! TROUBLESHOOTING WARNING! The appliance does not drain the water. • - If the alarm code appears again, contact the Authorised Service...
User Manual
Page 33
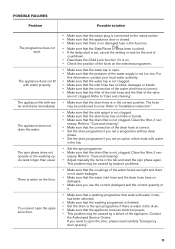
... sure that the water inlet hose and the drain hose have no damaged fuse in the tub. • Set the spin programme. • Make sure that the mains plug is not clogged. Contact the Authorised Service Centre. You cannot open the appliance door. • Make sure that the drain filter is connected to "Care and cleaning". • Adjust manually the items in the correct position. Clean the filter, if nec- essary...
... sure that the water inlet hose and the drain hose have no damaged fuse in the tub. • Set the spin programme. • Make sure that the mains plug is not clogged. Contact the Authorised Service Centre. You cannot open the appliance door. • Make sure that the drain filter is connected to "Care and cleaning". • Adjust manually the items in the correct position. Clean the filter, if nec- essary...

User Manual
Page 34
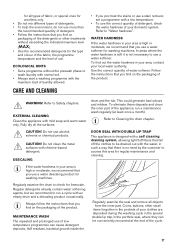
...; Use special products to remove the stubborn stains before you wash the laundry. • Make sure that the flap is possible to "Installation instruction". • Add more laundry in «Care and cleaning» chapter). If the problem continues, contact the Authorised Service Centre. Before opening the door: CAUTION! Disconnect the mains plug from the point of burns! After the washing cycle, there are some detergent residues in the dispenser drawer...
...; Use special products to remove the stubborn stains before you wash the laundry. • Make sure that the flap is possible to "Installation instruction". • Add more laundry in «Care and cleaning» chapter). If the problem continues, contact the Authorised Service Centre. Before opening the door: CAUTION! Disconnect the mains plug from the point of burns! After the washing cycle, there are some detergent residues in the dispenser drawer...
User Manual
Page 35
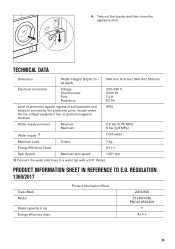
... TO E.U. 4. REGULATION 1369/2017 Trade Mark Model Rated capacity in kg Energy efficiency class Product Information Sheet ZANUSSI Z714W43BI, PNC914580206 7 A+++ 35 Take out the laundry and then close the appliance door. TECHNICAL DATA Dimension Width/ Height/ Depth/ Total depth 596 mm/ 819 mm/ 540 mm/ 553 mm Electrical connection Voltage Overall power Fuse Frequency 230-240 V 2000 W 13 A 50 Hz Level of protection against ingress of solid...
... TO E.U. 4. REGULATION 1369/2017 Trade Mark Model Rated capacity in kg Energy efficiency class Product Information Sheet ZANUSSI Z714W43BI, PNC914580206 7 A+++ 35 Take out the laundry and then close the appliance door. TECHNICAL DATA Dimension Width/ Height/ Depth/ Total depth 596 mm/ 819 mm/ 540 mm/ 553 mm Electrical connection Voltage Overall power Fuse Frequency 230-240 V 2000 W 13 A 50 Hz Level of protection against ingress of solid...


