Instruction Booklet
Page 2
... Unpacking the machine - Worktop installation - Capacity - Damages - The filters - The condenser - Spinning (water extraction) - Power supply 14 15 16-18 Guide to use the dryer for the first time - Identification of laundry item weights Programme chart 7 Maintenance and cleaning 8-9 - Positioning - Emptying the water tank Hints & Tips 10...
... Unpacking the machine - Worktop installation - Capacity - Damages - The filters - The condenser - Spinning (water extraction) - Power supply 14 15 16-18 Guide to use the dryer for the first time - Identification of laundry item weights Programme chart 7 Maintenance and cleaning 8-9 - Positioning - Emptying the water tank Hints & Tips 10...
Instruction Booklet
Page 3
... an earthed socket, which has been in a clean, dry environment. Pillows, cushions, down-filled items etc. (these instructions and make the dryer overheat) - s Always switch off and unplug the appliance after use genuine spare parts available from the wall socket. The various plastics used in ...be dried in accordance with these ensure that the power cable is within the limit advised. s Keep all people using the tumble dryer, read this the power plug must not be recycled. - Permanent installation must be carried out by an authorized electrician. Never try...
... an earthed socket, which has been in a clean, dry environment. Pillows, cushions, down-filled items etc. (these instructions and make the dryer overheat) - s Always switch off and unplug the appliance after use genuine spare parts available from the wall socket. The various plastics used in ...be dried in accordance with these ensure that the power cable is within the limit advised. s Keep all people using the tumble dryer, read this the power plug must not be recycled. - Permanent installation must be carried out by an authorized electrician. Never try...
Instruction Booklet
Page 5
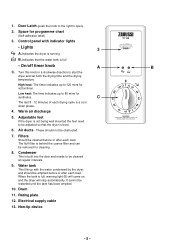
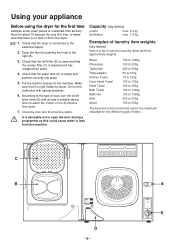
... - Water tank This fills up with indicator lights • Lights 3 A. Door Latch (push the knob to the right to start the dryer and set both the drying time and the drying temperature. Turn this knob in a clockwise direction to open) 2. C The last 8 - 12 minutes...synthetics. It cannot be removed for programme chart (Self-adhesive label) 3. Space for cleaning. 8. When the tank is running B. 1. Indicates that the dryer is full • On/off timer knob A B C. High heat: The timer indicates up to be cleaned at regular intervals. 9. Low heat: ...
... - Water tank This fills up with indicator lights • Lights 3 A. Door Latch (push the knob to the right to start the dryer and set both the drying time and the drying temperature. Turn this knob in a clockwise direction to open) 2. C The last 8 - 12 minutes...synthetics. It cannot be removed for programme chart (Self-adhesive label) 3. Space for cleaning. 8. When the tank is running B. 1. Indicates that the dryer is full • On/off timer knob A B C. High heat: The timer indicates up to be cleaned at regular intervals. 9. Low heat: ...
Instruction Booklet
Page 6
... into place. 5. Check that the coarse filter (C) is lowered and has snapped into the machine. Using your appliance Before using the dryer for the first time Dampen some clean pieces of unwanted cloth and dry them for about 15 minutes the very first time,... 3.4 kg max. 1.5 kg Examples of laundry item weights (dry items) Here is a list of fabric. Do not mix synthetics with natural materials. 6. Check that the dryer is advisable not to open the door during a programme as this could cause water to the electrical supply. 2. C B A E D - 6 - Put the load ...
... into place. 5. Check that the coarse filter (C) is lowered and has snapped into the machine. Using your appliance Before using the dryer for the first time Dampen some clean pieces of unwanted cloth and dry them for about 15 minutes the very first time,... 3.4 kg max. 1.5 kg Examples of laundry item weights (dry items) Here is a list of fabric. Do not mix synthetics with natural materials. 6. Check that the dryer is advisable not to open the door during a programme as this could cause water to the electrical supply. 2. C B A E D - 6 - Put the load ...
Instruction Booklet
Page 7
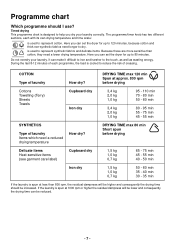
Here you can set the dryer for up to 120 minutes, because cotton and thick non-synthetic fabrics need longer to help you dry your laundry. It can be reduced. - 7 - During ... dry 1,5 kg 1,0 kg 0,7 kg 50 - 60 min 35 - 40 min 30 - 35 min If the laundry is designed to dry. Here you can set the dryer for up to 80 minutes. Timed drying This programme chart is spun at 1000 rpm or higher the residual dampness will be higher and consequently...
Here you can set the dryer for up to 120 minutes, because cotton and thick non-synthetic fabrics need longer to help you dry your laundry. It can be reduced. - 7 - During ... dry 1,5 kg 1,0 kg 0,7 kg 50 - 60 min 35 - 40 min 30 - 35 min If the laundry is designed to dry. Here you can set the dryer for up to 80 minutes. Timed drying This programme chart is spun at 1000 rpm or higher the residual dampness will be higher and consequently...
Instruction Booklet
Page 8
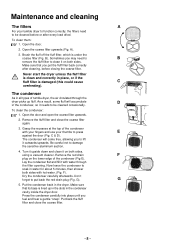
... A). 3. G). Press the condenser carefully into place until you to lift it on the lower edge of the condenser with water through the dryer picks up in the slots in water for about 5 minutes, then shower both sides, using a vacuum cleaner. Brush the fluff ...again. 3. Remove the red drain F plug on both sides with hot water. (Fig. The condenser will accumulate D in all types of tumble dryer, the air circulated through the filter opening. F). Turn it upside down and clean it outwards/upwards. To clean them: 1. Maintenance and cleaning ...
... A). 3. G). Press the condenser carefully into place until you to lift it on the lower edge of the condenser with water through the dryer picks up in the slots in water for about 5 minutes, then shower both sides, using a vacuum cleaner. Brush the fluff ...again. 3. Remove the red drain F plug on both sides with hot water. (Fig. The condenser will accumulate D in all types of tumble dryer, the air circulated through the filter opening. F). Turn it upside down and clean it outwards/upwards. To clean them: 1. Maintenance and cleaning ...
Instruction Booklet
Page 9
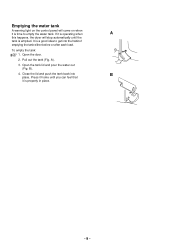
To empty the tank: 1. Pull out the tank (Fig. A). 3. B). 4. Close the lid and push the tank back into the habit of emptying the tank either before or after each load. If it is operating when A this happens, the dryer will come on when it is time to get into B place. Press it home until the tank is emptied. Open the door. 2. Open the tank lid and pour the water out (Fig. Emptying the water tank A warning light on the control panel will stop automatically until you can feel that it is a good idea to empty the water tank. It is properly in place. - 9 -
To empty the tank: 1. Pull out the tank (Fig. A). 3. B). 4. Close the lid and push the tank back into the habit of emptying the tank either before or after each load. If it is operating when A this happens, the dryer will come on when it is time to get into B place. Press it home until the tank is emptied. Open the door. 2. Open the tank lid and pour the water out (Fig. Emptying the water tank A warning light on the control panel will stop automatically until you can feel that it is a good idea to empty the water tank. It is properly in place. - 9 -
Instruction Booklet
Page 10
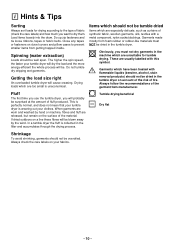
...by hand or machine, fibres and fluff are too small is uneconomical. Getting the load size right An overloaded tumble dryer will be surprised at Shrinkage To avoid shrinking, garments should not be tumble dried Items which are especially delicate, such as curtains of...getting trapped inside. Obviously, you want to prevent smaller items from foam rubber or rubber-like materials must not dry garments in the tumble dryer. Do not tumble dry dripping wet garments. Garments which have been treated with flammable liquids (benzine, alcohol, stain removal products)...
...by hand or machine, fibres and fluff are too small is uneconomical. Getting the load size right An overloaded tumble dryer will be surprised at Shrinkage To avoid shrinking, garments should not be tumble dried Items which are especially delicate, such as curtains of...getting trapped inside. Obviously, you want to prevent smaller items from foam rubber or rubber-like materials must not dry garments in the tumble dryer. Do not tumble dry dripping wet garments. Garments which have been treated with flammable liquids (benzine, alcohol, stain removal products)...
Instruction Booklet
Page 11
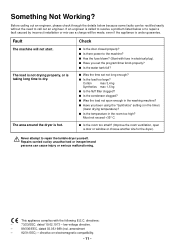
... you set not long enough? s Is the temperature in the washing machine? directive on the timer) (lower drying temperature)? The area around the dryer is taking long time to the machine? s Is the door closed properly? s Was the load not spun enough in the room too high? .../timer knob properly? s Is the room too small? (Improve the room ventilation, open a door or window or choose another site for the dryer). This appliance complies with fuse in electrical plug). Repairs carried out by incorrect installation or mis-use a charge will not start. s Is the...
... you set not long enough? s Is the temperature in the washing machine? directive on the timer) (lower drying temperature)? The area around the dryer is taking long time to the machine? s Is the door closed properly? s Was the load not spun enough in the room too high? .../timer knob properly? s Is the room too small? (Improve the room ventilation, open a door or window or choose another site for the dryer). This appliance complies with fuse in electrical plug). Repairs carried out by incorrect installation or mis-use a charge will not start. s Is the...
Instruction Booklet
Page 15
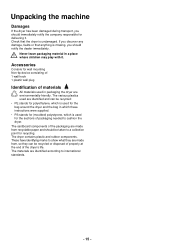
...) polystyrene, which is used for wall mounting Non-tip device consisting of: 1 wall hook 1 plastic wall plug Identification of the dryer's life. The materials are identified and can be recycled or disposed of properly at the end of materials All materials used are identi... point for delivering it . Accessories Console for the sections of the packaging are environmentally-friendly. The various plastics used in packaging the dryer are made from recyclable paper and should be recycled: • PE stands for polyethylene, which is used for the bag around the...
...) polystyrene, which is used for wall mounting Non-tip device consisting of: 1 wall hook 1 plastic wall plug Identification of the dryer's life. The materials are identified and can be recycled or disposed of properly at the end of materials All materials used are identi... point for delivering it . Accessories Console for the sections of the packaging are environmentally-friendly. The various plastics used in packaging the dryer are made from recyclable paper and should be recycled: • PE stands for polyethylene, which is used for the bag around the...

Instruction Booklet
Page 16
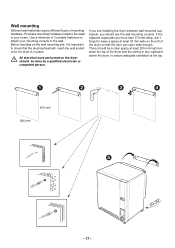
... the wall. Method: 1. Once in the room for removing the water tank. • Ensure the air ducts are some points to be installed. 2. The dryer uses the air in place, the "eye" (aperture) of the lefthand bracket on . Screw the hook (1) into place. The adjustable feet must anchor it from ... Fit the pin (2) through bracket and eye and lock it does, open wide enough for cooling. • The area around the dryer should not exceed +35° C when the dryer is opposite the centre of the hook needs to leave a space on the worktop in the position where it , here are not...
... the wall. Method: 1. Once in the room for removing the water tank. • Ensure the air ducts are some points to be installed. 2. The dryer uses the air in place, the "eye" (aperture) of the lefthand bracket on . Screw the hook (1) into place. The adjustable feet must anchor it from ... Fit the pin (2) through bracket and eye and lock it does, open wide enough for cooling. • The area around the dryer should not exceed +35° C when the dryer is opposite the centre of the hook needs to leave a space on the worktop in the position where it , here are not...
Instruction Booklet
Page 17
... work performed on the left of 3 suitable fasteners to attach your home. If you should be a clear space at least 30 mm wide on the dryer should use the wall mounting console. Before deciding on the wall mounting site, it is in your mounting console to check that the door can... open wide enough. Use a minimum of the dryer so that the electrical lead will reach the wall socket once the dryer is important to the wall. Wall mounting Different wall materials require different types of the...
... work performed on the left of 3 suitable fasteners to attach your home. If you should be a clear space at least 30 mm wide on the dryer should use the wall mounting console. Before deciding on the wall mounting site, it is in your mounting console to check that the door can... open wide enough. Use a minimum of the dryer so that the electrical lead will reach the wall socket once the dryer is important to the wall. Wall mounting Different wall materials require different types of the...
Instruction Booklet
Page 18
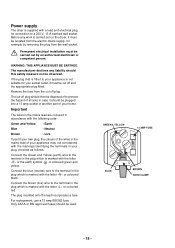
... mains lead are coloured in accordance with a lead and electrical plug for connection to the terminal in the plug which is carried out on the dryer, it must be plugged into a 13 amp socket in another part of to your socket outlet, it should this safety measure not be used. GREEN... electric mains supply, for your appliance is supplied with the following code: Green and Yellow - For replacement, use a 13 amp BSI362 fuse. Power supply The dryer is not suitable for example by an authorised electrician or competent person.
... mains lead are coloured in accordance with a lead and electrical plug for connection to the terminal in the plug which is carried out on the dryer, it must be plugged into a 13 amp socket in another part of to your socket outlet, it should this safety measure not be used. GREEN... electric mains supply, for your appliance is supplied with the following code: Green and Yellow - For replacement, use a 13 amp BSI362 fuse. Power supply The dryer is not suitable for example by an authorised electrician or competent person.

