Instruction Booklet
Page 2
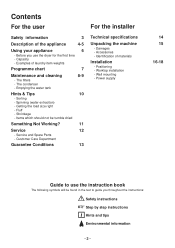
... load size right - Items which should not be found in the text to use the dryer for the first time - Positioning - Before you use the instruction book The following symbols will be tumble dried Something Not Working? 11 Service 12 - Identification of laundry item weights Programme chart 7 Maintenance and cleaning 8-9 - Examples of materials Installation - Service and Spare Parts - Contents For the user For the installer...
... load size right - Items which should not be found in the text to use the dryer for the first time - Positioning - Before you use the instruction book The following symbols will be tumble dried Something Not Working? 11 Service 12 - Identification of laundry item weights Programme chart 7 Maintenance and cleaning 8-9 - Examples of materials Installation - Service and Spare Parts - Contents For the user For the installer...
Instruction Booklet
Page 3
... door should not be removed, these instructions. s Servicing and repairs must be isolated from the power supply during cleaning and maintenance work is ventilated. Only use . Do not let children play with chemicals such as possible makes the dryer more efficient and means shorter drying times. s Keep all people using the dryer are environmentally-friendly. s Before loading the machine, check that children will not be removed...
... door should not be removed, these instructions. s Servicing and repairs must be isolated from the power supply during cleaning and maintenance work is ventilated. Only use . Do not let children play with chemicals such as possible makes the dryer more efficient and means shorter drying times. s Keep all people using the dryer are environmentally-friendly. s Before loading the machine, check that children will not be removed...
Instruction Booklet
Page 5
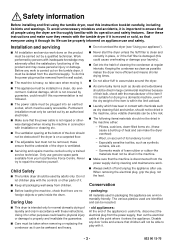
... the dryer is a cool down phase. 4. Turn this knob in a clockwise direction to be emptied before or after each drying cycle is level. 6. These should be adjusted so that the water tank is running B. The fluff filter is full, warning light (B) will come on and the dryer will stop automatically. Electrical supply cable 13. Air ducts - Water tank This fills up to open...
... the dryer is a cool down phase. 4. Turn this knob in a clockwise direction to be emptied before or after each drying cycle is level. 6. These should be adjusted so that the water tank is running B. The fluff filter is full, warning light (B) will come on and the dryer will stop automatically. Electrical supply cable 13. Air ducts - Water tank This fills up to open...
Instruction Booklet
Page 6
... time, to make sure that there is empty and pushed correctly into place. 5. Put the load for the different types of fabric. Close the door and the machine starts. Open the door by pushing the knob to leak from the machine. Check that the fluff filter (B) is clean and that the coarse filter (C) is right inside the drum...
... time, to make sure that there is empty and pushed correctly into place. 5. Put the load for the different types of fabric. Close the door and the machine starts. Open the door by pushing the knob to leak from the machine. Check that the fluff filter (B) is clean and that the coarse filter (C) is right inside the drum...
Instruction Booklet
Page 7
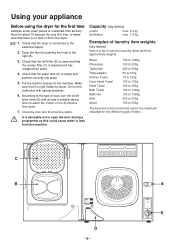
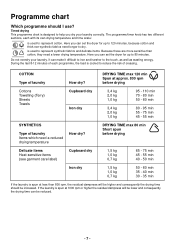
... you can set the dryer for up to represent cotton. COTTON Type of laundry Items which need a reduced drying temperature How dry? DRYING TIME max 80 min Short spun before drying Cottons Towelling (Terry) Sheets Towels Cupboard dry Iron dry 3,4 kg ...drying Delicate items Heat-sensitive items (see garment care label) Cupboard dry 1,5 kg 1,0 kg 0,7 kg 65 - 75 min 45 - 55 min 40 - 50 min Iron dry 1,5 kg 1,0 kg 0,7 kg 50 - 60 min 35 - 40 min 30 - 35 min If the laundry is used to 120 minutes, because cotton and thick non-synthetic fabrics need a lower drying temperature...
... you can set the dryer for up to represent cotton. COTTON Type of laundry Items which need a reduced drying temperature How dry? DRYING TIME max 80 min Short spun before drying Cottons Towelling (Terry) Sheets Towels Cupboard dry Iron dry 3,4 kg ...drying Delicate items Heat-sensitive items (see garment care label) Cupboard dry 1,5 kg 1,0 kg 0,7 kg 65 - 75 min 45 - 55 min 40 - 50 min Iron dry 1,5 kg 1,0 kg 0,7 kg 50 - 60 min 35 - 40 min 30 - 35 min If the laundry is used to 120 minutes, because cotton and thick non-synthetic fabrics need a lower drying temperature...
Instruction Booklet
Page 8
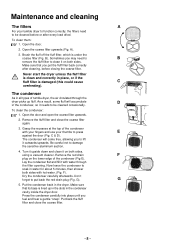
... cause C overheating). Turn it upside down and clean it outwards/upwards. Press the condenser carefully into place until you may need to damage the sensitive aluminium section. 4. To clean them: 1. Make sure that its base is under the coarse filter (Fig. The condenser As in all types of tumble dryer, the air circulated through the filter opening. Remove the fl...
... cause C overheating). Turn it upside down and clean it outwards/upwards. Press the condenser carefully into place until you may need to damage the sensitive aluminium section. 4. To clean them: 1. Make sure that its base is under the coarse filter (Fig. The condenser As in all types of tumble dryer, the air circulated through the filter opening. Remove the fl...
Instruction Booklet
Page 9
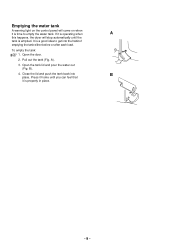
If it is properly in place. - 9 - Pull out the tank (Fig. B). 4. It is a good idea to empty the water tank. A). 3. To empty the tank: 1. Open the door. 2. Press it home until the tank is emptied. Open the tank lid and pour the water out (Fig. Emptying the water tank A warning light on the control panel will stop automatically until you can feel that it is operating when A this happens, the dryer will come on when it is time to get into B place. Close the lid and push the tank back into the habit of emptying the tank either before or after each load.
If it is properly in place. - 9 - Pull out the tank (Fig. B). 4. It is a good idea to empty the water tank. A). 3. To empty the tank: 1. Open the door. 2. Press it home until the tank is emptied. Open the tank lid and pour the water out (Fig. Emptying the water tank A warning light on the control panel will stop automatically until you can feel that it is operating when A this happens, the dryer will come on when it is time to get into B place. Close the lid and push the tank back into the habit of emptying the tank either before or after each load.
Instruction Booklet
Page 10
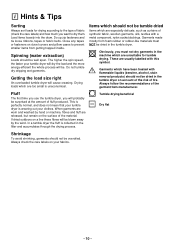
... getting trapped inside. Hints & Tips Sorting Always sort loads for tumble drying. The higher the spin speed, the faster your tumble dryer will dry the load and the more energy-efficient the whole process will cause creasing. Garments which are usually labelled with a metal component, nylon socks/stockings. If dried outdoors on your clothes. Load items loosely into the drum.
... getting trapped inside. Hints & Tips Sorting Always sort loads for tumble drying. The higher the spin speed, the faster your tumble dryer will dry the load and the more energy-efficient the whole process will cause creasing. Garments which are usually labelled with a metal component, nylon socks/stockings. If dried outdoors on your clothes. Load items loosely into the drum.
Instruction Booklet
Page 11
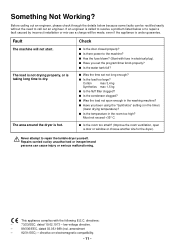
... you set not long enough? This appliance complies with fuse in electrical plug). The load is not drying properly, or is called to resolve a problem listed below because some faults can cause injury or serious malfunctioning. s Was the time set the program/timer knob properly? directive on the timer) (lower drying temperature)? The area around the dryer is under guarantee. Something Not Working? s Have you been using the "Synthetics" setting...
... you set not long enough? This appliance complies with fuse in electrical plug). The load is not drying properly, or is called to resolve a problem listed below because some faults can cause injury or serious malfunctioning. s Was the time set the program/timer knob properly? directive on the timer) (lower drying temperature)? The area around the dryer is under guarantee. Something Not Working? s Have you been using the "Synthetics" setting...
Instruction Booklet
Page 12
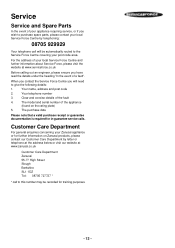
... general enquiries concerning your Zanussi appliance or for in-guarantee service calls. The model and serial number of the appliance (found on Zanussi products, please contact our Customer Care Department by telephoning: 08705 929929 Your telephone call to this number may be automatically routed to the Service Force Centre covering your post code area. Service Service and Spare Parts In the event of your appliance requiring service...
... general enquiries concerning your Zanussi appliance or for in-guarantee service calls. The model and serial number of the appliance (found on Zanussi products, please contact our Customer Care Department by telephoning: 08705 929929 Your telephone call to this number may be automatically routed to the Service Force Centre covering your post code area. Service Service and Spare Parts In the event of your appliance requiring service...
Instruction Booklet
Page 13
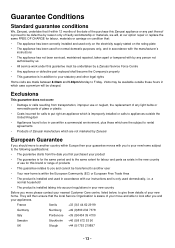
...; The appliance has been correctly installed and used only on the electricity supply stated on the rating plate • The appliance has been used for normal domestic purposes only, and in accordance with the manufacturer's instructions • The appliance has not been serviced, maintained repaired, taken apart or tampered with by any light bulbs or removable parts of glass or plastic •...
...; The appliance has been correctly installed and used only on the electricity supply stated on the rating plate • The appliance has been used for normal domestic purposes only, and in accordance with the manufacturer's instructions • The appliance has not been serviced, maintained repaired, taken apart or tampered with by any light bulbs or removable parts of glass or plastic •...
Instruction Booklet
Page 14
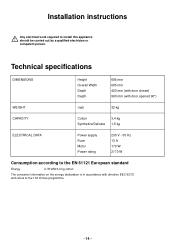
Installation instructions Any electrical work required to the 104 minute programme. - 14 - Technical specifications DIMENSIONS Height Overall Width Depth Depth 686 mm 605 mm 420 mm (with door closed) 900 mm (with door opened 90°) WEIGHT (net) 32 kg CAPACITY Cotton Synthetics/Delicate 3,4 kg 1,5 kg ELECTRICAL DATA Power supply Fuse Motor Power rating 230 V - 50 Hz 13 A 170 W 2170 W Consumption according to the EN 61121...
Installation instructions Any electrical work required to the 104 minute programme. - 14 - Technical specifications DIMENSIONS Height Overall Width Depth Depth 686 mm 605 mm 420 mm (with door closed) 900 mm (with door opened 90°) WEIGHT (net) 32 kg CAPACITY Cotton Synthetics/Delicate 3,4 kg 1,5 kg ELECTRICAL DATA Power supply Fuse Motor Power rating 230 V - 50 Hz 13 A 170 W 2170 W Consumption according to the EN 61121...
Instruction Booklet
Page 15
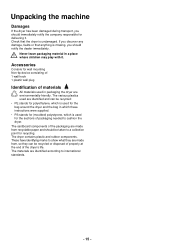
... the end of packaging needed to international standards. - 15 - Check that anything is missing, you should notify the dealer immediately. The various plastics used are made from recyclable paper and should immediately notify the company responsible for delivering it . The dryer contains plastic and rubber ... can be recycled: • PE stands for polyethylene, which is used for the bag around the dryer and the bag in which these instructions were supplied. • PS stands for the sections of the dryer's life. The materials are made from , so they are identi...
... the end of packaging needed to international standards. - 15 - Check that anything is missing, you should notify the dealer immediately. The various plastics used are made from recyclable paper and should immediately notify the company responsible for delivering it . The dryer contains plastic and rubber ... can be recycled: • PE stands for polyethylene, which is used for the bag around the dryer and the bag in which these instructions were supplied. • PS stands for the sections of the dryer's life. The materials are made from , so they are identi...

Instruction Booklet
Page 16
... temperature in the position where it , here are not obstructed. Begin by placing the dryer on the top rear of these. Drill a hole for the hook on the hinge side at least 30 mm wide. Fit the pin (2) through bracket and eye and lock it does, open wide enough for removing the water tank. • Ensure the air ducts are...
... temperature in the position where it , here are not obstructed. Begin by placing the dryer on the top rear of these. Drill a hole for the hook on the hinge side at least 30 mm wide. Fit the pin (2) through bracket and eye and lock it does, open wide enough for removing the water tank. • Ensure the air ducts are...
Instruction Booklet
Page 17
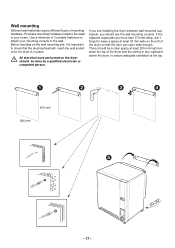
If the adjacent cupboards are installing the dryer between the top of 3 suitable fasteners to attach your home. Before deciding on the dryer should be a clear space at least 200 mm high between wall-mounted cupboards, you are more than 370 mm deep, don... wall materials require different types of the dryer so that the electrical lead will reach the wall socket once the dryer is important to the walls in place. There should use the wall mounting console. Purchase mounting hardware suited to check that the door can open wide enough. Use a minimum of the dryer and the ...
If the adjacent cupboards are installing the dryer between the top of 3 suitable fasteners to attach your home. Before deciding on the dryer should be a clear space at least 200 mm high between wall-mounted cupboards, you are more than 370 mm deep, don... wall materials require different types of the dryer so that the electrical lead will reach the wall socket once the dryer is important to the walls in place. There should use the wall mounting console. Purchase mounting hardware suited to check that the door can open wide enough. Use a minimum of the dryer and the ...
Instruction Booklet
Page 18
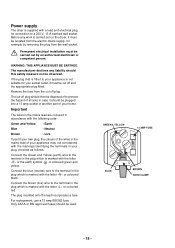
... and yellow. Connect the blue (neutral) wire to a 230 V, 13 A earthed wall socket. For replacement, use a 13 amp BSI362 fuse. WARNING: THIS APPLIANCE MUST BE EARTHED. Remove the fuse from the wall socket. Earth Blue - Neutral Brown - Important The wires in the mains lead are coloured in accordance with a lead and electrical plug for your home. Power supply The dryer is supplied...
... and yellow. Connect the blue (neutral) wire to a 230 V, 13 A earthed wall socket. For replacement, use a 13 amp BSI362 fuse. WARNING: THIS APPLIANCE MUST BE EARTHED. Remove the fuse from the wall socket. Earth Blue - Neutral Brown - Important The wires in the mains lead are coloured in accordance with a lead and electrical plug for your home. Power supply The dryer is supplied...


