Owner's Manual
Page 3
... the instructions contained in the users manual, may void your authority, granted by the interference. We Want You Listening For A Lifetime YAMAHA and the Electronic Industries Association's Consumer Electronics Group want you to the instructions found in this product in a residential environment will not... statements apply ONLY to those products distributed by playing it is being affected by the FCC, to use the product. 2 IMPORTANT : When connecting this product to accessories and/or another product use this product MUST be determined by turning the unit " OFF" and " ON" , ...
... the instructions contained in the users manual, may void your authority, granted by the interference. We Want You Listening For A Lifetime YAMAHA and the Electronic Industries Association's Consumer Electronics Group want you to the instructions found in this product in a residential environment will not... statements apply ONLY to those products distributed by playing it is being affected by the FCC, to use the product. 2 IMPORTANT : When connecting this product to accessories and/or another product use this product MUST be determined by turning the unit " OFF" and " ON" , ...
Owner's Manual
Page 4
...risk or fire or electric shock, do not position with the rear panel facing down on switches, controls or connection wires. Avoid sources of excessive vibration, dust, moisture and cold. Never pull the wires themselves. •... unit. Keep it may cause damage to the speaker, and/or you may be liable for selecting this YAMAHA subwoofer system. If glass etc. If the object falls or drops by vibrations, it may cause fire and bodily...unit. • Never place a fragile object near the YST port of a disc, reduce the volume level to prevent fire or damage.
...risk or fire or electric shock, do not position with the rear panel facing down on switches, controls or connection wires. Avoid sources of excessive vibration, dust, moisture and cold. Never pull the wires themselves. •... unit. Keep it may cause damage to the speaker, and/or you may be liable for selecting this YAMAHA subwoofer system. If glass etc. If the object falls or drops by vibrations, it may cause fire and bodily...unit. • Never place a fragile object near the YST port of a disc, reduce the volume level to prevent fire or damage.

Owner's Manual
Page 5
... a TV set . SUPPLIED ACCESSORIES 3 PLACEMENT 4 CONNECTIONS 5 1 Connecting to line output (pin jack) terminals of the amplifier 5 2 Connecting to speaker output terminals of the amplifier 8 Connecting to the INPUT1/ OUTPUT terminals of the subwoofer 12 Plug in your local main voltage BEFORE plugging ... AC outlet 12 CONTROLS AND THEIR FUNCTIONS 13 AUTOMATIC POWER-SWITCHING FUNCTION 15 ADJUSTING THE SUBWOOFER BEFORE USE 16 Frequency characteristics 17 ADVANCED YAMAHA ACTIVE SERVO TECHNOLOGY 18 TROUBLESHOOTING 19 SPECIAL INSTRUCTIONS FOR U.K. Voltages are not suitable for ...
... a TV set . SUPPLIED ACCESSORIES 3 PLACEMENT 4 CONNECTIONS 5 1 Connecting to line output (pin jack) terminals of the amplifier 5 2 Connecting to speaker output terminals of the amplifier 8 Connecting to the INPUT1/ OUTPUT terminals of the subwoofer 12 Plug in your local main voltage BEFORE plugging ... AC outlet 12 CONTROLS AND THEIR FUNCTIONS 13 AUTOMATIC POWER-SWITCHING FUNCTION 15 ADJUSTING THE SUBWOOFER BEFORE USE 16 Frequency characteristics 17 ADVANCED YAMAHA ACTIVE SERVO TECHNOLOGY 18 TROUBLESHOOTING 19 SPECIAL INSTRUCTIONS FOR U.K. Voltages are not suitable for ...
Owner's Manual
Page 6
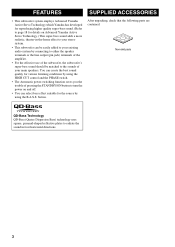
...-shaped reflective plates to radiate the sound in -the-home effect to your stereo system. • This subwoofer can be easily added to your existing audio system by connecting to either the speaker terminals or the line output (pin jack) terminals of the amplifier. • For...of your main speakers. After unpacking, check that the following parts are contained. button. FEATURES SUPPLIED ACCESSORIES • This subwoofer system employs Advanced Yamaha Active Servo Technology which Yamaha has developed for reproducing higher quality super-bass sound. (Refer to turn the power on Advanced...
...-shaped reflective plates to radiate the sound in -the-home effect to your stereo system. • This subwoofer can be easily added to your existing audio system by connecting to either the speaker terminals or the line output (pin jack) terminals of the amplifier. • For...of your main speakers. After unpacking, check that the following parts are contained. button. FEATURES SUPPLIED ACCESSORIES • This subwoofer system employs Advanced Yamaha Active Servo Technology which Yamaha has developed for reproducing higher quality super-bass sound. (Refer to turn the power on Advanced...

Owner's Manual
Page 8
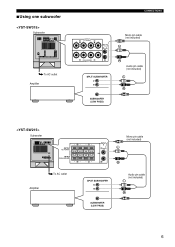
...;Choose 2 (pages 8-11) if your component to be connected to the subwoofer. • After all connections are completed, plug in the subwoofer and other audio/video components. 1 Connecting to line output (pin jack) terminals of the amplifier • To connect with a YAMAHA DSP amplifier (or AV receiver), connect the SUBWOOFER (or LOW PASS etc.) terminal on the rear of...
...;Choose 2 (pages 8-11) if your component to be connected to the subwoofer. • After all connections are completed, plug in the subwoofer and other audio/video components. 1 Connecting to line output (pin jack) terminals of the amplifier • To connect with a YAMAHA DSP amplifier (or AV receiver), connect the SUBWOOFER (or LOW PASS etc.) terminal on the rear of...
Owner's Manual
Page 9
■Using one subwoofer Subwoofer To AC outlet Amplifier Subwoofer Amplifier To AC outlet CONNECTIONS Mono pin cable (not included) Audio pin cable (not included) Mono pin cable (not included) Audio pin cable (not included) 6
■Using one subwoofer Subwoofer To AC outlet Amplifier Subwoofer Amplifier To AC outlet CONNECTIONS Mono pin cable (not included) Audio pin cable (not included) Mono pin cable (not included) Audio pin cable (not included) 6
Owner's Manual
Page 10
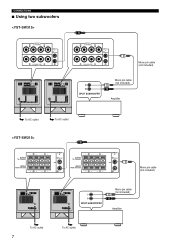
CONNECTIONS ■ Using two subwoofers To AC outlet To AC outlet To AC outlet 7 To AC outlet Mono pin cable (not included) Mono pin cable (not included) Amplifier Mono pin cable (not included) Mono pin cable (not included) Amplifier
CONNECTIONS ■ Using two subwoofers To AC outlet To AC outlet To AC outlet 7 To AC outlet Mono pin cable (not included) Mono pin cable (not included) Amplifier Mono pin cable (not included) Mono pin cable (not included) Amplifier
Owner's Manual
Page 11
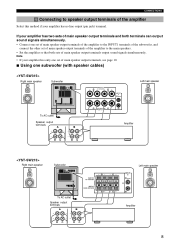
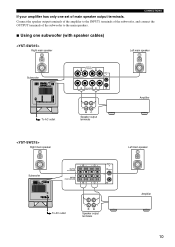
...no line output (pin jack) terminal. CONNECTIONS 2 Connecting to the main speakers. • Set the amplifier so that both sets of main speaker output terminals, see page 10. ■ Using one subwoofer (with speaker cables) Right main speaker Subwoofer Left main speaker To AC outlet Speaker output...speaker output terminals and both terminals can output sound signals simultaneously. • Connect one set of main speaker output terminals of the amplifier to the INPUT1 terminals of the subwoofer, and connect the other set of main speaker output terminals of the amplifier to speaker output...
...no line output (pin jack) terminal. CONNECTIONS 2 Connecting to the main speakers. • Set the amplifier so that both sets of main speaker output terminals, see page 10. ■ Using one subwoofer (with speaker cables) Right main speaker Subwoofer Left main speaker To AC outlet Speaker output...speaker output terminals and both terminals can output sound signals simultaneously. • Connect one set of main speaker output terminals of the amplifier to the INPUT1 terminals of the subwoofer, and connect the other set of main speaker output terminals of the amplifier to speaker output...
Owner's Manual
Page 12
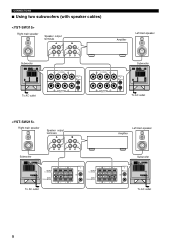
CONNECTIONS ■ Using two subwoofers (with speaker cables) Right main speaker Speaker output terminals Amplifier Left main speaker Subwoofer Subwoofer To AC outlet Right main speaker Speaker output terminals Subwoofer To AC outlet Amplifier Left main speaker Subwoofer To AC outlet To AC outlet 9
CONNECTIONS ■ Using two subwoofers (with speaker cables) Right main speaker Speaker output terminals Amplifier Left main speaker Subwoofer Subwoofer To AC outlet Right main speaker Speaker output terminals Subwoofer To AC outlet Amplifier Left main speaker Subwoofer To AC outlet To AC outlet 9
Owner's Manual
Page 13
CONNECTIONS If your amplifier has only one subwoofer (with speaker cables) Right main speaker Left main speaker Subwoofer To AC outlet Right main speaker Speaker output terminals Amplifier Left main speaker Subwoofer To AC outlet Speaker output terminals Amplifier 10 Connect the speaker output terminals of the amplifier to the main speakers. ■ Using one set of the subwoofer to the INPUT1 terminals of the subwoofer, and connect the OUTPUT terminals of main speaker output terminals.
CONNECTIONS If your amplifier has only one subwoofer (with speaker cables) Right main speaker Left main speaker Subwoofer To AC outlet Right main speaker Speaker output terminals Amplifier Left main speaker Subwoofer To AC outlet Speaker output terminals Amplifier 10 Connect the speaker output terminals of the amplifier to the main speakers. ■ Using one set of the subwoofer to the INPUT1 terminals of the subwoofer, and connect the OUTPUT terminals of main speaker output terminals.
Owner's Manual
Page 14
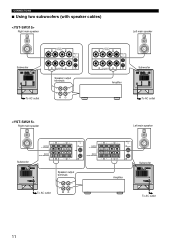
CONNECTIONS ■ Using two subwoofers (with speaker cables) Right main speaker Left main speaker Subwoofer Speaker output terminals To AC outlet Right main speaker Amplifier Subwoofer To AC outlet Left main speaker Subwoofer Speaker output terminals To AC outlet Amplifier Subwoofer To AC outlet 11
CONNECTIONS ■ Using two subwoofers (with speaker cables) Right main speaker Left main speaker Subwoofer Speaker output terminals To AC outlet Right main speaker Amplifier Subwoofer To AC outlet Left main speaker Subwoofer Speaker output terminals To AC outlet Amplifier Subwoofer To AC outlet 11
Owner's Manual
Page 15
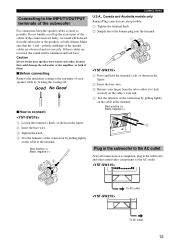
... the terminal's knob, as shown in the figure. 2 Insert the bare wire. 3 Tighten the knob. 4 Test the firmness of the subwoofer For connection, keep the speaker cables as short as shown in the figure. 2 Insert the bare wire. 3 Release your finger from the tab to allow it to ...the AC outlet After all connections are faulty, no sound will be heard from the subwoofer or the speakers, or both of them . Caution Do not let the bare speaker wires touch each speaker cable by pulling...
... the terminal's knob, as shown in the figure. 2 Insert the bare wire. 3 Tighten the knob. 4 Test the firmness of the subwoofer For connection, keep the speaker cables as short as shown in the figure. 2 Insert the bare wire. 3 Release your finger from the tab to allow it to ...the AC outlet After all connections are faulty, no sound will be heard from the subwoofer or the speakers, or both of them . Caution Do not let the bare speaker wires touch each speaker cable by pulling...
Owner's Manual
Page 17
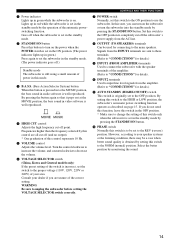
...by the operation of the automatic powerswitching function. Set this switch to the OFF position to completely cut off the subwoofer's power supply from the amplifier. (Refer to "CONNECTIONS" for details.) A AUTO STANDBY (HIGH/LOW/OFF) switch This switch is originally set to the OFF position. ...level signals from the AC line. 8 OUTPUT (TO SPEAKERS) terminals Can be used for details.) 9 INPUT1 (FROM AMPLIFIER) terminals Used to connect the subwoofer with the speaker terminals of power in this mode. 3 B.A.S.S. (Bass Action Selector System) button When this button is pressed in to the ...
...by the operation of the automatic powerswitching function. Set this switch to the OFF position to completely cut off the subwoofer's power supply from the amplifier. (Refer to "CONNECTIONS" for details.) A AUTO STANDBY (HIGH/LOW/OFF) switch This switch is originally set to the OFF position. ...level signals from the AC line. 8 OUTPUT (TO SPEAKERS) terminals Can be used for details.) 9 INPUT1 (FROM AMPLIFIER) terminals Used to connect the subwoofer with the speaker terminals of power in this mode. 3 B.A.S.S. (Bass Action Selector System) button When this button is pressed in to the ...
Owner's Manual
Page 22
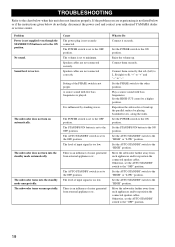
.../ON button is set to the OFF position. The AUTO STANDBY switch is set to the OFF position. What to the "HIGH" position. Connect them securely. Reposition the subwoofer or break up . Set the POWER switch to the "HIGH" or "LOW" position. It is L (left) to L, R (right) to R, "+" to... to the ON position. TROUBLESHOOTING Refer to the chart below do not help, disconnect the power cord and contact your authorized YAMAHA dealer or service center. Connect them correctly, that is influenced by placing bookshelves etc. No sound. Set the POWER switch to the "HIGH" or "...
.../ON button is set to the OFF position. The AUTO STANDBY switch is set to the OFF position. What to the "HIGH" position. Connect them securely. Reposition the subwoofer or break up . Set the POWER switch to the "HIGH" or "LOW" position. It is L (left) to L, R (right) to R, "+" to... to the ON position. TROUBLESHOOTING Refer to the chart below do not help, disconnect the power cord and contact your authorized YAMAHA dealer or service center. Connect them correctly, that is influenced by placing bookshelves etc. No sound. Set the POWER switch to the "HIGH" or "...