
Owner's Manual
Page 4
... This unit may cause damage to clean this unit with chemical solvents as that the unit is faulty. • Install this unit near the YST port of this manual carefully. For example, if 20 Hz-50 Hz sine waves from a test disc, bass sounds from windows, heat sources,... period (ie., vacation, etc.), disconnect the AC power plug from the rear panel. YAMAHA shall not be held responsible for selecting this might also cause personal injury and/or damage to this unit. • When using a humidifier, be the same as this YAMAHA subwoofer system. Never pull the wires themselves. •...
... This unit may cause damage to clean this unit with chemical solvents as that the unit is faulty. • Install this unit near the YST port of this manual carefully. For example, if 20 Hz-50 Hz sine waves from a test disc, bass sounds from windows, heat sources,... period (ie., vacation, etc.), disconnect the AC power plug from the rear panel. YAMAHA shall not be held responsible for selecting this might also cause personal injury and/or damage to this unit. • When using a humidifier, be the same as this YAMAHA subwoofer system. Never pull the wires themselves. •...

Owner's Manual
Page 5
... Canadian ICES-003. 1 CONTROLS AND THEIR FUNCTIONS 9 AUTOMATIC POWER-SWITCHING FUNCTION 11 Changing the AUTO STANDBY setting 11 ADJUSTING THE SUBWOOFER BEFORE USE 12 Frequency characteristics 13 ADVANCED YAMAHA ACTIVE SERVO TECHNOLOGY II 14 TROUBLESHOOTING 15 SPECIFICATIONS Backcover For Canadian... Customers To prevent electric shock, match wide blade of the subwoofer 8 Plug in the home are 110-120/220-240 ...
... Canadian ICES-003. 1 CONTROLS AND THEIR FUNCTIONS 9 AUTOMATIC POWER-SWITCHING FUNCTION 11 Changing the AUTO STANDBY setting 11 ADJUSTING THE SUBWOOFER BEFORE USE 12 Frequency characteristics 13 ADVANCED YAMAHA ACTIVE SERVO TECHNOLOGY II 14 TROUBLESHOOTING 15 SPECIFICATIONS Backcover For Canadian... Customers To prevent electric shock, match wide blade of the subwoofer 8 Plug in the home are 110-120/220-240 ...
Owner's Manual
Page 6
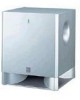
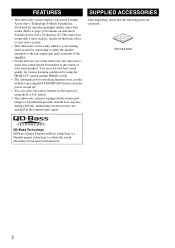
... pads QD-Bass Technology QD-Bass (Quatre Dispersion Bass) technology is equipped with a linear port unique to Yamaha that the following parts are contained. button. • This subwoofer system is a Yamaha unique technology to turn the power on and off. • You can select bass effect suitable for various listening conditions by using the...
... pads QD-Bass Technology QD-Bass (Quatre Dispersion Bass) technology is equipped with a linear port unique to Yamaha that the following parts are contained. button. • This subwoofer system is a Yamaha unique technology to turn the power on and off. • You can select bass effect suitable for various listening conditions by using the...

Owner's Manual
Page 9
...OFF VOLTAGE SELECTOR 220V-240V 110V-120V POWER ON OFF To AC outlet Amplifier OUTPUT TO SPEAKERS INPUT 2 L /MONO INPUT 1 R FROM AMPLIFIER CONNECTIONS Mono pin cable (not included) Audio pin cable (not included) ■Using two subwoofers OUTPUT TO SPEAKERS INPUT 2 L /... cable(not included) OUTPUT TO SPEAKERS INPUT 2 L /MONO Subwoofer INPUT 1 FROM AMPLIFIER R Subwoofer OUTPUT TO SPEAKERS INPUT 1 FROM AMPLIFIER INPUT PHASE 2 L /MONO NORM REV R AUTO STANDBY HIGH LOW OFF VOLTAGE SELECTOR 220V-240V 110V-120V POWER ON OFF OUTPUT TO SPEAKERS INPUT 1 FROM AMPLIFIER INPUT PHASE...
...OFF VOLTAGE SELECTOR 220V-240V 110V-120V POWER ON OFF To AC outlet Amplifier OUTPUT TO SPEAKERS INPUT 2 L /MONO INPUT 1 R FROM AMPLIFIER CONNECTIONS Mono pin cable (not included) Audio pin cable (not included) ■Using two subwoofers OUTPUT TO SPEAKERS INPUT 2 L /... cable(not included) OUTPUT TO SPEAKERS INPUT 2 L /MONO Subwoofer INPUT 1 FROM AMPLIFIER R Subwoofer OUTPUT TO SPEAKERS INPUT 1 FROM AMPLIFIER INPUT PHASE 2 L /MONO NORM REV R AUTO STANDBY HIGH LOW OFF VOLTAGE SELECTOR 220V-240V 110V-120V POWER ON OFF OUTPUT TO SPEAKERS INPUT 1 FROM AMPLIFIER INPUT PHASE...

Owner's Manual
Page 10
... HIGH LOW OFF VOLTAGE SELECTOR 220V-240V 110V-120V POWER ON OFF To AC outlet Speaker output terminals OUTPUT TO SPEAKERS INPUT 2 L /MONO Left front speaker INPUT 1 FROM AMPLIFIER R Amplifier ■Using two subwoofers (with speaker cables) Right front speaker Speaker output terminals...REV R AUTO STANDBY HIGH LOW OFF VOLTAGE SELECTOR 220V-240V 110V-120V POWER ON OFF To AC outlet OUTPUT TO SPEAKERS INPUT 2 L /MONO INPUT 1 R FROM AMPLIFIER OUTPUT TO SPEAKERS INPUT 1 FROM AMPLIFIER INPUT 2 L /MONO R Subwoofer OUTPUT TO SPEAKERS INPUT 1 FROM AMPLIFIER INPUT PHASE 2 L /MONO...
... HIGH LOW OFF VOLTAGE SELECTOR 220V-240V 110V-120V POWER ON OFF To AC outlet Speaker output terminals OUTPUT TO SPEAKERS INPUT 2 L /MONO Left front speaker INPUT 1 FROM AMPLIFIER R Amplifier ■Using two subwoofers (with speaker cables) Right front speaker Speaker output terminals...REV R AUTO STANDBY HIGH LOW OFF VOLTAGE SELECTOR 220V-240V 110V-120V POWER ON OFF To AC outlet OUTPUT TO SPEAKERS INPUT 2 L /MONO INPUT 1 R FROM AMPLIFIER OUTPUT TO SPEAKERS INPUT 1 FROM AMPLIFIER INPUT 2 L /MONO R Subwoofer OUTPUT TO SPEAKERS INPUT 1 FROM AMPLIFIER INPUT PHASE 2 L /MONO...

Owner's Manual
Page 11
... OUTPUT TO SPEAKERS INPUT 2 L /MONO R INPUT 1 FROM AMPLIFIER Amplifier Subwoofer OUTPUT TO SPEAKERS INPUT 1 FROM AMPLIFIER INPUT PHASE 2 L /MONO NORM REV R AUTO STANDBY HIGH LOW OFF VOLTAGE SELECTOR 220V-240V 110V-120V POWER ON OFF To AC outlet 7 Connect the speaker output terminals of the amplifier... to the INPUT1 terminals of the subwoofer, and connect the OUTPUT terminals of the subwoofer to the front speakers. ■Using one set of...
... OUTPUT TO SPEAKERS INPUT 2 L /MONO R INPUT 1 FROM AMPLIFIER Amplifier Subwoofer OUTPUT TO SPEAKERS INPUT 1 FROM AMPLIFIER INPUT PHASE 2 L /MONO NORM REV R AUTO STANDBY HIGH LOW OFF VOLTAGE SELECTOR 220V-240V 110V-120V POWER ON OFF To AC outlet 7 Connect the speaker output terminals of the amplifier... to the INPUT1 terminals of the subwoofer, and connect the OUTPUT terminals of the subwoofer to the front speakers. ■Using one set of...

Owner's Manual
Page 12
... the terminal. + 1 2 - 8 OUTPUT TO SPEAKERS INPUT 1 FROM AMPLIFIER INPUT PHASE 2 L /MONO NORM REV R AUTO STANDBY HIGH LOW OFF VOLTAGE SELECTOR 220V-240V 110V-120V POWER ON OFF To AC outlet Good 10mm (3/8") No Good ■How to connect: 1 Press and hold the terminal's tab, as possible. Make sure that the...firmness of the connection by pulling lightly on the cable at the extremity of each speaker cable by twisting the coating off. Plug in the subwoofer to the AC outlet After all connections are faulty, no sound will be heard from the tab to allow it to the AC outlet. ...
... the terminal. + 1 2 - 8 OUTPUT TO SPEAKERS INPUT 1 FROM AMPLIFIER INPUT PHASE 2 L /MONO NORM REV R AUTO STANDBY HIGH LOW OFF VOLTAGE SELECTOR 220V-240V 110V-120V POWER ON OFF To AC outlet Good 10mm (3/8") No Good ■How to connect: 1 Press and hold the terminal's tab, as possible. Make sure that the...firmness of the connection by pulling lightly on the cable at the extremity of each speaker cable by twisting the coating off. Plug in the subwoofer to the AC outlet After all connections are faulty, no sound will be heard from the tab to allow it to the AC outlet. ...
Owner's Manual
Page 13
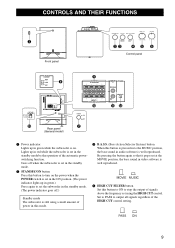
... OUTPUT TO SPEAKERS INPUT 1 FROM AMPLIFIER 0 POWER ON OFF 7 INPUT PHASE 2 L /MONO NORM REV R qw 1 Power indicator Lights up in green while the subwoofer is on the power when the POWER switch is set in the ON position. (The power indicator lights up in red while the subwoofer is well reproduced. 4 HIGH CUT FILTER button...is pressed in to stop the output of the HIGH CUT control setting. Lights up in green.) Press again to set the subwoofer in the standby mode. (The power indicator goes off when the subwoofer is set in the standby mode. 2 STANDBY/ON button Press this button to turn on .
... OUTPUT TO SPEAKERS INPUT 1 FROM AMPLIFIER 0 POWER ON OFF 7 INPUT PHASE 2 L /MONO NORM REV R qw 1 Power indicator Lights up in green while the subwoofer is on the power when the POWER switch is set in the ON position. (The power indicator lights up in red while the subwoofer is well reproduced. 4 HIGH CUT FILTER button...is pressed in to stop the output of the HIGH CUT control setting. Lights up in green.) Press again to set the subwoofer in the standby mode. (The power indicator goes off when the subwoofer is set in the standby mode. 2 STANDBY/ON button Press this button to turn on .

Owner's Manual
Page 14
... cut off point. In this switch is incorrect, set this switch to the HIGH or LOW position, the subwoofer's automatic power-switching function operates as described on the subwoofer or turn the subwoofer into the standby mode by monitoring the sound. A INPUT2 terminals Used to input line level signals from the ... speaker terminals of this switch to the NORM (normal) position. By setting this switch to the ON position to the proper voltage (110-120/220-240V) of your speaker systems or the listening condition, there may be a case when better sound quality is obtained by setting this ...
... cut off point. In this switch is incorrect, set this switch to the HIGH or LOW position, the subwoofer's automatic power-switching function operates as described on the subwoofer or turn the subwoofer into the standby mode by monitoring the sound. A INPUT2 terminals Used to input line level signals from the ... speaker terminals of this switch to the NORM (normal) position. By setting this switch to the ON position to the proper voltage (110-120/220-240V) of your speaker systems or the listening condition, there may be a case when better sound quality is obtained by setting this ...
Owner's Manual
Page 15
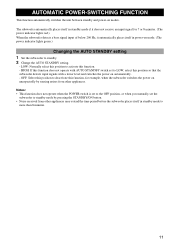
...activate this position to more than 8 minutes. 11 AUTOMATIC POWER-SWITCHING FUNCTION This function automatically switches the unit between standby and power-on mode. (The power indicator lights green.) Changing the AUTO STANDBY setting 1 Set the subwoofer to standby. 2 Change the AUTO STANDBY setting. - ... LOW, select this function, for 7 or 8 minutes. (The power indicator lights red.) When the subwoofer detects a bass signal input of below 200 Hz, it automatically places itself in power-on modes. The subwoofer automatically places itself in standby mode if it does not receive an...
...activate this position to more than 8 minutes. 11 AUTOMATIC POWER-SWITCHING FUNCTION This function automatically switches the unit between standby and power-on mode. (The power indicator lights green.) Changing the AUTO STANDBY setting 1 Set the subwoofer to standby. 2 Change the AUTO STANDBY setting. - ... LOW, select this function, for 7 or 8 minutes. (The power indicator lights red.) When the subwoofer detects a bass signal input of below 200 Hz, it automatically places itself in power-on modes. The subwoofer automatically places itself in standby mode if it does not receive an...

Owner's Manual
Page 16
... obtain the optimum volume and tone balance between the subwoofer and the front speakers by following the procedures described below. 7 3 3 8 5 1 NORM REV POWER ON OFF 1 Set the VOLUME control to minimum (0). 2 Turn on the power of your whole sound system by using the amplifier's volume ... which gives you can adjust the volume of all the other components. 3 Make sure that the POWER switch is set the switch to "Frequency characteristics" on the subwoofer. * The Power indicator lights up in green. 4 Play a source containing low-frequency components and adjust the amplifier's...
... obtain the optimum volume and tone balance between the subwoofer and the front speakers by following the procedures described below. 7 3 3 8 5 1 NORM REV POWER ON OFF 1 Set the VOLUME control to minimum (0). 2 Turn on the power of your whole sound system by using the amplifier's volume ... which gives you can adjust the volume of all the other components. 3 Make sure that the POWER switch is set the switch to "Frequency characteristics" on the subwoofer. * The Power indicator lights up in green. 4 Play a source containing low-frequency components and adjust the amplifier's...

Owner's Manual
Page 19
...subwoofer or break up . Set the STANDBY/ON button to the STANDBY position. Move the subwoofer...OFF" position. Move the subwoofer farther away from such appliances ... AUTO STANDBY switch to the OFF position. The POWER switch is too low. The level of the ... waves. No sound. The POWER switch is played. What to...subwoofer does not turn into the standby mode unexpectedly. The subwoofer turns into the standby mode automatically. Set the POWER switch to the OFF position. Set the POWER...power plug is too low. Set the AUTO STANDBY switch to the "HIGH" position. The subwoofer...
...subwoofer or break up . Set the STANDBY/ON button to the STANDBY position. Move the subwoofer...OFF" position. Move the subwoofer farther away from such appliances ... AUTO STANDBY switch to the OFF position. The POWER switch is too low. The level of the ... waves. No sound. The POWER switch is played. What to...subwoofer does not turn into the standby mode unexpectedly. The subwoofer turns into the standby mode automatically. Set the POWER switch to the OFF position. Set the POWER...power plug is too low. Set the AUTO STANDBY switch to the "HIGH" position. The subwoofer...


