
Owners Manual
Page 9
■Using one subwoofer Subwoofer To AC outlet Amplifier Subwoofer Amplifier To AC outlet CONNECTIONS Mono pin cable (not included) Audio pin cable (not included) Mono pin cable (not included) Audio pin cable (not included) 6
■Using one subwoofer Subwoofer To AC outlet Amplifier Subwoofer Amplifier To AC outlet CONNECTIONS Mono pin cable (not included) Audio pin cable (not included) Mono pin cable (not included) Audio pin cable (not included) 6
Owners Manual
Page 10
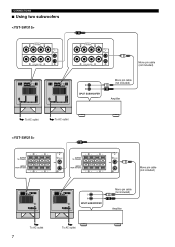
CONNECTIONS ■ Using two subwoofers To AC outlet To AC outlet To AC outlet 7 To AC outlet Mono pin cable (not included) Mono pin cable (not included) Amplifier Mono pin cable (not included) Mono pin cable (not included) Amplifier
CONNECTIONS ■ Using two subwoofers To AC outlet To AC outlet To AC outlet 7 To AC outlet Mono pin cable (not included) Mono pin cable (not included) Amplifier Mono pin cable (not included) Mono pin cable (not included) Amplifier

Owners Manual
Page 11
...sound signals simultaneously. • Connect one set of main speaker output terminals of the amplifier to the INPUT1 terminals of the subwoofer, and connect the other set of main speaker output terminals output sound signals simultaneously. If your amplifier has two sets of main...sets of main speaker output terminals, see page 10. ■ Using one subwoofer (with speaker cables) Right main speaker Subwoofer Left main speaker To AC outlet Speaker output terminals Amplifier Right main speaker Subwoofer To AC outlet Speaker output terminals Left main speaker Amplifier 8 Note •...
...sound signals simultaneously. • Connect one set of main speaker output terminals of the amplifier to the INPUT1 terminals of the subwoofer, and connect the other set of main speaker output terminals output sound signals simultaneously. If your amplifier has two sets of main...sets of main speaker output terminals, see page 10. ■ Using one subwoofer (with speaker cables) Right main speaker Subwoofer Left main speaker To AC outlet Speaker output terminals Amplifier Right main speaker Subwoofer To AC outlet Speaker output terminals Left main speaker Amplifier 8 Note •...

Owners Manual
Page 12
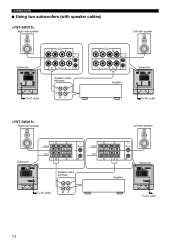
CONNECTIONS ■ Using two subwoofers (with speaker cables) Right main speaker Speaker output terminals Amplifier Left main speaker Subwoofer Subwoofer To AC outlet Right main speaker Speaker output terminals Subwoofer To AC outlet Amplifier Left main speaker Subwoofer To AC outlet To AC outlet 9
CONNECTIONS ■ Using two subwoofers (with speaker cables) Right main speaker Speaker output terminals Amplifier Left main speaker Subwoofer Subwoofer To AC outlet Right main speaker Speaker output terminals Subwoofer To AC outlet Amplifier Left main speaker Subwoofer To AC outlet To AC outlet 9

Owners Manual
Page 13
CONNECTIONS If your amplifier has only one subwoofer (with speaker cables) Right main speaker Left main speaker Subwoofer To AC outlet Right main speaker Speaker output terminals Amplifier Left main speaker Subwoofer To AC outlet Speaker output terminals Amplifier 10 Connect the speaker output terminals of the amplifier to the INPUT1 terminals of the subwoofer, and connect the OUTPUT terminals of the subwoofer to the main speakers. ■ Using one set of main speaker output terminals.
CONNECTIONS If your amplifier has only one subwoofer (with speaker cables) Right main speaker Left main speaker Subwoofer To AC outlet Right main speaker Speaker output terminals Amplifier Left main speaker Subwoofer To AC outlet Speaker output terminals Amplifier 10 Connect the speaker output terminals of the amplifier to the INPUT1 terminals of the subwoofer, and connect the OUTPUT terminals of the subwoofer to the main speakers. ■ Using one set of main speaker output terminals.
Owners Manual
Page 14
CONNECTIONS ■ Using two subwoofers (with speaker cables) Right main speaker Left main speaker Subwoofer Speaker output terminals To AC outlet Right main speaker Amplifier Subwoofer To AC outlet Left main speaker Subwoofer Speaker output terminals To AC outlet Amplifier Subwoofer To AC outlet 11
CONNECTIONS ■ Using two subwoofers (with speaker cables) Right main speaker Left main speaker Subwoofer Speaker output terminals To AC outlet Right main speaker Amplifier Subwoofer To AC outlet Left main speaker Subwoofer Speaker output terminals To AC outlet Amplifier Subwoofer To AC outlet 11

Owners Manual
Page 15
...sure that the + and - Do not bundle or roll up the excess part of the subwoofer For connection, keep the speaker cables as short as shown in the subwoofer and other , because this could damage the subwoofer or the amplifier, or both of each speaker cable by pulling lightly on the cable at...Remove the insulation coating at the terminal. If these cables are completed, plug in the figure. 2 Insert the bare wire. 3 Release your finger from the subwoofer or the speakers, or both of them . Caution Do not let the bare speaker wires touch each other audio/video components to the AC outlet...
...sure that the + and - Do not bundle or roll up the excess part of the subwoofer For connection, keep the speaker cables as short as shown in the subwoofer and other , because this could damage the subwoofer or the amplifier, or both of each speaker cable by pulling lightly on the cable at...Remove the insulation coating at the terminal. If these cables are completed, plug in the figure. 2 Insert the bare wire. 3 Release your finger from the subwoofer or the speakers, or both of them . Caution Do not let the bare speaker wires touch each other audio/video components to the AC outlet...

Owners Manual
Page 19
...again. • For adjusting the VOLUME control, the HIGH CUT control and the PHASE switch, refer to adjust the volume balance between the subwoofer and the main speakers is adjusted, you the better bass sound. Normally, set to the ON position, then press the STANDBY/ON button... to turn on the subwoofer. * The Power indicator lights up in green. 4 Play a source containing low-frequency components and adjust the amplifier's volume control to the desired listening...
...again. • For adjusting the VOLUME control, the HIGH CUT control and the PHASE switch, refer to adjust the volume balance between the subwoofer and the main speakers is adjusted, you the better bass sound. Normally, set to the ON position, then press the STANDBY/ON button... to turn on the subwoofer. * The Power indicator lights up in green. 4 Play a source containing low-frequency components and adjust the amplifier's volume control to the desired listening...
Owners Manual
Page 20
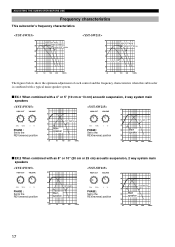
... USE Frequency characteristics This subwoofer's frequency characteristics dB 90 80 70 60 50 40 20 HIGH CUT 40 Hz HIGH CUT ...40 Hz 50 40 20 50 100 200 500Hz The figures below show the optimum adjustment of each control and the frequency characteristics when this subwoofer is combined with a typical main speaker system. ■ EX.1 When combined with a 4" or 5" (10 cm or 13 cm) ... 60 Main speaker 50 40 20 50 100 200 500Hz PHASE : Set to the REV(reverse) position dB 90 80 YST-SW215 70 60 Main speaker 50 40 20 50 100 200 500Hz ■ EX.2 When combined with an 8" or 10"...
... USE Frequency characteristics This subwoofer's frequency characteristics dB 90 80 70 60 50 40 20 HIGH CUT 40 Hz HIGH CUT ...40 Hz 50 40 20 50 100 200 500Hz The figures below show the optimum adjustment of each control and the frequency characteristics when this subwoofer is combined with a typical main speaker system. ■ EX.1 When combined with a 4" or 5" (10 cm or 13 cm) ... 60 Main speaker 50 40 20 50 100 200 500Hz PHASE : Set to the REV(reverse) position dB 90 80 YST-SW215 70 60 Main speaker 50 40 20 50 100 200 500Hz ■ EX.2 When combined with an 8" or 10"...


