Owners Manual
Page 4
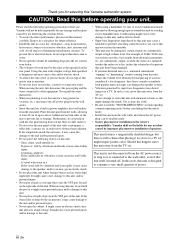
... frequency, bass-heavy sounds or similarly loud popular music passages can be held responsible for a long period (ie., vacation, etc.), disconnect the AC power plug from the rear panel. are continuously output at least 20 cm of the unit to clean this unit with a newspaper, a tablecloth, a ...test disc, bass sounds from windows, heat sources, sources of this Yamaha subwoofer system. This unit is not disconnected from the AC power source as long as that the unit is faulty. • Install this unit near the YST port of excessive vibration, dust, moisture and cold. Thank you ...
... frequency, bass-heavy sounds or similarly loud popular music passages can be held responsible for a long period (ie., vacation, etc.), disconnect the AC power plug from the rear panel. are continuously output at least 20 cm of the unit to clean this unit with a newspaper, a tablecloth, a ...test disc, bass sounds from windows, heat sources, sources of this Yamaha subwoofer system. This unit is not disconnected from the AC power source as long as that the unit is faulty. • Install this unit near the YST port of excessive vibration, dust, moisture and cold. Thank you ...
Owners Manual
Page 5
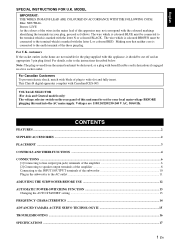
...which is coloured BROWN must be connected to the AC outlet ...11 ADJUSTING THE SUBWOOFER BEFORE USE ...12 AUTOMATIC POWER-SWITCHING FUNCTION 13 Changing the AUTO STANDBY setting ...13 FREQUENCY CHARACTERISTICS ...14 ADVANCED YAMAHA ACTIVE SERVO TECHNOLOGY II 15 TROUBLESHOOTING ...16 SPECIFICATIONS ...17 1 En Making sure that... LEAD ARE COLOURED IN ACCORDANCE WITH THE FOLLOWING CODE: Blue: NEUTRAL Brown: LIVE As the colours of the wires in the subwoofer to the terminal which is hazardous if engaged in your local main voltage BEFORE plugging this appliance, it should be set for ...
...which is coloured BROWN must be connected to the AC outlet ...11 ADJUSTING THE SUBWOOFER BEFORE USE ...12 AUTOMATIC POWER-SWITCHING FUNCTION 13 Changing the AUTO STANDBY setting ...13 FREQUENCY CHARACTERISTICS ...14 ADVANCED YAMAHA ACTIVE SERVO TECHNOLOGY II 15 TROUBLESHOOTING ...16 SPECIFICATIONS ...17 1 En Making sure that... LEAD ARE COLOURED IN ACCORDANCE WITH THE FOLLOWING CODE: Blue: NEUTRAL Brown: LIVE As the colours of the wires in the subwoofer to the terminal which is hazardous if engaged in your local main voltage BEFORE plugging this appliance, it should be set for ...
Owners Manual
Page 6
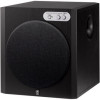
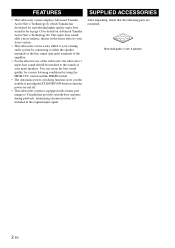
...signal. Non-skid pads (1 set: 4 pieces) 2 En FEATURES SUPPLIED ACCESSORIES • This subwoofer system employs Advanced Yamaha Active Servo Technology II, which Yamaha has developed for details on Advanced Yamaha Active Servo Technology II). You can be easily added to your existing audio system by connecting ...trouble of pressing the STANDBY/ON button to turn the power on and off. • This subwoofer system is equipped with a linear port unique to page 15 for reproducing higher quality super-bass sound (refer to Yamaha that the following parts are contained. This super-bass ...
...signal. Non-skid pads (1 set: 4 pieces) 2 En FEATURES SUPPLIED ACCESSORIES • This subwoofer system employs Advanced Yamaha Active Servo Technology II, which Yamaha has developed for details on Advanced Yamaha Active Servo Technology II). You can be easily added to your existing audio system by connecting ...trouble of pressing the STANDBY/ON button to turn the power on and off. • This subwoofer system is equipped with a linear port unique to page 15 for reproducing higher quality super-bass sound (refer to Yamaha that the following parts are contained. This super-bass ...
Owners Manual
Page 8
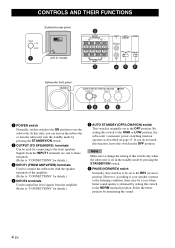
... 6 Subwoofer front panel SUBWOOFER SYSTEM YST-RSW300 STANDBY/ON HIGH CUT VOLUME 78 40Hz 140Hz 9 0 10 0 1 POWER switch Normally, set this switch to the ON position to the HIGH or LOW position, the subwoofer's automatic power-switching function operates as described on the subwoofer or turn the subwoofer into... may be set in the OFF position. CONTROLS AND THEIR FUNCTIONS 1 Subwoofer rear panel OUTPUT TO SPEAKERS INPUT 1 FROM AMPLIFIER INPUT 2 AUTO STANDBY PHASE /MONO OFF HIGH LOW NORM REV POWER ON OFF (U.S.A. Signals from the INPUT1 terminals are sent to these terminals...
... 6 Subwoofer front panel SUBWOOFER SYSTEM YST-RSW300 STANDBY/ON HIGH CUT VOLUME 78 40Hz 140Hz 9 0 10 0 1 POWER switch Normally, set this switch to the ON position to the HIGH or LOW position, the subwoofer's automatic power-switching function operates as described on the subwoofer or turn the subwoofer into... may be set in the OFF position. CONTROLS AND THEIR FUNCTIONS 1 Subwoofer rear panel OUTPUT TO SPEAKERS INPUT 1 FROM AMPLIFIER INPUT 2 AUTO STANDBY PHASE /MONO OFF HIGH LOW NORM REV POWER ON OFF (U.S.A. Signals from the INPUT1 terminals are sent to these terminals...
Owners Manual
Page 9
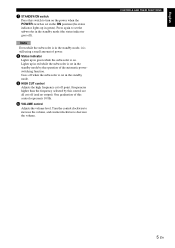
...10 Hz. 0 VOLUME control Adjusts the volume level. One graduation of power. 8 Status indicator Lights up in green while the subwoofer is set in the ON position (the status indicator lights up in red while the subwoofer is set the subwoofer in the standby mode. 9 HIGH CUT control Adjusts the high frequency...off ). English 7 STANDBY/ON switch Press this switch to turn on the power when the POWER switch is on. Goes off point. Lights up in the standby mode by this control are all cut off when the subwoofer is set in green). Press again to decrease the volume. Turn the ...
...10 Hz. 0 VOLUME control Adjusts the volume level. One graduation of power. 8 Status indicator Lights up in green while the subwoofer is set in the ON position (the status indicator lights up in red while the subwoofer is set the subwoofer in the standby mode. 9 HIGH CUT control Adjusts the high frequency...off ). English 7 STANDBY/ON switch Press this switch to turn on the power when the POWER switch is on. Goes off point. Lights up in the standby mode by this control are all cut off when the subwoofer is set in green). Press again to decrease the volume. Turn the ...

Owners Manual
Page 11
... (not included) ■ Using two subwoofers OUTPUT TO SPEAKERS R L INPUT 2 L /MONO R L FROM AMPLIFIER R INPUT 1 Subwoofer OUTPUT TO SPEAKERS INPUT 1 FROM AMPLIFIER INPUT 2 AUTO STANDBY PHASE /MONO OFF HIGH LOW NORM REV POWER ON OFF Subwoofer OUTPUT TO SPEAKERS INPUT 1 FROM AMPLIFIER ...INPUT 2 AUTO STANDBY PHASE /MONO OFF HIGH LOW NORM REV POWER ON OFF Mono pin cable (not included) OUTPUT TO SPEAKERS R L INPUT 2...
... (not included) ■ Using two subwoofers OUTPUT TO SPEAKERS R L INPUT 2 L /MONO R L FROM AMPLIFIER R INPUT 1 Subwoofer OUTPUT TO SPEAKERS INPUT 1 FROM AMPLIFIER INPUT 2 AUTO STANDBY PHASE /MONO OFF HIGH LOW NORM REV POWER ON OFF Subwoofer OUTPUT TO SPEAKERS INPUT 1 FROM AMPLIFIER ...INPUT 2 AUTO STANDBY PHASE /MONO OFF HIGH LOW NORM REV POWER ON OFF Mono pin cable (not included) OUTPUT TO SPEAKERS R L INPUT 2...
Owners Manual
Page 12
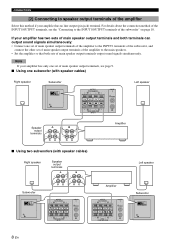
... both terminals can output sound signals simultaneously: • Connect one subwoofer (with speaker cables) Right speaker Subwoofer OUTPUT TO SPEAKERS INPUT 1 FROM AMPLIFIER INPUT 2 AUTO STANDBY PHASE /MONO OFF HIGH LOW NORM REV POWER ON OFF OUTPUT TO SPEAKERS R L INPUT 2 L /MONO...AUTO STANDBY PHASE /MONO OFF HIGH LOW NORM REV POWER ON OFF 8 En OUTPUT TO SPEAKERS R L INPUT 2 L /MONO R L FROM AMPLIFIER R INPUT 1 Amplifier OUTPUT TO SPEAKERS R L INPUT 2 L /MONO R L INPUT 1 R FROM AMPLIFIER Subwoofer OUTPUT TO SPEAKERS INPUT 1 FROM AMPLIFIER INPUT 2 ...
... both terminals can output sound signals simultaneously: • Connect one subwoofer (with speaker cables) Right speaker Subwoofer OUTPUT TO SPEAKERS INPUT 1 FROM AMPLIFIER INPUT 2 AUTO STANDBY PHASE /MONO OFF HIGH LOW NORM REV POWER ON OFF OUTPUT TO SPEAKERS R L INPUT 2 L /MONO...AUTO STANDBY PHASE /MONO OFF HIGH LOW NORM REV POWER ON OFF 8 En OUTPUT TO SPEAKERS R L INPUT 2 L /MONO R L FROM AMPLIFIER R INPUT 1 Amplifier OUTPUT TO SPEAKERS R L INPUT 2 L /MONO R L INPUT 1 R FROM AMPLIFIER Subwoofer OUTPUT TO SPEAKERS INPUT 1 FROM AMPLIFIER INPUT 2 ...
Owners Manual
Page 13
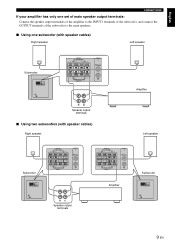
... SPEAKERS R L INPUT 2 L /MONO R L FROM AMPLIFIER R INPUT 1 Amplifier Speaker output terminals ■ Using two subwoofers (with speaker cables) Right speaker Left speaker Subwoofer OUTPUT TO SPEAKERS INPUT 1 FROM AMPLIFIER INPUT 2 AUTO STANDBY PHASE /MONO OFF HIGH LOW NORM REV POWER ON OFF OUTPUT TO SPEAKERS R L INPUT 2 L /MONO R L FROM AMPLIFIER R INPUT 1 Speaker output terminals OUTPUT...
... SPEAKERS R L INPUT 2 L /MONO R L FROM AMPLIFIER R INPUT 1 Amplifier Speaker output terminals ■ Using two subwoofers (with speaker cables) Right speaker Left speaker Subwoofer OUTPUT TO SPEAKERS INPUT 1 FROM AMPLIFIER INPUT 2 AUTO STANDBY PHASE /MONO OFF HIGH LOW NORM REV POWER ON OFF OUTPUT TO SPEAKERS R L INPUT 2 L /MONO R L FROM AMPLIFIER R INPUT 1 Speaker output terminals OUTPUT...
Owners Manual
Page 15
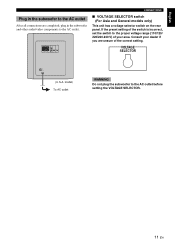
...is incorrect, set the switch to the proper voltage range (110/120/ 220/230-240 V) of the correct setting. VOLTAGE SELECTOR POWER ON OFF (U.S.A. Consult your area. English Plug in the subwoofer to the AC outlet After all connections are unsure of your dealer if you are completed, plug in the... subwoofer and other audio/video components to the AC outlet. model) To AC outlet WARNING Do not plug the subwoofer to the AC outlet before setting...
...is incorrect, set the switch to the proper voltage range (110/120/ 220/230-240 V) of the correct setting. VOLTAGE SELECTOR POWER ON OFF (U.S.A. Consult your area. English Plug in the subwoofer to the AC outlet After all connections are unsure of your dealer if you are completed, plug in the... subwoofer and other audio/video components to the AC outlet. model) To AC outlet WARNING Do not plug the subwoofer to the AC outlet before setting...
Owners Manual
Page 16
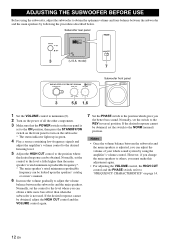
...STANDBY PHASE /MONO OFF HIGH LOW NORM REV POWER ON OFF NORM REV 3 (U.S.A. Normally, set the control to the NORM (normal) position. model) 7 SUBWOOFER SYSTEM YST-RSW300 STANDBY/ON HIGH CUT VOLUME 40Hz 140Hz 0 10 3 5,6 1,6 Subwoofer front panel 1 Set the VOLUME control to ...minimum (0). 2 Turn on the power of your whole sound system by using the subwoofer, adjust the subwoofer to obtain the optimum volume...
...STANDBY PHASE /MONO OFF HIGH LOW NORM REV POWER ON OFF NORM REV 3 (U.S.A. Normally, set the control to the NORM (normal) position. model) 7 SUBWOOFER SYSTEM YST-RSW300 STANDBY/ON HIGH CUT VOLUME 40Hz 140Hz 0 10 3 5,6 1,6 Subwoofer front panel 1 Set the VOLUME control to ...minimum (0). 2 Turn on the power of your whole sound system by using the subwoofer, adjust the subwoofer to obtain the optimum volume...

Owners Manual
Page 17
...to more than 8 minutes. 13 En When the subwoofer detects a bass signal input of below 200 Hz, it does not receive an input signal for example, when the subwoofer switches the power on automatically. - The subwoofer automatically places itself in standby mode if it automatically ...places itself in power-on modes. - LOW: Normally select this position to activate this position so that the subwoofer detects input signals with AUTO...
...to more than 8 minutes. 13 En When the subwoofer detects a bass signal input of below 200 Hz, it does not receive an input signal for example, when the subwoofer switches the power on automatically. - The subwoofer automatically places itself in standby mode if it automatically ...places itself in power-on modes. - LOW: Normally select this position to activate this position so that the subwoofer detects input signals with AUTO...
Owners Manual
Page 20
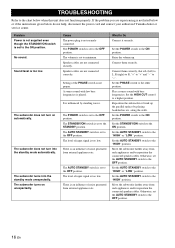
... proper. There is an influence of the PHASE switch is set to the chart below do not help, disconnect the power cord and contact your authorized Yamaha dealer or service center. Connect them correctly, that is set to the ON position. Connect them securely. Set the.... The STANDBY/ON switch is L (left) to L, R (right) to R, "+" to "+" and "-" to a higher position. Reposition the subwoofer or break up . Move the subwoofer farther away from such appliances and/or reposition the connected speaker cables. Set the AUTO STANDBY switch to the STANDBY position. Move the...
... proper. There is an influence of the PHASE switch is set to the chart below do not help, disconnect the power cord and contact your authorized Yamaha dealer or service center. Connect them correctly, that is set to the ON position. Connect them securely. Set the.... The STANDBY/ON switch is L (left) to L, R (right) to R, "+" to "+" and "-" to a higher position. Reposition the subwoofer or break up . Move the subwoofer farther away from such appliances and/or reposition the connected speaker cables. Set the AUTO STANDBY switch to the STANDBY position. Move the...


