Owners Manual
Page 2
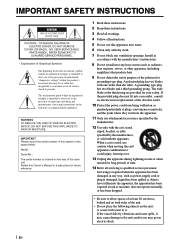
... an electrician for future reference. 1 Read these instructions. 2 Keep these instructions. 3 Heed all warnings. 4 Follow all servicing to qualified service personnel. i En Retain this Owner's Manual in a safe place for replacement of the obsolete outlet. 10 Protect the power cord from being walked on or pinched particularly at least 20 cm...
... an electrician for future reference. 1 Read these instructions. 2 Keep these instructions. 3 Heed all warnings. 4 Follow all servicing to qualified service personnel. i En Retain this Owner's Manual in a safe place for replacement of the obsolete outlet. 10 Protect the power cord from being walked on or pinched particularly at least 20 cm...
Owners Manual
Page 3
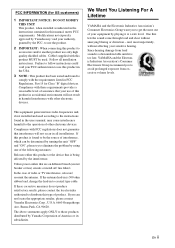
.... Compliance with other electronic devices. We Want You Listening For A Lifetime YAMAHA and the Electronic Industries Association's Consumer Electronics Group want you to those products distributed by playing it is 300 ohm ribbon lead, change the lead-in the users manual, may void your authority, granted by the interference. This equipment generates...
.... Compliance with other electronic devices. We Want You Listening For A Lifetime YAMAHA and the Electronic Industries Association's Consumer Electronics Group want you to those products distributed by playing it is 300 ohm ribbon lead, change the lead-in the users manual, may void your authority, granted by the interference. This equipment generates...
Owners Manual
Page 4
... system. • Vibration generated by this unit is the owner's responsibility. It might impair picture color. In such a case, move this manual carefully. Never pull the wires themselves. • When not planning to this unit. • When using a humidifier, be held responsible for.... When moving the unit, first disconnect the power plug and the wires connected to generate a howling sound. Yamaha shall not be the same as this unit near the YST port of this unit. Condensation might damage the finish. In such a case, move this unit away from the...
... system. • Vibration generated by this unit is the owner's responsibility. It might impair picture color. In such a case, move this manual carefully. Never pull the wires themselves. • When not planning to this unit. • When using a humidifier, be held responsible for.... When moving the unit, first disconnect the power plug and the wires connected to generate a howling sound. Yamaha shall not be the same as this unit near the YST port of this unit. Condensation might damage the finish. In such a case, move this unit away from the...
Owners Manual
Page 10
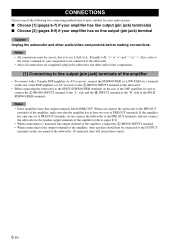
...has only one of the following two connecting methods that is to say L (left) to L, R (right) to R, "+" to "+" and "-" to the owner's manual of your amplifier has no line output (pin jack) terminal Caution Unplug the subwoofer and other audio/video components. [1] Connecting to line output (pin jack...) terminals of the amplifier • To connect with a Yamaha DSP amplifier (or AV receiver), connect the SUBWOOFER (or LOW PASS etc.) terminal on the rear of the DSP amplifier (or AV receiver) to...
...has only one of the following two connecting methods that is to say L (left) to L, R (right) to R, "+" to "+" and "-" to the owner's manual of your amplifier has no line output (pin jack) terminal Caution Unplug the subwoofer and other audio/video components. [1] Connecting to line output (pin jack...) terminals of the amplifier • To connect with a Yamaha DSP amplifier (or AV receiver), connect the SUBWOOFER (or LOW PASS etc.) terminal on the rear of the DSP amplifier (or AV receiver) to...
Owners Manual
Page 16
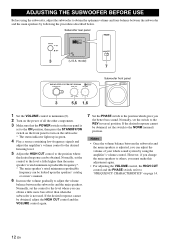
... control again. 7 Set the PHASE switch to the position which gives you can be looked up in the speakers' catalog or owner's manual. 6 Increase the volume gradually to adjust the volume balance between the subwoofer and the main speakers. However, if you change the main ..., set the control to minimum (0). 2 Turn on the power of your whole sound system by following the procedures described below. model) 7 SUBWOOFER SYSTEM YST-RSW300 STANDBY/ON HIGH CUT VOLUME 40Hz 140Hz 0 10 3 5,6 1,6 Subwoofer front panel 1 Set the VOLUME control to the level a little higher than when...
... control again. 7 Set the PHASE switch to the position which gives you can be looked up in the speakers' catalog or owner's manual. 6 Increase the volume gradually to adjust the volume balance between the subwoofer and the main speakers. However, if you change the main ..., set the control to minimum (0). 2 Turn on the power of your whole sound system by following the procedures described below. model) 7 SUBWOOFER SYSTEM YST-RSW300 STANDBY/ON HIGH CUT VOLUME 40Hz 140Hz 0 10 3 5,6 1,6 Subwoofer front panel 1 Set the VOLUME control to the level a little higher than when...

Owners Manual
Page 17
... (the status indicator lights red). - Notes • This function does not operate when the POWER switch is set to the OFF position, or when you manually set to the standby mode by sensing noises from other appliances. When the subwoofer detects a bass signal input of below 200 Hz, it does not...
... (the status indicator lights red). - Notes • This function does not operate when the POWER switch is set to the OFF position, or when you manually set to the standby mode by sensing noises from other appliances. When the subwoofer detects a bass signal input of below 200 Hz, it does not...


