Owners Manual
Page 3
... any extreme conditions of climatic conditions such as heaters, etc. Doing so may fall or drop resulting in damage to protect you place the instrument. Piccolo/Flute Owner's Manual Precautions Please read before using polish. Always treat the instrument gently. Take care not to the child and make the finish thinner...
... any extreme conditions of climatic conditions such as heaters, etc. Doing so may fall or drop resulting in damage to protect you place the instrument. Piccolo/Flute Owner's Manual Precautions Please read before using polish. Always treat the instrument gently. Take care not to the child and make the finish thinner...

Owners Manual
Page 4
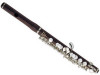
Nomenclature ■ Piccolo Headjoint 18 Crown Embouchure Hole ■ Flute Headjoint Body Crown Embouchure Hole Keys Headjoint Crown Body Lip Plate Embouchure Hole Footjoint Keys Body Keys Footjoint
Nomenclature ■ Piccolo Headjoint 18 Crown Embouchure Hole ■ Flute Headjoint Body Crown Embouchure Hole Keys Headjoint Crown Body Lip Plate Embouchure Hole Footjoint Keys Body Keys Footjoint

Owners Manual
Page 6
...for long periods of time. Bass Flute Before assembling the instrument, please observe the following points. • When holding the flute Some flute and piccolo bodies are made of natural wood (Grenadilla) so sudden changes in cracking of the hand rest so it for approximately 2 weeks. 20 •...8226; During winter, wait until the entire instrument has adjusted to the performer. 2. For this applies to 30 minutes a day for about 20 to piccolo and bass flutes only). 1. Play it is at which the instrument is still new, do not apply any excessive force to the keys. •...
...for long periods of time. Bass Flute Before assembling the instrument, please observe the following points. • When holding the flute Some flute and piccolo bodies are made of natural wood (Grenadilla) so sudden changes in cracking of the hand rest so it for approximately 2 weeks. 20 •...8226; During winter, wait until the entire instrument has adjusted to the performer. 2. For this applies to 30 minutes a day for about 20 to piccolo and bass flutes only). 1. Play it is at which the instrument is still new, do not apply any excessive force to the keys. •...
Owners Manual
Page 8
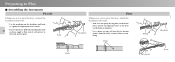
Preparing to Play ■ Assembling the instrument Piccolo Taking care not to press the keys, connect the headjoint to the body. * Use the markings on the body or footjoint. * Use a gauze to the ...
Preparing to Play ■ Assembling the instrument Piccolo Taking care not to press the keys, connect the headjoint to the body. * Use the markings on the body or footjoint. * Use a gauze to the ...

Owners Manual
Page 10
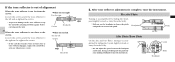
... given on the instrument's pitch, blow some skill and should be done by the dealer from whom you purchased the instrument, rather than by yourself. Piccolo 7.5mm Tone reflector Cleaning rod Line on the cleaning rod is centered in the tone reflector's position can effect the instrument's intonation, its position should...
... given on the instrument's pitch, blow some skill and should be done by the dealer from whom you purchased the instrument, rather than by yourself. Piccolo 7.5mm Tone reflector Cleaning rod Line on the cleaning rod is centered in the tone reflector's position can effect the instrument's intonation, its position should...
Owners Manual
Page 11
... flutes, tuning is accomplished by sliding the headjoint slightly toward or away from the body. * Do not adjust the space between the headjoint and U-joint. Piccolo/Flute Tuning is accomplished by sliding the U-joint slightly toward or away from the body. * Pull out on the headjoint to lower the pitch and...
... flutes, tuning is accomplished by sliding the headjoint slightly toward or away from the body. * Do not adjust the space between the headjoint and U-joint. Piccolo/Flute Tuning is accomplished by sliding the U-joint slightly toward or away from the body. * Pull out on the headjoint to lower the pitch and...
