Owners Manual
Page 4
... standby mode, and disconnect the power supply cable from cold to hot, and do not place: - Using this unit with the letter N or coloured BLACK. Yamaha will form when the surrounding temperature changes suddenly. The cabinet should be destroyed, as a plug with bared flexible cord is hazardous if engaged in them, as sunshine, fire or like. 21 Secure placement or installation...
... standby mode, and disconnect the power supply cable from cold to hot, and do not place: - Using this unit with the letter N or coloured BLACK. Yamaha will form when the surrounding temperature changes suddenly. The cabinet should be destroyed, as a plug with bared flexible cord is hazardous if engaged in them, as sunshine, fire or like. 21 Secure placement or installation...
Owners Manual
Page 5
... Connecting Blu-ray disc player or set-top box 13 BASIC OPERATION Basic playback operation 14 Enjoying sound modes 15 Surround mode 15 Stereo mode 15 UniVolume 15 Listening to FM broadcasts 16 Basic tuning operation 16 Editing the preset FM station 16 Using optional equipment 18 Connecting dock 18 Using iPod 18 Using Bluetooth™ components 19 USEFUL OPERATION Setup menu 20 Overview 20 Basic procedure 20 Adjusting the volume balance during playback 21 Adjusting high/low frequency sound (tone control 21 Adjusting the audio delay 21 Setting the audio output 21 Switching...
... Connecting Blu-ray disc player or set-top box 13 BASIC OPERATION Basic playback operation 14 Enjoying sound modes 15 Surround mode 15 Stereo mode 15 UniVolume 15 Listening to FM broadcasts 16 Basic tuning operation 16 Editing the preset FM station 16 Using optional equipment 18 Connecting dock 18 Using iPod 18 Using Bluetooth™ components 19 USEFUL OPERATION Setup menu 20 Overview 20 Basic procedure 20 Adjusting the volume balance during playback 21 Adjusting high/low frequency sound (tone control 21 Adjusting the audio delay 21 Setting the audio output 21 Switching...

Owners Manual
Page 7
...9758; P. 14) ■ Rear panel of the subwoofer integrated receiver 7 6 5 43 1 1 Power Cable For connecting an AC wall outlet. (☞ P. 12) 2 HDMI IN 1 - 3/HDMI OUT • HDMI IN 1 - 3 for connecting HDMI compatible external components. (☞ P. 13) • HDMI OUT for connecting an HDMI compatible TV. (☞ P. 13) 3 DIGITAL IN jack For connecting optical digital cable to the TV. (☞ P. 13) 2 4 ANALOG INPUT jack For connecting analog audio cable to external components. (☞ P. 12) 5 DOCK terminal For connecting an optional Yamaha iPod universal dock (such as YDS-11...
...9758; P. 14) ■ Rear panel of the subwoofer integrated receiver 7 6 5 43 1 1 Power Cable For connecting an AC wall outlet. (☞ P. 12) 2 HDMI IN 1 - 3/HDMI OUT • HDMI IN 1 - 3 for connecting HDMI compatible external components. (☞ P. 13) • HDMI OUT for connecting an HDMI compatible TV. (☞ P. 13) 3 DIGITAL IN jack For connecting optical digital cable to the TV. (☞ P. 13) 2 4 ANALOG INPUT jack For connecting analog audio cable to external components. (☞ P. 12) 5 DOCK terminal For connecting an optional Yamaha iPod universal dock (such as YDS-11...

Owners Manual
Page 8
Getting started ■ Front panel display of the subwoofer integrated receiver 12 3 4 8 7 6 1 HDMI indicator Lights up during normal communication when HDMI is selected as an input source. 2 Tuner indicators TUNED indicator Lights up when the system is receiving a station. (☞ P. 16) STEREO indicator Lights up when the system is receiving a strong signal from an FM stereo broadcast station in automatic tuning mode. (☞ P. 16) AUTO indicator Flashes when the system is tuning station automatically. (☞ P. 16) MEMORY indicator...
Getting started ■ Front panel display of the subwoofer integrated receiver 12 3 4 8 7 6 1 HDMI indicator Lights up during normal communication when HDMI is selected as an input source. 2 Tuner indicators TUNED indicator Lights up when the system is receiving a station. (☞ P. 16) STEREO indicator Lights up when the system is receiving a strong signal from an FM stereo broadcast station in automatic tuning mode. (☞ P. 16) AUTO indicator Flashes when the system is tuning station automatically. (☞ P. 16) MEMORY indicator...

Owners Manual
Page 9
... Returns to standby mode. (☞ P. 14) 9 En INTRODUCTION ■ Remote control Infrared signal transmitter 1 2 3 4 5 6 7 Getting started 1 Input buttons Select an input source you want to listen to. (☞ P. 14) 2 MEMORY, TUNING / , PRESET / , INFO Control an FM tuner. (☞ P. 16) 3 OPTION B Enters OPTION menu when operating FM function or using Bluetooth component. (☞ P. 16, 19) 4 (MENU (Center) • Change the setting. • Control an iPod. (☞ P. 18) S / T: Control the wheel of the system. (☞ P. 14) 8 A SETUP Enters the setup menu. (☞...
... Returns to standby mode. (☞ P. 14) 9 En INTRODUCTION ■ Remote control Infrared signal transmitter 1 2 3 4 5 6 7 Getting started 1 Input buttons Select an input source you want to listen to. (☞ P. 14) 2 MEMORY, TUNING / , PRESET / , INFO Control an FM tuner. (☞ P. 16) 3 OPTION B Enters OPTION menu when operating FM function or using Bluetooth component. (☞ P. 16, 19) 4 (MENU (Center) • Change the setting. • Control an iPod. (☞ P. 18) S / T: Control the wheel of the system. (☞ P. 14) 8 A SETUP Enters the setup menu. (☞...
Owners Manual
Page 12
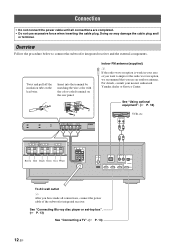
... use excessive force when inserting the cable plug. Brown Red Black Green Gray White To AC wall outlet y After you want to connect the subwoofer integrated receiver and the external components. Connection • Do not connect the power cable until all connections, connect the power cable of the subwoofer integrated receiver. Insert into the terminal by matching the wire color with the color-coded terminal on the lead wire. See "Connecting Blu-ray disc player or set-top box...
... use excessive force when inserting the cable plug. Brown Red Black Green Gray White To AC wall outlet y After you want to connect the subwoofer integrated receiver and the external components. Connection • Do not connect the power cable until all connections, connect the power cable of the subwoofer integrated receiver. Insert into the terminal by matching the wire color with the color-coded terminal on the lead wire. See "Connecting Blu-ray disc player or set-top box...

Owners Manual
Page 13
Signal flow Connecting Blu-ray disc player or set -top box 13 En Blu-ray disc player or set -top box You can select from this system, you need to connect an audio cable to the analog input terminal. TV y For analog connection, you can select optical digital input and connect to digital output jack. These three jacks are identical. PREPARATION Connection Connecting a TV If a DVD player, etc., is connected to one of the HDMI IN jacks, connect your TV or video monitor (projector, etc.) to the HDMI OUT jack of a TV...
Signal flow Connecting Blu-ray disc player or set -top box 13 En Blu-ray disc player or set -top box You can select from this system, you need to connect an audio cable to the analog input terminal. TV y For analog connection, you can select optical digital input and connect to digital output jack. These three jacks are identical. PREPARATION Connection Connecting a TV If a DVD player, etc., is connected to one of the HDMI IN jacks, connect your TV or video monitor (projector, etc.) to the HDMI OUT jack of a TV...

Owners Manual
Page 14
... a place that is output from the TV, the volume level does not change if you have finished all cable connections and remote control operation, follow the procedure below to start basic playback operation. 2 Press one of the input buttons to select 1 an input source. 2 3 Start playback on and the STATUS indicator lights green. to turn off . (☞ P. 21) ■ Using the remote control Use the remote control within 6 m (20') of HDMI is : - To resume...
... a place that is output from the TV, the volume level does not change if you have finished all cable connections and remote control operation, follow the procedure below to start basic playback operation. 2 Press one of the input buttons to select 1 an input source. 2 3 Start playback on and the STATUS indicator lights green. to turn off . (☞ P. 21) ■ Using the remote control Use the remote control within 6 m (20') of HDMI is : - To resume...

Owners Manual
Page 15
... you select another input, the system automatically recalls the last settings for a 2 channel source such as Blu-ray disc, etc. "STEREO": Reproduces the sound without any effect. When UniVolume is activated, UNIVOLUME indicator is displayed and the sound volume of TV is turned on (EXTENDED STEREO) and off (STEREO) alternately. Press STEREO MODE to set surround mode. When you enjoy video games. Press SURROUND MODE to enter extended stereo mode. MUSIC This mode is useful when you press STEREO MODE, the function...
... you select another input, the system automatically recalls the last settings for a 2 channel source such as Blu-ray disc, etc. "STEREO": Reproduces the sound without any effect. When UniVolume is activated, UNIVOLUME indicator is displayed and the sound volume of TV is turned on (EXTENDED STEREO) and off (STEREO) alternately. Press STEREO MODE to set surround mode. When you enjoy video games. Press SURROUND MODE to enter extended stereo mode. MUSIC This mode is useful when you press STEREO MODE, the function...
Owners Manual
Page 16
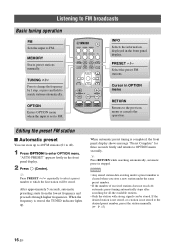
... frequencies. PRESET / Select the preset FM stations. Editing the preset FM station ■ Automatic preset You can be stored. y Press PRESET / repeatedly to select a preset number to FM. MEMORY Stores preset stations manually. Listening to FM broadcasts Basic tuning operation FM Sets the input to which the first station will be stored. TUNING / Press to change the frequency by 1 step, or press and hold to OPTION menu secondly. When automatic preset tuning is stored, the TUNED indicator lights...
... frequencies. PRESET / Select the preset FM stations. Editing the preset FM station ■ Automatic preset You can be stored. y Press PRESET / repeatedly to select a preset number to FM. MEMORY Stores preset stations manually. Listening to FM broadcasts Basic tuning operation FM Sets the input to which the first station will be stored. TUNING / Press to change the frequency by 1 step, or press and hold to OPTION menu secondly. When automatic preset tuning is stored, the TUNED indicator lights...
Owners Manual
Page 17
...; SURROUND MODE Displays the surround mode or stereo mode. • FREQUENCY Displays the frequency and preset number. • PROGRAM SERVICE (PS) Displays the currently received Radio Data System program. • PROGRAM TYPE (PTY) Displays the type of the currently received Radio Data System program. • RADIO TEXT (RT) Displays the information of the registered station you want to the selected preset number is registered, EMPTY indicator appears on the remote control or leave the tuner without any operations for more than the last preset number...
...; SURROUND MODE Displays the surround mode or stereo mode. • FREQUENCY Displays the frequency and preset number. • PROGRAM SERVICE (PS) Displays the currently received Radio Data System program. • PROGRAM TYPE (PTY) Displays the type of the currently received Radio Data System program. • RADIO TEXT (RT) Displays the information of the registered station you want to the selected preset number is registered, EMPTY indicator appears on the remote control or leave the tuner without any operations for more than the last preset number...
Owners Manual
Page 18
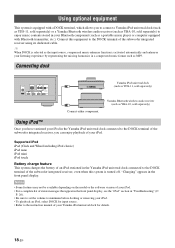
... Yamaha iPod universal dock for details. 18 En "Charging" appears in "Troubleshooting" (☞ P. 26). • Be sure to set the volume to minimum before docking or removing your iPod. • To playback an iPod, select DOCK for input source. • Refer to the instruction manual of your listening experience by regenerating the missing harmonics in the Yamaha iPod universal dock connected to the DOCK terminal of the subwoofer integrated receiver, you have stationed your iPod in a compressed music format...
... Yamaha iPod universal dock for details. 18 En "Charging" appears in "Troubleshooting" (☞ P. 26). • Be sure to set the volume to minimum before docking or removing your iPod. • To playback an iPod, select DOCK for input source. • Refer to the instruction manual of your listening experience by regenerating the missing harmonics in the Yamaha iPod universal dock connected to the DOCK terminal of the subwoofer integrated receiver, you have stationed your iPod in a compressed music format...
Owners Manual
Page 19
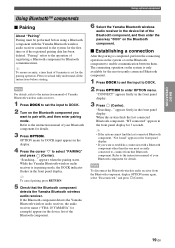
... Bluetooth component detects the Yamaha Bluetooth wireless audio receiver. "Pairing" refers to the instruction manual of 8 minutes is completed, perform the connecting operation on the system or on the system is in pairing mode, the DOCK indicator flashes in the display. 4 Press the cursor to enable communication between them. Refer to set for details. OPTION menu for the most recently connected to enter OPTION menu. The connecting operation on the Bluetooth component to select...
... Bluetooth component detects the Yamaha Bluetooth wireless audio receiver. "Pairing" refers to the instruction manual of 8 minutes is completed, perform the connecting operation on the system or on the system is in pairing mode, the DOCK indicator flashes in the display. 4 Press the cursor to enable communication between them. Refer to set for details. OPTION menu for the most recently connected to enter OPTION menu. The connecting operation on the Bluetooth component to select...

Owners Manual
Page 20
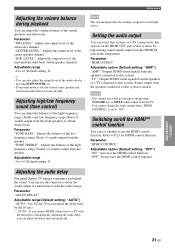
... function Adjusting the volume balance during playback Adjusting high/low frequency sound (tone control) Adjusting the audio delay Setting the audio output Switching on/off the HDMI control function Changing the brightness of the front panel display Changing the setting of the speaker type Setting the distance between the speakers Note If the "SP TYPE" is displayed in the front panel display. 2 Press the cursor / to the default setting ("BAR"), "SP DISTANCE" will not be displayed. "SW LEVEL" is set to select menu and press (Center). The current setting...
... function Adjusting the volume balance during playback Adjusting high/low frequency sound (tone control) Adjusting the audio delay Setting the audio output Switching on/off the HDMI control function Changing the brightness of the front panel display Changing the setting of the speaker type Setting the distance between the speakers Note If the "SP TYPE" is displayed in the front panel display. 2 Press the cursor / to the default setting ("BAR"), "SP DISTANCE" will not be displayed. "SW LEVEL" is set to select menu and press (Center). The current setting...
Owners Manual
Page 21
...volume level will not change the audio output when "HDMI CONTROL" is muted. Refer to each input source. You can set to "ON". "CENTER LEVEL": Adjusts the output level of the surround/surround back virtual speaker channels. Switching on/off , the virtual center speaker and virtual surround effects become invalid. "SUR. USEFUL OPERATION 21 En Parameter "AUDIO DELAY" Adjustable range (Default setting: "AUTO") "AUTO", 0 to 240 ms (You can adjust the delay time automatically. "TV": Outputs HDMI sound signals from the speakers of a TV connected to this function to delay...
...volume level will not change the audio output when "HDMI CONTROL" is muted. Refer to each input source. You can set to "ON". "CENTER LEVEL": Adjusts the output level of the surround/surround back virtual speaker channels. Switching on/off , the virtual center speaker and virtual surround effects become invalid. "SUR. USEFUL OPERATION 21 En Parameter "AUDIO DELAY" Adjustable range (Default setting: "AUTO") "AUTO", 0 to 240 ms (You can adjust the delay time automatically. "TV": Outputs HDMI sound signals from the speakers of a TV connected to this function to delay...
Owners Manual
Page 23
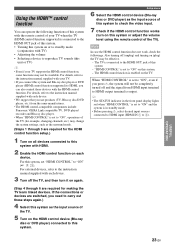
... Link compatible TV, DVD player/ recorder and Blu-ray disc player. • When "HDMI CONTROL" is set to "ON" and the system is in the front panel display lights red when "HDMI CONTROL" is connected to HDMI, you connect this system and Blu-ray disc player or DVD player (HDMI control function supported) to the HDMI OUT jack of this system. For details, refer to the instruction manual supplied with each device. USEFUL OPERATION 23 En The TV is set to "ON", operations of the TV. 5 Turn on...
... Link compatible TV, DVD player/ recorder and Blu-ray disc player. • When "HDMI CONTROL" is set to "ON" and the system is in the front panel display lights red when "HDMI CONTROL" is connected to HDMI, you connect this system and Blu-ray disc player or DVD player (HDMI control function supported) to the HDMI OUT jack of this system. For details, refer to the instruction manual supplied with each device. USEFUL OPERATION 23 En The TV is set to "ON", operations of the TV. 5 Turn on...
Owners Manual
Page 24
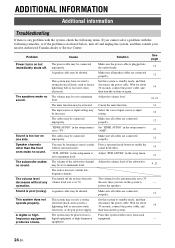
... a surround mode button to minimum level. Adjust "SUR. ADDITIONAL INFORMATION Additional information Troubleshooting If there is any operation. "HDMI AUDIO" in the setup menu is not listed below, turn on the system to standby mode, and then disconnect the power cable. The source does not contain lowfrequency signals. Adjust the volume level of the subwoofer channel may be set to enable the sound field effect. Problem Cause Solution Power turns on again. The subwoofer makes no sound. The cables may be connected improperly. LEVEL...
... a surround mode button to minimum level. Adjust "SUR. ADDITIONAL INFORMATION Additional information Troubleshooting If there is any operation. "HDMI AUDIO" in the setup menu is not listed below, turn on the system to standby mode, and then disconnect the power cable. The source does not contain lowfrequency signals. Adjust the volume level of the subwoofer channel may be set to enable the sound field effect. Problem Cause Solution Power turns on again. The subwoofer makes no sound. The cables may be connected improperly. LEVEL...
Owners Manual
Page 25
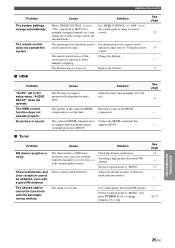
... picture or sound Cause The TV does not support automatically adjusting the audio delay. See page 21 - - ■ Tuner Problem Cause Solution FM stereo reception is multi-path interference. Use a high-quality directional FM antenna. Additional information Problem The system settings change frequency by using a high-quality directional FM antenna. Cause Solution When "HDMI CONTROL" is set to "OFF" or set in the setup menu "AUDIO DELAY" does not operate. The batteries may change the system settings, such as the surround mode. Replace the...
... picture or sound Cause The TV does not support automatically adjusting the audio delay. See page 21 - - ■ Tuner Problem Cause Solution FM stereo reception is multi-path interference. Use a high-quality directional FM antenna. Additional information Problem The system settings change frequency by using a high-quality directional FM antenna. Cause Solution When "HDMI CONTROL" is set to "OFF" or set in the setup menu "AUDIO DELAY" does not operate. The batteries may change the system settings, such as the surround mode. Replace the...

Owners Manual
Page 28
... audio/ video interface that meets the security requirements of audio data, it a higher quality sound than sRGB, and allows the expression of colors that is changed to digital format without compression. Providing an interface between any source (such as a set-top box or AV receiver) and an audio/video monitor (such as a digital television), HDMI supports standard, enhanced or high-definition video as well as multichannel digital audio using a single cable...
... audio/ video interface that meets the security requirements of audio data, it a higher quality sound than sRGB, and allows the expression of colors that is changed to digital format without compression. Providing an interface between any source (such as a set-top box or AV receiver) and an audio/video monitor (such as a digital television), HDMI supports standard, enhanced or high-definition video as well as multichannel digital audio using a single cable...

Owners Manual
Page 30
... Bitstream Dolby Digital, DTS DVD-Video, etc. Multi-ch Linear PCM 8ch, 32-96 kHz, 16/20/24 bit DVD-Audio, Blu-ray disc, HD DVD, etc. y • Refer to the supplied instruction manuals for details. Additional information Available signal information ■ HDMI signal compatibility Audio signals Audio signal types Audio signal formats Compatible media 2ch Linear PCM 2ch, 32-96 kHz, 16/20/24 bit CD, DVD-Video, DVD-Audio, etc. Refer to the supplied instruction manuals of the input source component, and set the component appropriately...
... Bitstream Dolby Digital, DTS DVD-Video, etc. Multi-ch Linear PCM 8ch, 32-96 kHz, 16/20/24 bit DVD-Audio, Blu-ray disc, HD DVD, etc. y • Refer to the supplied instruction manuals for details. Additional information Available signal information ■ HDMI signal compatibility Audio signals Audio signal types Audio signal formats Compatible media 2ch Linear PCM 2ch, 32-96 kHz, 16/20/24 bit CD, DVD-Video, DVD-Audio, etc. Refer to the supplied instruction manuals of the input source component, and set the component appropriately...


