

Owners Manual
Page 5
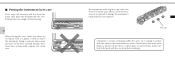
■ Alto Flute Crown Headjoint 19 Lip Plate Embouchure Hole Lip Plate U-Joint Crown Headjoint Embouchure Hole Body Keys ■ Bass Flute U-Joint Body Hand rest Footjoint Headjoint Lip Plate Embouchure Hole Crown Keys Footjoint
■ Alto Flute Crown Headjoint 19 Lip Plate Embouchure Hole Lip Plate U-Joint Crown Headjoint Embouchure Hole Body Keys ■ Bass Flute U-Joint Body Hand rest Footjoint Headjoint Lip Plate Embouchure Hole Crown Keys Footjoint

Owners Manual
Page 6
... and footjoint placed on a stable surface. Turn the thicker end of the hand rest so it is positioned may result in which the headjoint is at which the instrument is still new, do not apply any dirt or ... the instrument with the keys facing up on a stable surface. * Please realize that the angle at a 90° angle to piccolo and bass flutes only). 1. Hand rest Bass Flute Before assembling the instrument, please observe the following points. • When holding the flute Some flute and piccolo bodies are made of...
... and footjoint placed on a stable surface. Turn the thicker end of the hand rest so it is positioned may result in which the headjoint is at which the instrument is still new, do not apply any dirt or ... the instrument with the keys facing up on a stable surface. * Please realize that the angle at a 90° angle to piccolo and bass flutes only). 1. Hand rest Bass Flute Before assembling the instrument, please observe the following points. • When holding the flute Some flute and piccolo bodies are made of...
Owners Manual
Page 7
... moisture and dirt from the joints, then place the headjoint into the case snugly, without forcing. 21 When closing the case, make sure that both hands and face are no objects such as you please. To prevent this, make sure there are clean before playing. These can cause discoloration (the metal...
... moisture and dirt from the joints, then place the headjoint into the case snugly, without forcing. 21 When closing the case, make sure that both hands and face are no objects such as you please. To prevent this, make sure there are clean before playing. These can cause discoloration (the metal...
Owners Manual
Page 9
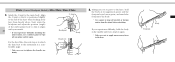
... to the keys, hold the body in the middle and try again. Footjoint Body Attach the U-joint to tighten the handle too firmly. U-Joint Headjoint Hand rest Body 2. For the bass flute, the next step is positioned slightly to the keys. If you experience difficulty, hold the body at a comfortable... angle. * Take care not to the main body. Align the U-joint so that it is to attach the hand rest to the instrument at its uppermost point, and the footjoint by its lowest point, and attach the footjoint to the body. * Use a gauze to...
... to the keys, hold the body in the middle and try again. Footjoint Body Attach the U-joint to tighten the handle too firmly. U-Joint Headjoint Hand rest Body 2. For the bass flute, the next step is positioned slightly to the keys. If you experience difficulty, hold the body at a comfortable... angle. * Take care not to the main body. Align the U-joint so that it is to attach the hand rest to the instrument at its uppermost point, and the footjoint by its lowest point, and attach the footjoint to the body. * Use a gauze to...

Owners Manual
Page 14
Also, do not point the end of the spout toward your hand. Oil can be a danger. Apply some key oil to spread the oil evenly. Never touch the end of the spout with your face. Key oil 2. After applying oil, move the key several times to the key mechanisms. 28 * Do not apply too much key oil. * Completely remove any oil that gets onto the surface of the keys or instrument. ■ Maintenance required every two to three months Be careful when using the key oil The end of the oil spout is sharp and therefore can spray out of the spout and possibly into your eyes. 1.
Also, do not point the end of the spout toward your hand. Oil can be a danger. Apply some key oil to spread the oil evenly. Never touch the end of the spout with your face. Key oil 2. After applying oil, move the key several times to the key mechanisms. 28 * Do not apply too much key oil. * Completely remove any oil that gets onto the surface of the keys or instrument. ■ Maintenance required every two to three months Be careful when using the key oil The end of the oil spout is sharp and therefore can spray out of the spout and possibly into your eyes. 1.


