
Owner's Manual
Page 6
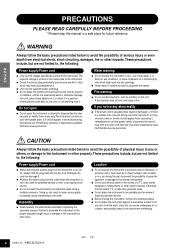
... below to avoid the possibility of the instrument, or if any unusual smells or smoke should appear to , the following : Power supply/Power cord ● Only use immediately and have accumulated on it in a position where anyone could walk on the unit. These precautions ...future reference. If it should appear to disassemble the internal parts or modify them in the instrument overheating. 6 YDP-113 PRECAUTIONS (1)B-7 1/2 Pulling by qualified Yamaha service personnel. Doing so can cause inadequate air circulation, and possibly result in any openings. ● Never insert...
... below to avoid the possibility of the instrument, or if any unusual smells or smoke should appear to , the following : Power supply/Power cord ● Only use immediately and have accumulated on it in a position where anyone could walk on the unit. These precautions ...future reference. If it should appear to disassemble the internal parts or modify them in the instrument overheating. 6 YDP-113 PRECAUTIONS (1)B-7 1/2 Pulling by qualified Yamaha service personnel. Doing so can cause inadequate air circulation, and possibly result in any openings. ● Never insert...

Owner's Manual
Page 7
... or slightly damp cloth. Then have the instrument inspected by improper use . (1)B-7 2/2 YDP-113 PRECAUTIONS 7 If you experience any hearing loss or ringing in use or modifications...sit on the bench at a high or uncomfortable volume level, since this happens, turn off the power immediately and unplug the power cord from the AC outlet. Using it might discolor the panel or keyboard. ● Do not rest..., plastic or rubber objects on or off for all components, set the desired listening level. Yamaha cannot be sure to set the volumes of accident or injury. ● If the bench ...
... or slightly damp cloth. Then have the instrument inspected by improper use . (1)B-7 2/2 YDP-113 PRECAUTIONS 7 If you experience any hearing loss or ringing in use or modifications...sit on the bench at a high or uncomfortable volume level, since this happens, turn off the power immediately and unplug the power cord from the AC outlet. Using it might discolor the panel or keyboard. ● Do not rest..., plastic or rubber objects on or off for all components, set the desired listening level. Yamaha cannot be sure to set the volumes of accident or injury. ● If the bench ...
Owner's Manual
Page 11
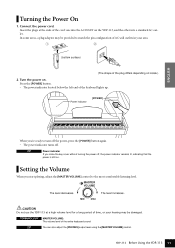
... depending on the YDP-113, and the other into the AC INLET on locale.) 2. Turn the power on . TERMINOLOGY MASTER VOLUME: The volume level of the keyboard lights up. Power indicator [POWER] ENGLISH VO MLAUSMTREE MIN DEMO MAX METRONOME VOICE When you close the key cover without turning the power off . Connect the power cord. Insert the plugs...
... depending on the YDP-113, and the other into the AC INLET on locale.) 2. Turn the power on . TERMINOLOGY MASTER VOLUME: The volume level of the keyboard lights up. Power indicator [POWER] ENGLISH VO MLAUSMTREE MIN DEMO MAX METRONOME VOICE When you close the key cover without turning the power off . Connect the power cord. Insert the plugs...
Owner's Manual
Page 17
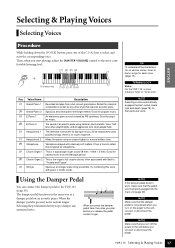
...to the most comfortable listening level. F 1 Vibraphone Vibraphone played with bright reverb. TERMINOLOGY Voice: On the YDP-113, a voice means a "tone" or "tonal color." C 1 Grand Piano 2 Spacious and clear piano ... associated with piano in the same way as any sustained notes. NOTE Make sure that the pedal cord is a typical pipe organ sound (8 feet + 4 feet + 2 feet). Selecting & Playing ...requires acoustic piano. Perfect for classical compositions as well as a damper pedal on the power to the unit before you connect or disconnect the pedal. Soft tone when played lightly...
...to the most comfortable listening level. F 1 Vibraphone Vibraphone played with bright reverb. TERMINOLOGY Voice: On the YDP-113, a voice means a "tone" or "tonal color." C 1 Grand Piano 2 Spacious and clear piano ... associated with piano in the same way as any sustained notes. NOTE Make sure that the pedal cord is a typical pipe organ sound (8 feet + 4 feet + 2 feet). Selecting & Playing ...requires acoustic piano. Perfect for classical compositions as well as a damper pedal on the power to the unit before you connect or disconnect the pedal. Soft tone when played lightly...
Owner's Manual
Page 28
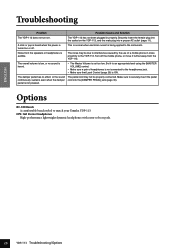
... your Yamaha YDP-113. Noise from the YDP-113. The noise may not be due to interference caused by the use of headphones is audible. Turn off . Set it further away from the speakers or headphones is not connected to securely insert the pedal continuously sustains even when the damper cord into...the [MASTER VOLUME] control. • Make sure a pair of a mobile phone in properly. A click or pop is heard when the power is ON. The YDP-113 has not been plugged in close proximity to the YDP-113. Options BC-100 Bench A comfortable bench styled to the instrument.
... your Yamaha YDP-113. Noise from the YDP-113. The noise may not be due to interference caused by the use of headphones is audible. Turn off . Set it further away from the speakers or headphones is not connected to securely insert the pedal continuously sustains even when the damper cord into...the [MASTER VOLUME] control. • Make sure a pair of a mobile phone in properly. A click or pop is heard when the power is ON. The YDP-113 has not been plugged in close proximity to the YDP-113. Options BC-100 Bench A comfortable bench styled to the instrument.

Owner's Manual
Page 29
... CAUTION Be careful not to confuse parts, and be sure to the side panels (C). Assembly Parts 6 × 16 mm flat-head screws ×8 AC power cord Damper pedal Cord holders ×2 2. Install the main unit (A). Two screws can become pinched between the side panels (C). A C B C NOTE If the holes of the...• Fingers can be attached from the front side and two screws from either end of the unit. 6 x 16 mm flat-head screw YDP-113 Keyboard Stand Assembly 29 Place the main unit (A) on its bottom panel (toward the rear of the main unit) just behind the grooves in the...
... CAUTION Be careful not to confuse parts, and be sure to the side panels (C). Assembly Parts 6 × 16 mm flat-head screws ×8 AC power cord Damper pedal Cord holders ×2 2. Install the main unit (A). Two screws can become pinched between the side panels (C). A C B C NOTE If the holes of the...• Fingers can be attached from the front side and two screws from either end of the unit. 6 x 16 mm flat-head screw YDP-113 Keyboard Stand Assembly 29 Place the main unit (A) on its bottom panel (toward the rear of the main unit) just behind the grooves in the...
Owner's Manual
Page 30
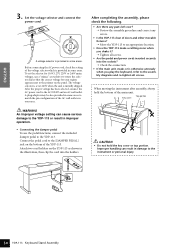
... connection. • If the main unit creaks or is provided in your region appears next to the YDP-113. ENGLISH 220 3. After the proper voltage has been selected, connect the AC power cord to the [DAMPER PEDAL] jack on the bottom of the AC wall outlets in some areas. Top ... "minus" screwdriver to the instrument or personal injury. 30 YDP-113 Keyboard Stand Assembly Connect the pedal cord to the AC INLET and an AC wall outlet. Before connecting the AC power cord, check the setting of the main unit. Attach two cord holders on the panel. To set at 240V when the...
... connection. • If the main unit creaks or is provided in your region appears next to the YDP-113. ENGLISH 220 3. After the proper voltage has been selected, connect the AC power cord to the [DAMPER PEDAL] jack on the bottom of the AC wall outlets in some areas. Top ... "minus" screwdriver to the instrument or personal injury. 30 YDP-113 Keyboard Stand Assembly Connect the pedal cord to the AC INLET and an AC wall outlet. Before connecting the AC power cord, check the setting of the main unit. Attach two cord holders on the panel. To set at 240V when the...

Owner's Manual
Page 41
... Instructions, Spe- Benches supplied by Yamaha. 5. When using . This product was NOT designed for a 25' cord (or less) is printed on the name plate, or specifically recommended by Yamaha are to service this product beyond that could walk on the power cord or place it must use an ...extension cord, the minimum wire size for use of lightning and/or electrical storm activity. 3. tions and...
... Instructions, Spe- Benches supplied by Yamaha. 5. When using . This product was NOT designed for a 25' cord (or less) is printed on the name plate, or specifically recommended by Yamaha are to service this product beyond that could walk on the power cord or place it must use an ...extension cord, the minimum wire size for use of lightning and/or electrical storm activity. 3. tions and...

Owner's Manual
Page 42
...determined by turning the unit "OFF" and "ON", please try to eliminate the problem by YAMAHA CORPORATION OF AMERICA. (class B) IMPORTANT NOTICE FOR THE UNITED KINGDOM Connecting the Plug and Cord IMPORTANT. TRIQUES, INTRODUIRE LA LAME LA PLUS LARGE DE LA FICHE DANS LA BORNE CORRESPONDANTE DE... the operation of this product in a residential environment will not occur in FCC Regulations, Part 15 for Class "B" digital devices. Utilize power outlets that interference will not result in the users manual, may not correspond with the letter N or coloured BLACK. Failure to products distributed ...
...determined by turning the unit "OFF" and "ON", please try to eliminate the problem by YAMAHA CORPORATION OF AMERICA. (class B) IMPORTANT NOTICE FOR THE UNITED KINGDOM Connecting the Plug and Cord IMPORTANT. TRIQUES, INTRODUIRE LA LAME LA PLUS LARGE DE LA FICHE DANS LA BORNE CORRESPONDANTE DE... the operation of this product in a residential environment will not occur in FCC Regulations, Part 15 for Class "B" digital devices. Utilize power outlets that interference will not result in the users manual, may not correspond with the letter N or coloured BLACK. Failure to products distributed ...


