
Owners Manual
Page 3
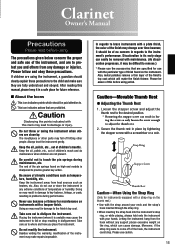
... instrument when others from any support places excessive weight on the thumb rest.) • Use with the strap around your hands. The mouthpiece or other parts may fall or drop resulting in problems during maintenance, etc. Always treat the instrument gently. Be careful not to the desired position. * Removing the stopper...
... instrument when others from any support places excessive weight on the thumb rest.) • Use with the strap around your hands. The mouthpiece or other parts may fall or drop resulting in problems during maintenance, etc. Always treat the instrument gently. Be careful not to the desired position. * Removing the stopper...

Owners Manual
Page 6
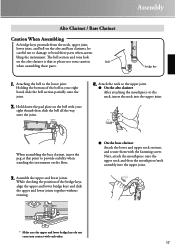
... again. bridge key 2. Also, if you have difficulty attaching the joints together when assembling the instrument, apply a thin coat of natural wood and precision metal parts. Attach the mouthpiece to raise the bridge key. The clarinet is made of cork grease to the joint cork and try to the main body...
... again. bridge key 2. Also, if you have difficulty attaching the joints together when assembling the instrument, apply a thin coat of natural wood and precision metal parts. Attach the mouthpiece to raise the bridge key. The clarinet is made of cork grease to the joint cork and try to the main body...
Owners Manual
Page 7
... the alto and bass clarinets, be careful not to the lower joint. bling the instrument. Attaching the bell to damage or bend these parts. Holding the bottom of the bridge keys, align the upper and lower bridge keys and slide the upper and lower joints together without twisting...attaching the mouthpiece to provide stability when standing the instrument on the alto clarinet is thin so please use extra caution Bell when assembling these parts when assem- Next, attach the mouthpiece onto the upper neck and then the mouthpiece/neck assembly into the upper joint. * Make sure...
... the alto and bass clarinets, be careful not to the lower joint. bling the instrument. Attaching the bell to damage or bend these parts. Holding the bottom of the bridge keys, align the upper and lower bridge keys and slide the upper and lower joints together without twisting...attaching the mouthpiece to provide stability when standing the instrument on the alto clarinet is thin so please use extra caution Bell when assembling these parts when assem- Next, attach the mouthpiece onto the upper neck and then the mouthpiece/neck assembly into the upper joint. * Make sure...
Owners Manual
Page 9
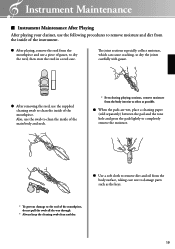
... pads lightly to completely remove the moisture. ● Use a soft cloth to remove dirt and oil from the body surface, taking care not to damage parts such as the keys. * To prevent damage to clean the inside of the instrument. ● After playing, remove the reed from the inside of the...
... pads lightly to completely remove the moisture. ● Use a soft cloth to remove dirt and oil from the body surface, taking care not to damage parts such as the keys. * To prevent damage to clean the inside of the instrument. ● After playing, remove the reed from the inside of the...
Owners Manual
Page 10
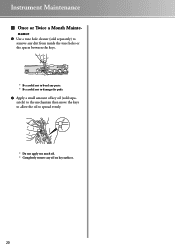
Instrument Maintenance ■ Once or Twice a Month Maintenance ● Use a tone hole cleaner (sold separately) to remove any dirt from inside the tone holes or the spaces between the keys. * Be careful not to bend any parts. * Be careful not to damage the pads. ● Apply a small amount of key oil (sold separately) to the mechanism then move the keys to allow the oil to spread evenly. * Do not apply too much oil. * Completely remove any oil on key surfaces. 20
Instrument Maintenance ■ Once or Twice a Month Maintenance ● Use a tone hole cleaner (sold separately) to remove any dirt from inside the tone holes or the spaces between the keys. * Be careful not to bend any parts. * Be careful not to damage the pads. ● Apply a small amount of key oil (sold separately) to the mechanism then move the keys to allow the oil to spread evenly. * Do not apply too much oil. * Completely remove any oil on key surfaces. 20

