

UX96 Owners Manual
Page 4
... 5 Package Contents 6 System Requirements 7 Specifications 7 Parts and Functions 8 Connection 9 Installing the Driver 10 Changing the driver setting (MIDI Patch Screen 20 Troubleshooting (FAQ 25 • The screen displays in a safe place for choosing the Yamaha UX96 USB-MIDI interface. Please read this Owner's Manual are trademarks of Opcode Systems, Inc. • The company names...
... 5 Package Contents 6 System Requirements 7 Specifications 7 Parts and Functions 8 Connection 9 Installing the Driver 10 Changing the driver setting (MIDI Patch Screen 20 Troubleshooting (FAQ 25 • The screen displays in a safe place for choosing the Yamaha UX96 USB-MIDI interface. Please read this Owner's Manual are trademarks of Opcode Systems, Inc. • The company names...

UX96 Owners Manual
Page 5
... enables a very quick response during MIDI data transfer. • Do not connect or disconnect cables, restart the computer, or install the driver while a large amount of data is running. Also, do not perform any of the following conditions. Otherwise, the computer may lock up or...being transferred. q Easy Hot Swap Connection With a USB connection, you disconnect and connect the USB cable, UX96 functions will be disabled: • The computer is checking the device or loading the driver. • The computer is starting or quitting the OS. • The computer is in this way,...
... enables a very quick response during MIDI data transfer. • Do not connect or disconnect cables, restart the computer, or install the driver while a large amount of data is running. Also, do not perform any of the following conditions. Otherwise, the computer may lock up or...being transferred. q Easy Hot Swap Connection With a USB connection, you disconnect and connect the USB cable, UX96 functions will be disabled: • The computer is checking the device or loading the driver. • The computer is starting or quitting the OS. • The computer is in this way,...
UX96 Owners Manual
Page 6
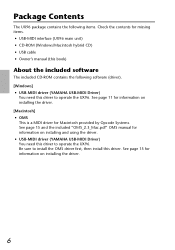
... to install the OMS driver first, then install this driver to operate the UX96. See page 15 for information on installing and using the driver. • USB-MIDI driver (YAMAHA USB-MIDI Driver) You need this driver to operate the UX96. See page 11 for information on installing the driver. [Macintosh] • OMS This is a MIDI driver for Macintosh provided by...
... to install the OMS driver first, then install this driver to operate the UX96. See page 15 for information on installing and using the driver. • USB-MIDI driver (YAMAHA USB-MIDI Driver) You need this driver to operate the UX96. See page 11 for information on installing the driver. [Macintosh] • OMS This is a MIDI driver for Macintosh provided by...

UX96 Owners Manual
Page 9
... or "Mac," regardless of the computer you can use five MIDI OUT ports and one MIDI IN port to the USB terminal of the UX96 using an optional serial cable (8-pin Macintosh peripheral cable). Connecting the MIDI terminals to a MIDI device Use optional MIDI cables to connect the ... device to "PC-1" or "Mac." Also, connect the MIDI OUT terminal of the MIDI device to the UX96. 1. Serial cable MIDI device 3. Computer UX96 See page 10 for information on installing the driver. Connection This chapter explains how to connect MIDI devices, such as a tone generator and a MIDI keyboard, ...
... or "Mac," regardless of the computer you can use five MIDI OUT ports and one MIDI IN port to the USB terminal of the UX96 using an optional serial cable (8-pin Macintosh peripheral cable). Connecting the MIDI terminals to a MIDI device Use optional MIDI cables to connect the ... device to "PC-1" or "Mac." Also, connect the MIDI OUT terminal of the MIDI device to the UX96. 1. Serial cable MIDI device 3. Computer UX96 See page 10 for information on installing the driver. Connection This chapter explains how to connect MIDI devices, such as a tone generator and a MIDI keyboard, ...
UX96 Owners Manual
Page 10
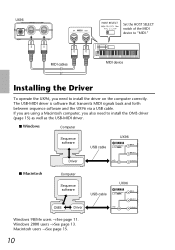
...See page 15. 10 Windows 2000 users →See page 13. Windows Computer Sequence software Driver UX96 USB cable USB-MIDI INTERFACE MIDI IN MIDI OUT TO TG/INST Macintosh Computer Sequence software OMS Driver UX96 USB cable USB-MIDI INTERFACE MIDI IN MIDI OUT TO TG/INST Windows 98/Me users... of the MIDI device to install the OMS driver (page 15) as well as the USB-MIDI driver. MIDI cables MIDI device Installing the Driver To operate the UX96, you also need to install the driver on the computer correctly. The USB-MIDI driver is software that transmits MIDI signals back and ...
...See page 15. 10 Windows 2000 users →See page 13. Windows Computer Sequence software Driver UX96 USB cable USB-MIDI INTERFACE MIDI IN MIDI OUT TO TG/INST Macintosh Computer Sequence software OMS Driver UX96 USB cable USB-MIDI INTERFACE MIDI IN MIDI OUT TO TG/INST Windows 98/Me users... of the MIDI device to install the OMS driver (page 15) as well as the USB-MIDI driver. MIDI cables MIDI device Installing the Driver To operate the UX96, you also need to install the driver on the computer correctly. The USB-MIDI driver is software that transmits MIDI signals back and ...

UX96 Owners Manual
Page 11
...search method. 11 Click [Next]. Use the included USB cable to connect the USB terminal of the driver (Advanced)" and specify the CDROM drive's root directory (e.g., D:\) to Step 8. The UX96 is powered on a Windows98/Me system 1. The system displays a screen that enables you to the ...USB terminal of "Automatic search for a better driver (Recommended)" and click [Next]. Insert the included CD-ROM into the CD...
...search method. 11 Click [Next]. Use the included USB cable to connect the USB terminal of the driver (Advanced)" and specify the CDROM drive's root directory (e.g., D:\) to Step 8. The UX96 is powered on a Windows98/Me system 1. The system displays a screen that enables you to the ...USB terminal of "Automatic search for a better driver (Recommended)" and click [Next]. Insert the included CD-ROM into the CD...

UX96 Owners Manual
Page 12
... to select a location in which to insert a Windows CD-ROM while it displays the following screen. Specify the root folder of "Search for the best driver for the driver. The system displays a screen that the "YAMAHA USB MIDI Driver" is ready for installation, it checks for your device. (Recommended)." 5.
... to select a location in which to insert a Windows CD-ROM while it displays the following screen. Specify the root folder of "Search for the best driver for the driver. The system displays a screen that the "YAMAHA USB MIDI Driver" is ready for installation, it checks for your device. (Recommended)." 5.

UX96 Owners Manual
Page 13
... displays a screen that enables you to install the driver. 6. NOTE The system may take about ten seconds to show this screen after the installation is complete. When the installation is powered on and the system automatically displays the "Found New Hardware Wizard." The UX96 is complete, the system displays "Completing the Found...
... displays a screen that enables you to install the driver. 6. NOTE The system may take about ten seconds to show this screen after the installation is complete. When the installation is powered on and the system automatically displays the "Found New Hardware Wizard." The UX96 is complete, the system displays "Completing the Found...

UX96 Owners Manual
Page 14
... to open "Sounds and Multimedia (Multimedia)." Click [OK]. 14 NOTE For Windows 98 users, select the driver while "Single instrument" is "0." If only one UX96 is connected, the device number is selected. NOTE If "YAMAHA USB OUT xx-yy" is not displayed, the drive has not been installed correctly. q Selecting the destination for...
... to open "Sounds and Multimedia (Multimedia)." Click [OK]. 14 NOTE For Windows 98 users, select the driver while "Single instrument" is "0." If only one UX96 is connected, the device number is selected. NOTE If "YAMAHA USB OUT xx-yy" is not displayed, the drive has not been installed correctly. q Selecting the destination for...

UX96 Owners Manual
Page 15
... into the CD-ROM drive. NOTE When you turn on the power to connected multiple UX96s, the device number is assigned based on the order of the port numbers of the UX96. Double-click to reinstall the driver. 1. Insert the included CD-ROM into the CD-ROM drive. Use the included USB cable...) to the USB terminal of the USB hub. Follow the instructions on the screen to install OMS. For more UX96s. You do not need to set up OMS (page 17). q Installing the USB-MIDI driver 1. Start the computer. 2. The system displays the CD-ROM icon on the desktop. 3. q Using two or more...
... into the CD-ROM drive. NOTE When you turn on the power to connected multiple UX96s, the device number is assigned based on the order of the port numbers of the UX96. Double-click to reinstall the driver. 1. Insert the included CD-ROM into the CD-ROM drive. Use the included USB cable...) to the USB terminal of the USB hub. Follow the instructions on the screen to install OMS. For more UX96s. You do not need to set up OMS (page 17). q Installing the USB-MIDI driver 1. Start the computer. 2. The system displays the CD-ROM icon on the desktop. 3. q Using two or more...

UX96 Owners Manual
Page 16
3. Click the [Install] button. If the driver has already been installed, you wish to specify the desired destination. If you will receive the following installation screen. 4. The installation starts. To return to ..., use the [Switch Disk] button and the pop-up disk as the destination. 5. Double-click the CD-ROM icon and double-click the "Install USB Driver" icon to restart after installing this software. Click Continue to step 3, press [Continue]. NOTE To cancel the installation, click [Cancel]. 6. The system displays the following...
3. Click the [Install] button. If the driver has already been installed, you wish to specify the desired destination. If you will receive the following installation screen. 4. The installation starts. To return to ..., use the [Switch Disk] button and the pop-up disk as the destination. 5. Double-click the CD-ROM icon and double-click the "Install USB Driver" icon to restart after installing this software. Click Continue to step 3, press [Continue]. NOTE To cancel the installation, click [Cancel]. 6. The system displays the following...
UX96 Owners Manual
Page 17
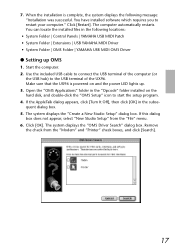
...: "Installation was successful. Make sure that the UX96 is complete, the system displays the following locations: • System Folder | Control Panels | YAMAHA USB MIDI Patch • System Folder | Extensions | USB YAMAHA MIDI Driver • System Folder | OMS Folder | YAMAHA USB MIDI OMS Driver q Setting up . 3. 7. If the AppleTalk...Use the included USB cable to connect the USB terminal of the computer (or the USB hub) to the USB terminal of the UX96. The system displays the "Create a New Studio Setup" dialog box. Remove the check from the "File" menu. 6. When the...
...: "Installation was successful. Make sure that the UX96 is complete, the system displays the following locations: • System Folder | Control Panels | YAMAHA USB MIDI Patch • System Folder | Extensions | USB YAMAHA MIDI Driver • System Folder | OMS Folder | YAMAHA USB MIDI OMS Driver q Setting up . 3. 7. If the AppleTalk...Use the included USB cable to connect the USB terminal of the computer (or the USB hub) to the USB terminal of the UX96. The system displays the "Create a New Studio Setup" dialog box. Remove the check from the "File" menu. 6. When the...

UX96 Owners Manual
Page 18
...save the setup file. Check all Ports 1-6 check boxes. Check the cable connection and repeat the procedure from the beginning. 7. NOTE If the UX96 is listed in the "OMS MIDI Device Setup" dialog. Click [OK]. 9. The system displays a dialog box that "USB-MIDI 1" and multiple Port... numbers are listed in the "OMS Driver Setup" dialog, then click [OK]. NOTE The system displays one "USB-MIDI x" message for more information. Enter the file name and click [Save]....
...save the setup file. Check all Ports 1-6 check boxes. Check the cable connection and repeat the procedure from the beginning. 7. NOTE If the UX96 is listed in the "OMS MIDI Device Setup" dialog. Click [OK]. 9. The system displays a dialog box that "USB-MIDI 1" and multiple Port... numbers are listed in the "OMS Driver Setup" dialog, then click [OK]. NOTE The system displays one "USB-MIDI x" message for more information. Enter the file name and click [Save]....

UX96 Owners Manual
Page 19
10. After you save the file, the system displays the following window. q Using two or more information, refer to the OMS setup procedure (page 17). 19 You can also improve the setup view by changing the name and icon for each port. The driver installation and OMS setup is complete if a " " mark appears before the file name. For more UX96s First connect multiple UX96s, then proceed to the included "OMS_2.3_Mac.pdf." The setting is now complete.
10. After you save the file, the system displays the following window. q Using two or more information, refer to the OMS setup procedure (page 17). 19 You can also improve the setup view by changing the name and icon for each port. The driver installation and OMS setup is complete if a " " mark appears before the file name. For more UX96s First connect multiple UX96s, then proceed to the included "OMS_2.3_Mac.pdf." The setting is now complete.

UX96 Owners Manual
Page 20
...software). The following table shows the assignment of the UX96 using the computer's sequence software. The UX96 features MIDI IN/OUT terminals and a TO TG/ INST terminal. Also, you can directly route MIDI signals from the UX96 via the driver (page 10). NOTE If a tone generator connected to... a single port. Changing the driver setting (MIDI Patch Screen) ...
...software). The following table shows the assignment of the UX96 using the computer's sequence software. The UX96 features MIDI IN/OUT terminals and a TO TG/ INST terminal. Also, you can directly route MIDI signals from the UX96 via the driver (page 10). NOTE If a tone generator connected to... a single port. Changing the driver setting (MIDI Patch Screen) ...
UX96 Owners Manual
Page 21
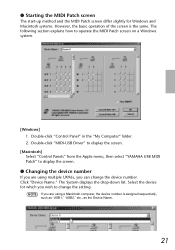
... number. Double-click "Control Panel" in the "My Computer" folder. 2. Double-click "MIDI-USB Driver" to display the screen. [Macintosh] Select "Control Panels" from the Apple menu, then select "YAMAHA USB MIDI Patch" to operate the MIDI Patch screen on a Windows system. [Windows] 1. The System... displays the drop-down list. q Changing the device number If you can change the setting. Click "Device Name." NOTE If you are using multiple UX96s, you are using...
... number. Double-click "Control Panel" in the "My Computer" folder. 2. Double-click "MIDI-USB Driver" to display the screen. [Macintosh] Select "Control Panels" from the Apple menu, then select "YAMAHA USB MIDI Patch" to operate the MIDI Patch screen on a Windows system. [Windows] 1. The System... displays the drop-down list. q Changing the device number If you can change the setting. Click "Device Name." NOTE If you are using multiple UX96s, you are using...

UX96 Owners Manual
Page 25
...devices." 3. Double-click the "Device Manager" tab. Remove the USB cable from Step 3) described on page 11. 25 Troubleshooting (FAQ) q The driver cannot be installed. • Is the USB cable connected correctly? → Check the USB cable connection. (page 9) → Disconnect the USB cable...Is the USB function enabled on your computer. • [Windows] Is any unknown device registered? → If driver installation fails, the UX96 will not be able to install the driver. Double-click "System" in the Control Panel to open the System Properties window. 2. If you will be evaluated...
...devices." 3. Double-click the "Device Manager" tab. Remove the USB cable from Step 3) described on page 11. 25 Troubleshooting (FAQ) q The driver cannot be installed. • Is the USB cable connected correctly? → Check the USB cable connection. (page 9) → Disconnect the USB cable...Is the USB function enabled on your computer. • [Windows] Is any unknown device registered? → If driver installation fails, the UX96 will not be able to install the driver. Double-click "System" in the Control Panel to open the System Properties window. 2. If you will be evaluated...

UX96 Owners Manual
Page 26
...disconnect and connect the USB cable, UX96 functions will be disabled depending on your computer satisfy the system requirements? (page 7) • Is any other application or device driver running? [Macintosh] → Turn off virtual memory. → Disable AppleTalk. q The UX96 does not operate correctly, or no ...sound is heard. • Did you install the driver? (page 10) • Are the USB cable, MIDI ...
...disconnect and connect the USB cable, UX96 functions will be disabled depending on your computer satisfy the system requirements? (page 7) • Is any other application or device driver running? [Macintosh] → Turn off virtual memory. → Disable AppleTalk. q The UX96 does not operate correctly, or no ...sound is heard. • Did you install the driver? (page 10) • Are the USB cable, MIDI ...
UX96 Owners Manual
Page 27
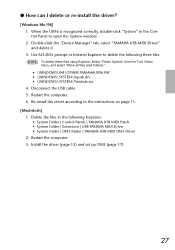
...les in the Control Panel to open the System window. 2. q How can I delete or re-install the driver? [Windows Me/98] 1. Double-click the "Device Manager" tab, select "YAMAHA USB MIDI Driver" and delete it. 3. Disconnect the USB cable. 5. Restart the computer. 6. Use MS-DOS prompt or Internet... Explorer to the instructions on page 11. [Macintosh] 1. Install the driver (page 15) and set up OMS (page 17). 27 When the UX96 is recognized correctly, ...
...les in the Control Panel to open the System window. 2. q How can I delete or re-install the driver? [Windows Me/98] 1. Double-click the "Device Manager" tab, select "YAMAHA USB MIDI Driver" and delete it. 3. Disconnect the USB cable. 5. Restart the computer. 6. Use MS-DOS prompt or Internet... Explorer to the instructions on page 11. [Macintosh] 1. Install the driver (page 15) and set up OMS (page 17). 27 When the UX96 is recognized correctly, ...
UX96 Owners Manual
Page 4
...place for future reference. Please read this Owner's Manual are intended for choosing the Yamaha UX96 USB-MIDI interface. After you for instructional pur- Welcome to the UX96 Thank you read this Owner's Manual are the trademarks or registered trademarks of their ...respective companies. 4 The UX96 is a MIDI interface that has a USB terminal and enjoy the advantages of Contents UX96 Features 5 Package Contents 6 System Requirements 7 Specifications 7 Parts and Functions 8 Connection 9 Installing the Driver 10 Changing the driver setting (MIDI Patch Screen 20 ...
...place for future reference. Please read this Owner's Manual are intended for choosing the Yamaha UX96 USB-MIDI interface. After you for instructional pur- Welcome to the UX96 Thank you read this Owner's Manual are the trademarks or registered trademarks of their ...respective companies. 4 The UX96 is a MIDI interface that has a USB terminal and enjoy the advantages of Contents UX96 Features 5 Package Contents 6 System Requirements 7 Specifications 7 Parts and Functions 8 Connection 9 Installing the Driver 10 Changing the driver setting (MIDI Patch Screen 20 ...


