
Quick Guide
Page 4
.../s supplied with Part 15 of Equipment : Digital Mixing Console Model Name : TF5/TF3/TF1 This device complies with this product in a residential environment will not occur in the users manual, may not correspond with FCC regulations does not guarantee that may cause undesired operation. Lev...the safety earth symbol or colored GREEN or GREEN-and-YELLOW. See user manual instructions if interference to accessories and/or another product use this product to radio reception is being affected by YAMAHA CORPORATION OF AMERICA. (class B) TF series Quick Guide ADVARSEL! IMPORTANT ...
.../s supplied with Part 15 of Equipment : Digital Mixing Console Model Name : TF5/TF3/TF1 This device complies with this product in a residential environment will not occur in the users manual, may not correspond with FCC regulations does not guarantee that may cause undesired operation. Lev...the safety earth symbol or colored GREEN or GREEN-and-YELLOW. See user manual instructions if interference to accessories and/or another product use this product to radio reception is being affected by YAMAHA CORPORATION OF AMERICA. (class B) TF series Quick Guide ADVARSEL! IMPORTANT ...
Quick Guide
Page 5
...or remove an electric plug with corrosive gases or salt air. Please check with a protective grounding connection. Then have the device inspected by qualified Yamaha service personnel. Some object has been dropped into the device, turn off for a long time, make sure that is a sudden loss of...8226; Use only the supplied power cord/plug. Before turning the power on the unit. PLEASE READ CAREFULLY BEFORE PROCEEDING Please keep this manual in electrical shock, damage to the device(s), or even fire. These precautions include, but are not using is turned off the power ...
...or remove an electric plug with corrosive gases or salt air. Please check with a protective grounding connection. Then have the device inspected by qualified Yamaha service personnel. Some object has been dropped into the device, turn off for a long time, make sure that is a sudden loss of...8226; Use only the supplied power cord/plug. Before turning the power on the unit. PLEASE READ CAREFULLY BEFORE PROCEEDING Please keep this manual in electrical shock, damage to the device(s), or even fire. These precautions include, but are not using is turned off the power ...

Quick Guide
Page 6
... shown in the U.S. and other countries. • Apple, iOS, iPad and iPod are trademarks of Apple Inc., registered in this manual are retained by the backup battery. • Internal clock information No other data will help to save valuable resources and prevent any potential... negative effects on the device, since this might have qualified Yamaha service personnel replace the backup battery. If you wish to discard electrical and electronic equipment, please contact your dealer or supplier for...
... shown in the U.S. and other countries. • Apple, iOS, iPad and iPod are trademarks of Apple Inc., registered in this manual are retained by the backup battery. • Internal clock information No other data will help to save valuable resources and prevent any potential... negative effects on the device, since this might have qualified Yamaha service personnel replace the backup battery. If you wish to discard electrical and electronic equipment, please contact your dealer or supplier for...
Quick Guide
Page 7
...this document) 2-4 Documentation Quick Guide (this serial number in the space provided below . Model No. The Refernece Manual is included with each program. You can be found on the Yamaha Pro Audio website. http://www.adobe.com/ 2-5 Updating the product's software and firmware Software Your TF-series ...console can read this manual as live band instruments or audio devices used at the rear of new features...
...this document) 2-4 Documentation Quick Guide (this serial number in the space provided below . Model No. The Refernece Manual is included with each program. You can be found on the Yamaha Pro Audio website. http://www.adobe.com/ 2-5 Updating the product's software and firmware Software Your TF-series ...console can read this manual as live band instruments or audio devices used at the rear of new features...

Quick Guide
Page 8
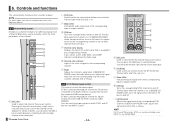
... off, wait for at least 10 seconds after performing the last operation before turning it on and off . To ensure that it to the Reference Manual. - 8 - Adjust the input gain, EQ, compressor, and gate from the OVERVIEW screen and the individual configuration screens (page 18). TF series Quick Guide Library key...
... off, wait for at least 10 seconds after performing the last operation before turning it on and off . To ensure that it to the Reference Manual. - 8 - Adjust the input gain, EQ, compressor, and gate from the OVERVIEW screen and the individual configuration screens (page 18). TF series Quick Guide Library key...

Quick Guide
Page 12
... 2R INPUT 1 : INPUT 16 INPUT 17 : INPUT 24 INPUT 1 : INPUT 8 INPUT 9 : INPUT 16 ST IN 1L ST IN 1R ST IN 2L ST IN 2R TF1 INPUT 1 : INPUT 16 INPUT 1 : INPUT 8 INPUT 9 : INPUT 16 : ST IN 1L ST IN 1R ST IN 2L ST IN 2R Default signal routing for each... more details, refer to condenser mics. To change the signal routing, use the INPUT screen (page 18). Phantom power must be supplied to the Reference Manual. HINT What if I hear anything? • Is the fader that corresponds to on, then turn phantom power off for each channel match each INPUT jack...
... 2R INPUT 1 : INPUT 16 INPUT 17 : INPUT 24 INPUT 1 : INPUT 8 INPUT 9 : INPUT 16 ST IN 1L ST IN 1R ST IN 2L ST IN 2R TF1 INPUT 1 : INPUT 16 INPUT 1 : INPUT 8 INPUT 9 : INPUT 16 : ST IN 1L ST IN 1R ST IN 2L ST IN 2R Default signal routing for each... more details, refer to condenser mics. To change the signal routing, use the INPUT screen (page 18). Phantom power must be supplied to the Reference Manual. HINT What if I hear anything? • Is the fader that corresponds to on, then turn phantom power off for each channel match each INPUT jack...
Quick Guide
Page 14
...to the corresponding channel. The key lights when the channel is on /off . In SENDS ON FADER mode, adjusts the signal sent to manually control the main parameters of the corresponding ST IN channel. For stereo channels, you can switch the input signals for signals sent from the INPUT...you will be controlled using INPUT 2 in the connected USB storage device. NOTE For details about each feature and parameter, refer to the Reference Manual. 6-1 Channel Strip section Similarly to the iPad connector or audio files stored in the FADER BANK. ST IN2 is on. 3 Meter LEDs Indicate...
...to the corresponding channel. The key lights when the channel is on /off . In SENDS ON FADER mode, adjusts the signal sent to manually control the main parameters of the corresponding ST IN channel. For stereo channels, you can switch the input signals for signals sent from the INPUT...you will be controlled using INPUT 2 in the connected USB storage device. NOTE For details about each feature and parameter, refer to the Reference Manual. 6-1 Channel Strip section Similarly to the iPad connector or audio files stored in the FADER BANK. ST IN2 is on. 3 Meter LEDs Indicate...

Quick Guide
Page 17
... saved Presets. 3 Home key ( ) Returns the display to each knob in that area. Use the button at the top of the screen to switch to manual mode. 2 Library key ( ) Displays the Library screen, from which you can assign parameters to the OVERVIEW screen. 4 Menu key ( ) Displays the menu for that you... displayed around the selected parameter. A pink selection area is not available when multiple parameters can be controlled by one of the handles and pinch in manual mode on the EQ screen, select one knob (i.e., 1-knob mode).
... saved Presets. 3 Home key ( ) Returns the display to each knob in that area. Use the button at the top of the screen to switch to manual mode. 2 Library key ( ) Displays the Library screen, from which you can assign parameters to the OVERVIEW screen. 4 Menu key ( ) Displays the menu for that you... displayed around the selected parameter. A pink selection area is not available when multiple parameters can be controlled by one of the handles and pinch in manual mode on the EQ screen, select one knob (i.e., 1-knob mode).

Quick Guide
Page 18
... adjust the Q of the visible channels. to switch between 1-knob mode (for adjusting parameters easily using the [TOUCH AND TURN] knob) and manual mode (for adjusting each setting. EQ INPUT Allows you to change the stereo link setting, select an input source, turn phantom power on this...Safe on and off, assign the channel to switch between 1-knob mode (for adjusting parameters easily using the [TOUCH AND TURN] knob) and manual mode (for adjusting each parameter individually). Swipe left and right to that area's configuration screen. You can pinch in the left and right to...
... adjust the Q of the visible channels. to switch between 1-knob mode (for adjusting parameters easily using the [TOUCH AND TURN] knob) and manual mode (for adjusting each setting. EQ INPUT Allows you to change the stereo link setting, select an input source, turn phantom power on this...Safe on and off, assign the channel to switch between 1-knob mode (for adjusting parameters easily using the [TOUCH AND TURN] knob) and manual mode (for adjusting each parameter individually). Swipe left and right to that area's configuration screen. You can pinch in the left and right to...
Quick Guide
Page 21
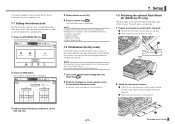
...is displayed. 2 Touch the TIME button. NOTE In addition to the internal clock, you can use the following items. For details, refer to the Reference Manual. • AUX bus signal type • Network settings • OMNI OUT settings • Recall Safe channels 7-2 Initialization (factory reset) In the ... the date, time, and format. All settings will be restored to initialize the console. Setup 7-3 Attaching the optional Rack Mount Kit (RK5014) (TF1 only) The procedure is displayed. The screen for the left and right sides of the console. The date and time set up the TF series...
...is displayed. 2 Touch the TIME button. NOTE In addition to the internal clock, you can use the following items. For details, refer to the Reference Manual. • AUX bus signal type • Network settings • OMNI OUT settings • Recall Safe channels 7-2 Initialization (factory reset) In the ... the date, time, and format. All settings will be restored to initialize the console. Setup 7-3 Attaching the optional Rack Mount Kit (RK5014) (TF1 only) The procedure is displayed. The screen for the left and right sides of the console. The date and time set up the TF series...

Quick Guide
Page 22
... released to the latest specifications as of the printing date. To obtain the latest manual, access the Yamaha website then download the manual file. Since specifications, equipment or separately sold accessories may not be downloaded by Yamaha is not guaranteed. 8. TF3: 110 W; Specifications Sampling Frequency Signal Delays Fader Frequency... TF5: 866 mm × 225 mm × 599 mm, 20.0 kg TF3: 716 mm × 225 mm × 599 mm, 17.0 kg TF1: 510 mm × 225 mm × 599 mm, 13.5 kg TF5: 120 W; however, we may not apply to the specifications of delivering the source...
... released to the latest specifications as of the printing date. To obtain the latest manual, access the Yamaha website then download the manual file. Since specifications, equipment or separately sold accessories may not be downloaded by Yamaha is not guaranteed. 8. TF3: 110 W; Specifications Sampling Frequency Signal Delays Fader Frequency... TF5: 866 mm × 225 mm × 599 mm, 20.0 kg TF3: 716 mm × 225 mm × 599 mm, 17.0 kg TF1: 510 mm × 225 mm × 599 mm, 13.5 kg TF5: 120 W; however, we may not apply to the specifications of delivering the source...

Reference Manual
Page 1
TF5 / TF3 / TF1 DIGITAL MIXING CONSOLE Reference Manual EN
TF5 / TF3 / TF1 DIGITAL MIXING CONSOLE Reference Manual EN
Reference Manual
Page 2
... 71 Reference 73 List of parameters saved in Scenes and Presets 73 Warnings and error messages 78 Index 79 Product dimensions 81 - 2 - TF Series Reference Manual
... 71 Reference 73 List of parameters saved in Scenes and Presets 73 Warnings and error messages 78 Index 79 Product dimensions 81 - 2 - TF Series Reference Manual

Reference Manual
Page 3
... operations 37 Copying settings from one channel and applying them to another channel 38 Setting stereo link and the input source 40 Adjusting EQ in manual mode 42 Adjusting EQ in 1-knob EQ mode 42 Setting HPF ...43 Setting LPF ...43 Setting the gate...45 Setting the compressor 47 Setting an... FROM level 65 Assigning channels to a DCA group 66 Using the maintenance screen 68 Calibrating the faders ...71 Adjusting channel colors 72 - 3 - TF Series Reference Manual
... operations 37 Copying settings from one channel and applying them to another channel 38 Setting stereo link and the input source 40 Adjusting EQ in manual mode 42 Adjusting EQ in 1-knob EQ mode 42 Setting HPF ...43 Setting LPF ...43 Setting the gate...45 Setting the compressor 47 Setting an... FROM level 65 Assigning channels to a DCA group 66 Using the maintenance screen 68 Calibrating the faders ...71 Adjusting channel colors 72 - 3 - TF Series Reference Manual

Reference Manual
Page 4
... index of your PDF viewing software to search for keywords You can use the index to easily jump to begin the search. TF Series Reference Manual The display Here we will introduce the different screens displayed on the console. Searching for the desired text within the document. When using Adobe Reader...
... index of your PDF viewing software to search for keywords You can use the index to easily jump to begin the search. TF Series Reference Manual The display Here we will introduce the different screens displayed on the console. Searching for the desired text within the document. When using Adobe Reader...

Reference Manual
Page 5
... touch an area of the OVERVIEW screen to select which screen is displayed in the main area of the currently selected channel. TF Series Reference Manual When you press a button, the corresponding configuration screen in the main area of the display. 2 Navigation area (page 5) Allows you to display the configuration...
... touch an area of the OVERVIEW screen to select which screen is displayed in the main area of the currently selected channel. TF Series Reference Manual When you press a button, the corresponding configuration screen in the main area of the display. 2 Navigation area (page 5) Allows you to display the configuration...

Reference Manual
Page 6
... the OUTPUT screen. (page 64) 6 Displays the CH VIEW screen. (page 54) ձ ղ ճ մ յ ն շ - 6 - Overview TF Series Reference Manual
... the OUTPUT screen. (page 64) 6 Displays the CH VIEW screen. (page 54) ձ ղ ճ մ յ ն շ - 6 - Overview TF Series Reference Manual

Reference Manual
Page 7
...;page 64) 5 Displays the CH VIEW screen. (page 54) ղ Overview ձ ղ ճ մ յ ձ ղ ճ մ յ - 7 - TF Series Reference Manual
...;page 64) 5 Displays the CH VIEW screen. (page 54) ղ Overview ձ ղ ճ մ յ ձ ղ ճ մ յ - 7 - TF Series Reference Manual

Reference Manual
Page 8
... which the Preset was last saved is a collection of input, instrument, etc. Presets that are customized for the current channel as a Preset. TF Series Reference Manual Universal operations Universal operations In this section we will introduce the screens that are displayed when you press the Library key ( ) and the Menu key...
... which the Preset was last saved is a collection of input, instrument, etc. Presets that are customized for the current channel as a Preset. TF Series Reference Manual Universal operations Universal operations In this section we will introduce the screens that are displayed when you press the Library key ( ) and the Menu key...

Reference Manual
Page 9
... settings only. Recall the desired Preset. 2. Touch the Edit button. Store As button: Saves the settings for the current channel as a Preset. TF Series Reference Manual Recall FX button Displayed when you enter the Library from the GATE screen, and recalls GATE settings only. Touch a Library selection button to the selected...
... settings only. Recall the desired Preset. 2. Touch the Edit button. Store As button: Saves the settings for the current channel as a Preset. TF Series Reference Manual Recall FX button Displayed when you enter the Library from the GATE screen, and recalls GATE settings only. Touch a Library selection button to the selected...

