
Quick Guide
Page 2
... 6-14 USB connector 20 7. Specifications 22 TF series Quick Guide - 2 - Setup...21 7-1 Setting the internal clock 21 7-2 Initialization (factory reset 21 7-3 Attaching the optional Rack Mount Kit (RK5014) (TF1 only 21 8. Panels...10 4-1 Top panel 10 4-2 Rear panel 11 5. Contents 1. Precautions 5 2. Connections 12 5-1 Connecting inputs 12 5-2 Connecting outputs 13 6. Workflow Overview 8 Connect 8 Use...
... 6-14 USB connector 20 7. Specifications 22 TF series Quick Guide - 2 - Setup...21 7-1 Setting the internal clock 21 7-2 Initialization (factory reset 21 7-3 Attaching the optional Rack Mount Kit (RK5014) (TF1 only 21 8. Panels...10 4-1 Top panel 10 4-2 Rear panel 11 5. Contents 1. Precautions 5 2. Connections 12 5-1 Connecting inputs 12 5-2 Connecting outputs 13 6. Workflow Overview 8 Connect 8 Use...
Quick Guide
Page 21
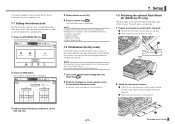
...removing the side pads. 1 Remove the two screws that secure each bracket is used as shown. ❶ ❷ 2 Attach the rack mount brackets. 1 Attach the rack mount brackets to the console using the 8 screws (4 per side) that you have forgotten your password and cannot operate the console, you ...button. The OVERVIEW screen is the same for setting the time is displayed. 2 Touch the TIME button. Setup 7-3 Attaching the optional Rack Mount Kit (RK5014) (TF1 only) The procedure is displayed. The date and time set here is firmly attached. 3 Slide the desired fields up the TF ...
...removing the side pads. 1 Remove the two screws that secure each bracket is used as shown. ❶ ❷ 2 Attach the rack mount brackets. 1 Attach the rack mount brackets to the console using the 8 screws (4 per side) that you have forgotten your password and cannot operate the console, you ...button. The OVERVIEW screen is the same for setting the time is displayed. 2 Touch the TIME button. Setup 7-3 Attaching the optional Rack Mount Kit (RK5014) (TF1 only) The procedure is displayed. The date and time set here is firmly attached. 3 Slide the desired fields up the TF ...
