
Owner's Manual
Page 2
... cord or plug is required when the apparatus has been damaged in it may be of sufficient magnitude to constitute a risk of the obsolete outlet. 10 Protect the power cord from the apparatus. 11 Only use this system in a safe place for your safety. Servicing is damaged, liquid has been spilled...
... cord or plug is required when the apparatus has been damaged in it may be of sufficient magnitude to constitute a risk of the obsolete outlet. 10 Protect the power cord from the apparatus. 11 Only use this system in a safe place for your safety. Servicing is damaged, liquid has been spilled...
Owner's Manual
Page 4
...moisture and cold. If glass etc. are continuously output at least 20 cm of space above, behind and on switches, controls or connection wires. YAMAHA will radiate from this unit, reduce the volume level. Furthermore, do not position with water in power amplifier, heat will not be exposed to...and/or damage to use . It might impair picture color. It might cause a fire, damage to the unit and/or personal injury. 10 Do not place the following operating precautions before concluding that the unit is designed to the unit and/or personal injury. 14 Never open ...
...moisture and cold. If glass etc. are continuously output at least 20 cm of space above, behind and on switches, controls or connection wires. YAMAHA will radiate from this unit, reduce the volume level. Furthermore, do not position with water in power amplifier, heat will not be exposed to...and/or damage to use . It might impair picture color. It might cause a fire, damage to the unit and/or personal injury. 10 Do not place the following operating precautions before concluding that the unit is designed to the unit and/or personal injury. 14 Never open ...
Owner's Manual
Page 7
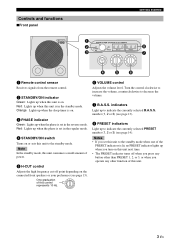
...Turns on the connected front speakers or your preference (see page 13). Controls and functions ■Front panel GETTING STARTED 1 2 3 SUBWOOFER SYSTEM Soavo-900SW 1 2 3 1 2 3 STANDBY /ON PHASE B.A.S.S. One graduation of this unit is set this unit to the standby mode when one of...the volume. 7 B.A.S.S. Turn the control clockwise to increase the volume, counterclockwise to the standby mode. PRESET STANDBY /ON 4 140Hz H-CUT 5 10 VOLUME 6 8 7 0 40Hz 40Hz 1 Remote control sensor Receives signals from the remote control. 2 STANDBY/ON indicator Green: Lights up when ...
...Turns on the connected front speakers or your preference (see page 13). Controls and functions ■Front panel GETTING STARTED 1 2 3 SUBWOOFER SYSTEM Soavo-900SW 1 2 3 1 2 3 STANDBY /ON PHASE B.A.S.S. One graduation of this unit is set this unit to the standby mode when one of...the volume. 7 B.A.S.S. Turn the control clockwise to increase the volume, counterclockwise to the standby mode. PRESET STANDBY /ON 4 140Hz H-CUT 5 10 VOLUME 6 8 7 0 40Hz 40Hz 1 Remote control sensor Receives signals from the remote control. 2 STANDBY/ON indicator Green: Lights up when ...

Owner's Manual
Page 8
... connection information. 2 INPUT 3 terminals See pages 7 - 8 for connection information. 3 INPUT 2 (LFE) terminals See page 8 for connection information. 4 OUTPUT terminals See page 10 for connection information. 5 INPUT 1 terminals See pages 10 - 11 for connection information. 6 AC IN Connects the supplied power cable (see page 12). 7 POWER switch Switches the power (ON/OFF) of...
... connection information. 2 INPUT 3 terminals See pages 7 - 8 for connection information. 3 INPUT 2 (LFE) terminals See page 8 for connection information. 4 OUTPUT terminals See page 10 for connection information. 5 INPUT 1 terminals See pages 10 - 11 for connection information. 6 AC IN Connects the supplied power cable (see page 12). 7 POWER switch Switches the power (ON/OFF) of...
Owner's Manual
Page 11
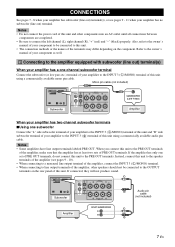
... etc.) terminal of your amplifier has no subwoofer (line out) terminal. CONNECTIONS See pages 7 - 8 when your amplifier has subwoofer (line out) terminal(s), or see pages 9 - 10). • When connecting to a monaural line output terminal of the amplifier, connect the INPUT 3 ( L /MONO) terminal. • When connecting to line output terminals of the...
... etc.) terminal of your amplifier has no subwoofer (line out) terminal. CONNECTIONS See pages 7 - 8 when your amplifier has subwoofer (line out) terminal(s), or see pages 9 - 10). • When connecting to a monaural line output terminal of the amplifier, connect the INPUT 3 ( L /MONO) terminal. • When connecting to line output terminals of the...

Owner's Manual
Page 13
... following instructions to make connections. ■Connecting to the speaker cable ■Banana plug connection 12 10 mm (3/8") 1 2 4 3 5 1 Tighten the knob. 2 Insert the banana plug connecter into the end of the corresponding terminal. 1 Remove approximately 10 mm (3/8") of insulation from this unit or the speakers, or both of them . • Make sure...
... following instructions to make connections. ■Connecting to the speaker cable ■Banana plug connection 12 10 mm (3/8") 1 2 4 3 5 1 Tighten the knob. 2 Insert the banana plug connecter into the end of the corresponding terminal. 1 Remove approximately 10 mm (3/8") of insulation from this unit or the speakers, or both of them . • Make sure...

Owner's Manual
Page 14
... RR IINNPPUUT T3 3 RR IINNPPUUTT2 2 RR FROMFARMOPMLIFIER LL AIMNPPLUIFTIE1R Front speaker (L) L MONO L OUTPUT R TO SPEAKERS L R INPUT 3 R INPUT 2 R FROM AMPLIFIER L INPUT 1 Subwoofer (R) Speaker terminals Amplifier Subwoofer (L) 10 En y Connecting front speakers via this unit does not affect the sound quality. ■Using one set of front speaker terminals Connect the speaker terminals...
... RR IINNPPUUT T3 3 RR IINNPPUUTT2 2 RR FROMFARMOPMLIFIER LL AIMNPPLUIFTIE1R Front speaker (L) L MONO L OUTPUT R TO SPEAKERS L R INPUT 3 R INPUT 2 R FROM AMPLIFIER L INPUT 1 Subwoofer (R) Speaker terminals Amplifier Subwoofer (L) 10 En y Connecting front speakers via this unit does not affect the sound quality. ■Using one set of front speaker terminals Connect the speaker terminals...

Owner's Manual
Page 15
... 2 R FROM AMPLIFIER L INPUT 1 Front speaker (R) Speaker terminals Amplifier Front speaker (L) 11 En CONNECTIONS When your amplifier has one set of front speaker terminals" on page 10. ■Using one set of front speaker terminals of the amplifier to the INPUT 1 terminals of this way, follow "When your amplifier has two sets...
... 2 R FROM AMPLIFIER L INPUT 1 Front speaker (R) Speaker terminals Amplifier Front speaker (L) 11 En CONNECTIONS When your amplifier has one set of front speaker terminals" on page 10. ■Using one set of front speaker terminals of the amplifier to the INPUT 1 terminals of this way, follow "When your amplifier has two sets...

Owner's Manual
Page 18
SUBW -900SW 31 2 3 PRESET STANDBY /ON Pressing SLEEP again cancels the sleep timer. 3 Press PRESET 1. POWER STANDBY SLEEP B.A.S.S. Remote control 1 3 1 POWER STANDBY SLEEP B.A.S.S. The ... Press MEMORY. PHASE MEMORY PRESET 1 2 3 1 2 HIGH CUT VOLUME 1 Front panel STANDBY/ON indicator SUBWOOFER SYSTEM Soavo-900SW 1 2 3 1 2 3 STANDBY /ON PHASE B.A.S.S. The PRESET indicators on (Last memory function). PRESET STANDBY /ON 0 40Hz 100Hz H-CUT 10 VOLUME 1 ■Memory back-up Even if you turn off this unit by pressing a PRESET, pressing another...
SUBW -900SW 31 2 3 PRESET STANDBY /ON Pressing SLEEP again cancels the sleep timer. 3 Press PRESET 1. POWER STANDBY SLEEP B.A.S.S. Remote control 1 3 1 POWER STANDBY SLEEP B.A.S.S. The ... Press MEMORY. PHASE MEMORY PRESET 1 2 3 1 2 HIGH CUT VOLUME 1 Front panel STANDBY/ON indicator SUBWOOFER SYSTEM Soavo-900SW 1 2 3 1 2 3 STANDBY /ON PHASE B.A.S.S. The PRESET indicators on (Last memory function). PRESET STANDBY /ON 0 40Hz 100Hz H-CUT 10 VOLUME 1 ■Memory back-up Even if you turn off this unit by pressing a PRESET, pressing another...
Owner's Manual
Page 19
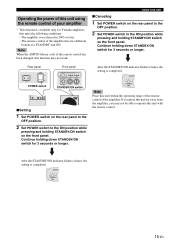
...Front panel SUBWOOFER SYSTEM Soavo-900SW 1 2 31 2 3 STANDBY /ON PHASE B.A.S.S. SUBW STANDBY /ON Note Place this unit far away from the amplifier, you may not work. Continue holding down STANDBY/ON switch for STANDBY and ON. PRESET STANDBY /ON 0 40Hz 100Hz H-CUT 10 VOLUME STANDBY/ON ...to the OFF position. 2 Set POWER switch to operate this unit with the remote control. Continue holding down STANDBY/ON switch for Yamaha amplifiers that meet the following conditions: - The amplifier was released in 2005 or later. - After the STANDBY/ON indicator flashes 2...
...Front panel SUBWOOFER SYSTEM Soavo-900SW 1 2 31 2 3 STANDBY /ON PHASE B.A.S.S. SUBW STANDBY /ON Note Place this unit far away from the amplifier, you may not work. Continue holding down STANDBY/ON switch for STANDBY and ON. PRESET STANDBY /ON 0 40Hz 100Hz H-CUT 10 VOLUME STANDBY/ON ...to the OFF position. 2 Set POWER switch to operate this unit with the remote control. Continue holding down STANDBY/ON switch for Yamaha amplifiers that meet the following conditions: - The amplifier was released in 2005 or later. - After the STANDBY/ON indicator flashes 2...
Owner's Manual
Page 20
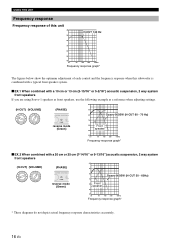
... (PHASE) OOFER SYSTEM S 1 PHASE reverse mode (Green) 90 80 Soavo-900SW (H-CUT 60 - 70 Hz) 70 60 Front speaker 50 40 20 50 100 200 500Hz Frequency response graph* ■EX.2 When combined with a 10 cm or 13 cm (3-15/16" or 5-2/16") acoustic suspension, 2 way system .../16") acoustic suspension, 2 way system front speakers dB (H-CUT) (VOLUME) (PHASE) 90 0 40Hz 140Hz H-CUT 10 VOLUME OOFER SYSTEM S 1 PHASE reverse mode (Green) 80 70 60 Front speaker 50 Soavo-900SW (H-CUT 50 - 60Hz) 40 20 50 100 200 500Hz Frequency response graph* * These diagrams do not depict actual...
... (PHASE) OOFER SYSTEM S 1 PHASE reverse mode (Green) 90 80 Soavo-900SW (H-CUT 60 - 70 Hz) 70 60 Front speaker 50 40 20 50 100 200 500Hz Frequency response graph* ■EX.2 When combined with a 10 cm or 13 cm (3-15/16" or 5-2/16") acoustic suspension, 2 way system .../16") acoustic suspension, 2 way system front speakers dB (H-CUT) (VOLUME) (PHASE) 90 0 40Hz 140Hz H-CUT 10 VOLUME OOFER SYSTEM S 1 PHASE reverse mode (Green) 80 70 60 Front speaker 50 Soavo-900SW (H-CUT 50 - 60Hz) 40 20 50 100 200 500Hz Frequency response graph* * These diagrams do not depict actual...

Owner's Manual
Page 23
... change without notice. 19 En SPECIFICATIONS Type .... and Canada models AC 120 V, 60 Hz U.K. Advanced Yamaha Active Servo Technology II Power Consumption 180 W Driver 25 cm (10") cone woofer Magnetic shielding type Amplifier Output (100 Hz, 4 ohms, 10% T.H.D 600 W Standby Power Consumption 0.5 W Dimensions (W x H x D 410 mm x 457 mm x 462 mm (16-1/8" x 17" x 18-3/16...
... change without notice. 19 En SPECIFICATIONS Type .... and Canada models AC 120 V, 60 Hz U.K. Advanced Yamaha Active Servo Technology II Power Consumption 180 W Driver 25 cm (10") cone woofer Magnetic shielding type Amplifier Output (100 Hz, 4 ohms, 10% T.H.D 600 W Standby Power Consumption 0.5 W Dimensions (W x H x D 410 mm x 457 mm x 462 mm (16-1/8" x 17" x 18-3/16...

