
Owner's Manual
Page 2
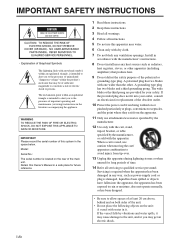
... important operating and maintenance (servicing) instructions in the literature accompanying the appliance. Retain this Owner's Manual in a safe place for long periods of time. 14 Refer all instructions. 5 Do not use attachments/accessories specified by the manufacturer. 12 Use only ...Install in accordance with the manufacturer's instructions. 8 Do not install near water. 6 Clean only with dry cloth. 7 Do not block any heat sources such as power-supply cord or plug is damaged, liquid has been spilled or objects have fallen into your safety. IMPORTANT Please record the serial number...
... important operating and maintenance (servicing) instructions in the literature accompanying the appliance. Retain this Owner's Manual in a safe place for long periods of time. 14 Refer all instructions. 5 Do not use attachments/accessories specified by the manufacturer. 12 Use only ...Install in accordance with the manufacturer's instructions. 8 Do not install near water. 6 Clean only with dry cloth. 7 Do not block any heat sources such as power-supply cord or plug is damaged, liquid has been spilled or objects have fallen into your safety. IMPORTANT Please record the serial number...
Owner's Manual
Page 3
.... ii En FCC INFORMATION (for Class "B" digital devices. This product, when installed as indicated in the instructions contained in this product is found in all installation instructions. Since hearing damage from excessive volume levels. This equipment generates/uses radio frequencies and, if not installed and used . Failure to follow instructions could void your authority, granted by playing it is often undetectable until it at...
.... ii En FCC INFORMATION (for Class "B" digital devices. This product, when installed as indicated in the instructions contained in this product is found in all installation instructions. Since hearing damage from excessive volume levels. This equipment generates/uses radio frequencies and, if not installed and used . Failure to follow instructions could void your authority, granted by playing it is often undetectable until it at...
Owner's Manual
Page 4
..." sounds) coming from windows, heat sources, sources of excessive vibration, dust, moisture and cold. falls by improper placement or installation of speakers. In this state, this unit away from the walls, allowing at high volume level. When moving the unit, first disconnect the power plug and the wires connected to prevent this unit from being damaged. 18 If you for selecting this...
..." sounds) coming from windows, heat sources, sources of excessive vibration, dust, moisture and cold. falls by improper placement or installation of speakers. In this state, this unit away from the walls, allowing at high volume level. When moving the unit, first disconnect the power plug and the wires connected to prevent this unit from being damaged. 18 If you for selecting this...
Owner's Manual
Page 5
... selector switch on the rear panel of this unit must be set for the plug supplied with the coloured markings identifying the terminals in your plug, proceed as a plug with bared flexible cord is marked with the letter L or coloured RED. For details, refer to the ground terminal 12 Connecting the power cable 12 USING THIS UNIT 13 Adjusting the sound balance 13 Storing the sound balance settings 14 Setting...
... selector switch on the rear panel of this unit must be set for the plug supplied with the coloured markings identifying the terminals in your plug, proceed as a plug with bared flexible cord is marked with the letter L or coloured RED. For details, refer to the ground terminal 12 Connecting the power cable 12 USING THIS UNIT 13 Adjusting the sound balance 13 Storing the sound balance settings 14 Setting...
Owner's Manual
Page 6
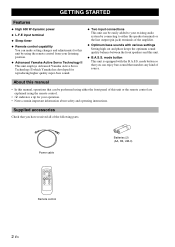
Power cable POWER STANDBY SLEEP B.A.S.S. PHASE MEMORY PRESET 1 2 3 HIGH CUT VOLUME Remote control Batteries (2) (AA, R6, UM-3) 2 En GETTING STARTED Features ◆ High 600 W dynamic power ◆ L.F.E input terminal ◆ Sleep timer ◆ Remote control capability You can make setting changes and adjustments for this unit by connecting to your existing audio system by using the remote control. • y indicates a tip for reproducing higher quality super-bass sound. ◆ Two input connections This unit can...
Power cable POWER STANDBY SLEEP B.A.S.S. PHASE MEMORY PRESET 1 2 3 HIGH CUT VOLUME Remote control Batteries (2) (AA, R6, UM-3) 2 En GETTING STARTED Features ◆ High 600 W dynamic power ◆ L.F.E input terminal ◆ Sleep timer ◆ Remote control capability You can make setting changes and adjustments for this unit by connecting to your existing audio system by using the remote control. • y indicates a tip for reproducing higher quality super-bass sound. ◆ Two input connections This unit can...
Owner's Manual
Page 7
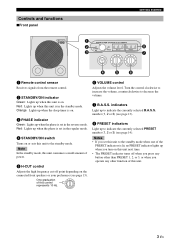
... the regular mode. 4 STANDBY/ON switch Turns on the connected front speakers or your preference (see page 13). 8 PRESET indicators Light up when this unit to the standby mode. number (1, 2 or 3) (see page 13). Turn the control clockwise to increase the volume, counterclockwise to indicate the currently selected B.A.S.S. Notes • If you set this unit is set in the standby mode. Controls and functions ■Front panel GETTING STARTED 1 2 3 SUBWOOFER SYSTEM Soavo-900SW 1 2 3 1 2 3 STANDBY /ON PHASE...
... the regular mode. 4 STANDBY/ON switch Turns on the connected front speakers or your preference (see page 13). 8 PRESET indicators Light up when this unit to the standby mode. number (1, 2 or 3) (see page 13). Turn the control clockwise to increase the volume, counterclockwise to indicate the currently selected B.A.S.S. Notes • If you set this unit is set in the standby mode. Controls and functions ■Front panel GETTING STARTED 1 2 3 SUBWOOFER SYSTEM Soavo-900SW 1 2 3 1 2 3 STANDBY /ON PHASE...

Owner's Manual
Page 8
... for the source. Note In the standby mode, this unit consumes a small amount of power. 2 POWER Turns on the connected front speakers or your speaker systems or the listening condition, there may be cases when better sound quality is obtained by monitoring the sound. 8 MEMORY Stores the B.A.S.S., volume, high-cut frequency and phase settings (see page 14). 7 PHASE Switches the phase mode. indicator changes between 1, 2, and 3. 4 PRESET Stores or...
... for the source. Note In the standby mode, this unit consumes a small amount of power. 2 POWER Turns on the connected front speakers or your speaker systems or the listening condition, there may be cases when better sound quality is obtained by monitoring the sound. 8 MEMORY Stores the B.A.S.S., volume, high-cut frequency and phase settings (see page 14). 7 PHASE Switches the phase mode. indicator changes between 1, 2, and 3. 4 PRESET Stores or...
Owner's Manual
Page 11
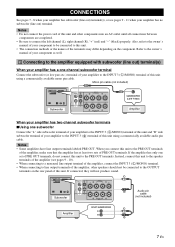
... subwoofer Connect the "L" side subwoofer terminal of your amplifier to the INPUT 3 ( L /MONO) terminal of this unit. Notes • Do not connect the power cord of this unit and other speakers should not be connected to this unit to connect the left channel (L), right channel (R), "+" (red) and "-" (black) properly. Mono pin cable (not included) L MONO L OUTPUT R TO SPEAKERS L Subwoofer R INPUT 3 R INPUT 2 R FROM AMPLIFIER L INPUT 1 Amplifier When your amplifier has two-channel subwoofer terminals ■Using one set of PRE...
... subwoofer Connect the "L" side subwoofer terminal of your amplifier to the INPUT 3 ( L /MONO) terminal of this unit. Notes • Do not connect the power cord of this unit and other speakers should not be connected to this unit to connect the left channel (L), right channel (R), "+" (red) and "-" (black) properly. Mono pin cable (not included) L MONO L OUTPUT R TO SPEAKERS L Subwoofer R INPUT 3 R INPUT 2 R FROM AMPLIFIER L INPUT 1 Amplifier When your amplifier has two-channel subwoofer terminals ■Using one set of PRE...

Owner's Manual
Page 12
... high frequencies from the signals for sending to the subwoofer, connect the amplifier to the INPUT 2 (LFE) terminal of this unit using a commercially available mono pin cable, and connect the "L" side subwoofer terminal of your amplifier can cut ) circuit. CONNECTIONS ■Using two subwoofers Connect the "R" side subwoofer terminal of your amplifier to the INPUT 3 ( R ) terminal on this unit using a commercially available mono pin cable. L MONO L OUTPUT R TO SPEAKERS L R INPUT 3 R INPUT 2 R FROM AMPLIFIER L INPUT 1 L MONO L OUTPUT R TO SPEAKERS L R INPUT 3 R INPUT...
... high frequencies from the signals for sending to the subwoofer, connect the amplifier to the INPUT 2 (LFE) terminal of this unit using a commercially available mono pin cable, and connect the "L" side subwoofer terminal of your amplifier can cut ) circuit. CONNECTIONS ■Using two subwoofers Connect the "R" side subwoofer terminal of your amplifier to the INPUT 3 ( R ) terminal on this unit using a commercially available mono pin cable. L MONO L OUTPUT R TO SPEAKERS L R INPUT 3 R INPUT 2 R FROM AMPLIFIER L INPUT 1 L MONO L OUTPUT R TO SPEAKERS L R INPUT 3 R INPUT...

Owner's Manual
Page 13
... speaker cables. 2 Twist the exposed wires of the cable together to prevent short circuits. 3 Turn the knob counterclockwise to loosen. 4 Insert the bare wire into the hole. Do not bundle or roll up the excess part of the speaker terminals are reversed, the sound will be produced. 9 En If these cables are observed and set correctly. CONNECTIONS 2 Connecting to an amplifier not equipped with a subwoofer...
... speaker cables. 2 Twist the exposed wires of the cable together to prevent short circuits. 3 Turn the knob counterclockwise to loosen. 4 Insert the bare wire into the hole. Do not bundle or roll up the excess part of the speaker terminals are reversed, the sound will be produced. 9 En If these cables are observed and set correctly. CONNECTIONS 2 Connecting to an amplifier not equipped with a subwoofer...

Owner's Manual
Page 14
... unit does not affect the sound quality. ■Using one set of front speaker terminals Connect the speaker terminals of the amplifier to the INPUT 1 terminals of this unit, and connect the OUTPUT terminals of this unit to the front speakers using a commercially available speaker cable. CONNECTIONS When your amplifier has one subwoofer Front speaker (R) Front speaker (L) L MONO L OUTPUT R TO SPEAKERS L R INPUT 3 R INPUT 2 R FROM AMPLIFIER L INPUT 1 Subwoofer Speaker terminals Amplifier ■Using two subwoofers Front speaker (R) LL MMOONNOO LL OOUUTTPPUUTT RR...
... unit does not affect the sound quality. ■Using one set of front speaker terminals Connect the speaker terminals of the amplifier to the INPUT 1 terminals of this unit, and connect the OUTPUT terminals of this unit to the front speakers using a commercially available speaker cable. CONNECTIONS When your amplifier has one subwoofer Front speaker (R) Front speaker (L) L MONO L OUTPUT R TO SPEAKERS L R INPUT 3 R INPUT 2 R FROM AMPLIFIER L INPUT 1 Subwoofer Speaker terminals Amplifier ■Using two subwoofers Front speaker (R) LL MMOONNOO LL OOUUTTPPUUTT RR...

Owner's Manual
Page 15
... speaker cables. • Set the amplifier so that both sets of front speaker terminals and both terminals can output sound signals simultaneously • Connect one subwoofer Front speaker (R) L MONO L OUTPUT R TO SPEAKERS L Front speaker (L) Subwoofer R INPUT 3 R INPUT 2 R FROM AMPLIFIER L INPUT 1 Speaker terminals Amplifier ■Using two subwoofers L MONO L OUTPUT R TO SPEAKERS L R INPUT 3 R INPUT 2 R FROM AMPLIFIER L INPUT 1 Subwoofer (R) Subwoofer (L) L MONO L OUTPUT R TO SPEAKERS L R INPUT 3 R INPUT 2 R FROM AMPLIFIER L INPUT 1 Front speaker...
... speaker cables. • Set the amplifier so that both sets of front speaker terminals and both terminals can output sound signals simultaneously • Connect one subwoofer Front speaker (R) L MONO L OUTPUT R TO SPEAKERS L Front speaker (L) Subwoofer R INPUT 3 R INPUT 2 R FROM AMPLIFIER L INPUT 1 Speaker terminals Amplifier ■Using two subwoofers L MONO L OUTPUT R TO SPEAKERS L R INPUT 3 R INPUT 2 R FROM AMPLIFIER L INPUT 1 Subwoofer (R) Subwoofer (L) L MONO L OUTPUT R TO SPEAKERS L R INPUT 3 R INPUT 2 R FROM AMPLIFIER L INPUT 1 Front speaker...

Owner's Manual
Page 16
... of your amplifier. Use of other power cables. Note When connecting the GND (ground) terminal, make sure the power cables of the amplifier and this unit are complete, and then plug the power cable to an AC outlet. POWER ON OFF A L MONO L OUTPUT R TO SPEAKERS L R INPUT 3 R INPUT 2 R FROM AMPLIFIER L INPUT 1 B To the AC outlet Notes • Do not use other power cables may create distorted sounds or turn off the power of your amplifier as...
... of your amplifier. Use of other power cables. Note When connecting the GND (ground) terminal, make sure the power cables of the amplifier and this unit are complete, and then plug the power cable to an AC outlet. POWER ON OFF A L MONO L OUTPUT R TO SPEAKERS L R INPUT 3 R INPUT 2 R FROM AMPLIFIER L INPUT 1 B To the AC outlet Notes • Do not use other power cables may create distorted sounds or turn off the power of your amplifier as...
Owner's Manual
Page 17
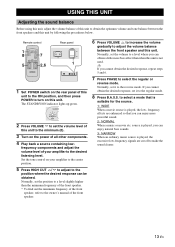
... speaker. 6 Press VOLUME to increase the volume gradually to adjust the volume balance between the front speakers and this unit. frequency effects are cut off to make the sound clearer. 13 En Set the tone control on the power of all other components. 4 Play back a source containing low- Normally, set it to a level slightly higher than when this unit is played, the low- PHASE MEMORY PRESET 1 2 3 HIGH CUT VOLUME 2,6 Rear panel POWER ON OFF 1 1 Set POWER switch on the rear panel...
... speaker. 6 Press VOLUME to increase the volume gradually to adjust the volume balance between the front speakers and this unit. frequency effects are cut off to make the sound clearer. 13 En Set the tone control on the power of all other components. 4 Play back a source containing low- Normally, set it to a level slightly higher than when this unit is played, the low- PHASE MEMORY PRESET 1 2 3 HIGH CUT VOLUME 2,6 Rear panel POWER ON OFF 1 1 Set POWER switch on the rear panel...

Owner's Manual
Page 18
... rear panel, this unit. The current setting is cleared. y • In step 3, pressing a stored number overwrites the old setting. • While the VOLUME control or the H-CUT control is rotating by using the POWER switch on the front panel flash. Remote control 1 3 1 POWER STANDBY SLEEP B.A.S.S. POWER STANDBY SLEEP B.A.S.S. USING THIS UNIT Storing the sound balance settings You can store up to recall (1, 2 or 3). 14 En PHASE MEMORY PRESET 1 2 3 1 2 HIGH CUT VOLUME 1 Front panel STANDBY/ON indicator SUBWOOFER SYSTEM Soavo-900SW 1 2 3 1 2 3 STANDBY...
... rear panel, this unit. The current setting is cleared. y • In step 3, pressing a stored number overwrites the old setting. • While the VOLUME control or the H-CUT control is rotating by using the POWER switch on the front panel flash. Remote control 1 3 1 POWER STANDBY SLEEP B.A.S.S. POWER STANDBY SLEEP B.A.S.S. USING THIS UNIT Storing the sound balance settings You can store up to recall (1, 2 or 3). 14 En PHASE MEMORY PRESET 1 2 3 1 2 HIGH CUT VOLUME 1 Front panel STANDBY/ON indicator SUBWOOFER SYSTEM Soavo-900SW 1 2 3 1 2 3 STANDBY...
Owner's Manual
Page 19
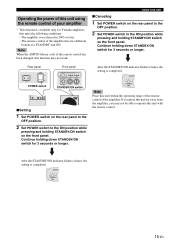
... the STANDBY/ON indicator flashes 2 times, the setting is completed. After the STANDBY/ON indicator flashes 4 times, the setting is completed. Operating the power of this unit within the operating range of the remote control of the amplifier. Note When the AMP ID library code of the amplifier has two different buttons for 3 seconds or longer. If you may not work. PRESET STANDBY /ON 0 40Hz 100Hz H-CUT 10 VOLUME STANDBY/ON switch ■ Setting 1 Set POWER switch on the rear panel...
... the STANDBY/ON indicator flashes 2 times, the setting is completed. After the STANDBY/ON indicator flashes 4 times, the setting is completed. Operating the power of this unit within the operating range of the remote control of the amplifier. Note When the AMP ID library code of the amplifier has two different buttons for 3 seconds or longer. If you may not work. PRESET STANDBY /ON 0 40Hz 100Hz H-CUT 10 VOLUME STANDBY/ON switch ■ Setting 1 Set POWER switch on the rear panel...
Owner's Manual
Page 20
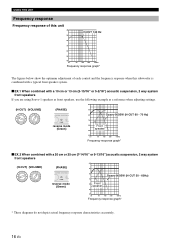
... reverse mode (Green) 90 80 Soavo-900SW (H-CUT 60 - 70 Hz) 70 60 Front speaker 50 40 20 50 100 200 500Hz Frequency response graph* ■EX.2 When combined with a 10 cm or 13 cm (3-15/16" or 5-2/16") acoustic suspension, 2 way system front speakers If you are using Soavo-1 speakers as front speakers, use the following example as a reference when adjusting settings.
... reverse mode (Green) 90 80 Soavo-900SW (H-CUT 60 - 70 Hz) 70 60 Front speaker 50 40 20 50 100 200 500Hz Frequency response graph* ■EX.2 When combined with a 10 cm or 13 cm (3-15/16" or 5-2/16") acoustic suspension, 2 way system front speakers If you are using Soavo-1 speakers as front speakers, use the following example as a reference when adjusting settings.

Owner's Manual
Page 21
... technology uses a direct connection between the cabinet capacity volume and port, it creates more stable performance and clear bass reproduction without any murkiness. As this technology uses speaker units controlled by the negative impedance drive of low amplitude Advanced impedance Converter Cabinet Active Servo Processing Amplifier Signals High-amplitude bass sound Port Air woofer (Helmholtz resonator) 17 En Signals of the amplifier and resonance generated between the amplifier and speaker...
... technology uses a direct connection between the cabinet capacity volume and port, it creates more stable performance and clear bass reproduction without any murkiness. As this technology uses speaker units controlled by the negative impedance drive of low amplitude Advanced impedance Converter Cabinet Active Servo Processing Amplifier Signals High-amplitude bass sound Port Air woofer (Helmholtz resonator) 17 En Signals of the amplifier and resonance generated between the amplifier and speaker...
Owner's Manual
Page 22
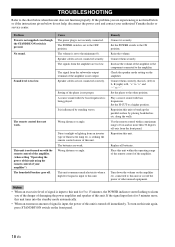
... signal is input, the power of this unit is not output. Turn down the volume on the amplifier. To turn on this unit using the remote control of this unit again, press STANDBY/ON switch on with the remote control of the amplifier. (when setting "Operating the power of your authorized Yamaha dealer or service center. Sound level is pressed. The signals from the front panel. The batteries are not connected securely. Check the speaker mode setting on the amplifier etc. Play a source sound...
... signal is input, the power of this unit is not output. Turn down the volume on the amplifier. To turn on this unit using the remote control of this unit again, press STANDBY/ON switch on with the remote control of the amplifier. (when setting "Operating the power of your authorized Yamaha dealer or service center. Sound level is pressed. The signals from the front panel. The batteries are not connected securely. Check the speaker mode setting on the amplifier etc. Play a source sound...

Owner's Manual
Page 23
.../230-240 V, 50/60 Hz Korea model AC 220 V, 60 Hz China model AC 220 V, 50 Hz Please note that all specifications are subject to change without notice. 19 En Advanced Yamaha Active Servo Technology II Power Consumption 180 W Driver 25 cm (10") cone woofer Magnetic shielding type Amplifier Output (100 Hz, 4 ohms, 10% T.H.D 600 W Standby Power Consumption 0.5 W Dimensions (W x H x D 410 mm x 457 mm...
.../230-240 V, 50/60 Hz Korea model AC 220 V, 60 Hz China model AC 220 V, 50 Hz Please note that all specifications are subject to change without notice. 19 En Advanced Yamaha Active Servo Technology II Power Consumption 180 W Driver 25 cm (10") cone woofer Magnetic shielding type Amplifier Output (100 Hz, 4 ohms, 10% T.H.D 600 W Standby Power Consumption 0.5 W Dimensions (W x H x D 410 mm x 457 mm...


