
Owner's Manual
Page 4
... from the walls, allowing at high volume level. When moving this YAMAHA subwoofer system. If glass etc. If the candle falls by vibrations, it...rain or moisture. 6 Do not use this unit for a long period (ie., vacation, etc.), disconnect the AC power plug from the rear panel. Extremely loud playing of space above, behind and on the rear panel. This unit ...in a safe place for future reference. 2 Install this unit: - When moving the unit, first disconnect the power plug and the wires connected to other surfaces. 9 Do not cover the rear panel of speakers. Should this ...
... from the walls, allowing at high volume level. When moving this YAMAHA subwoofer system. If glass etc. If the candle falls by vibrations, it...rain or moisture. 6 Do not use this unit for a long period (ie., vacation, etc.), disconnect the AC power plug from the rear panel. Extremely loud playing of space above, behind and on the rear panel. This unit ...in a safe place for future reference. 2 Install this unit: - When moving the unit, first disconnect the power plug and the wires connected to other surfaces. 9 Do not cover the rear panel of speakers. Should this ...
Owner's Manual
Page 5
...live socket outlet. The wire which is coloured BROWN must be set for the plug supplied with a subwoofer (line out) terminal 9 Connecting to the ground terminal 12 Connecting the power cable 12 USING THIS UNIT 13 Adjusting the sound balance 13 Storing the sound balance settings 14 Setting ... WITH THE FOLLOWING CODE: Blue: NEUTRAL Brown: LIVE As the colours of the wires in your amplifier 15 Frequency response 16 Advanced Yamaha Active Servo Technology II 17 TROUBLESHOOTING 18 SPECIFICATIONS 19 FOR CANADIAN CUSTOMERS To prevent electric shock, match wide blade of this unit into...
...live socket outlet. The wire which is coloured BROWN must be set for the plug supplied with a subwoofer (line out) terminal 9 Connecting to the ground terminal 12 Connecting the power cable 12 USING THIS UNIT 13 Adjusting the sound balance 13 Storing the sound balance settings 14 Setting ... WITH THE FOLLOWING CODE: Blue: NEUTRAL Brown: LIVE As the colours of the wires in your amplifier 15 Frequency response 16 Advanced Yamaha Active Servo Technology II 17 TROUBLESHOOTING 18 SPECIFICATIONS 19 FOR CANADIAN CUSTOMERS To prevent electric shock, match wide blade of this unit into...
Owner's Manual
Page 7
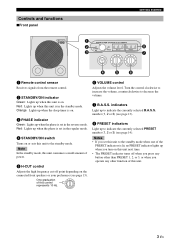
Controls and functions ■Front panel GETTING STARTED 1 2 3 SUBWOOFER SYSTEM Soavo-900SW 1 2 3 1 2 3 STANDBY /ON PHASE B.A.S.S. H-CUT 140Hz 6 VOLUME control Adjusts the volume level. Orange: Lights up when the sleep timer is on. 3 PHASE indicator Green: Lights up ... lit, no PRESET indicator lights up when you turn on or sets this unit. 3 En Red: Lights up to decrease the volume. 7 B.A.S.S. One graduation of power. 5 H-CUT control Adjusts the high frequency cut off when you press any other than PRESET 1, 2, or 3, or when you set in the regular mode. 4 ...
Controls and functions ■Front panel GETTING STARTED 1 2 3 SUBWOOFER SYSTEM Soavo-900SW 1 2 3 1 2 3 STANDBY /ON PHASE B.A.S.S. H-CUT 140Hz 6 VOLUME control Adjusts the volume level. Orange: Lights up when the sleep timer is on. 3 PHASE indicator Green: Lights up ... lit, no PRESET indicator lights up when you turn on or sets this unit. 3 En Red: Lights up to decrease the volume. 7 B.A.S.S. One graduation of power. 5 H-CUT control Adjusts the high frequency cut off when you press any other than PRESET 1, 2, or 3, or when you set in the regular mode. 4 ...
Owner's Manual
Page 11
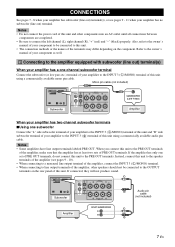
...amplifier to the INPUT 3 ( L /MONO) terminal of this unit to the speaker terminals of the amplifier (see pages 9 - 11 when your amplifier has no subwoofer (line out) terminal. Subwoofer L MONO L OUTPUT R TO SPEAKERS L R INPUT 3 R INPUT 2 R FROM AMPLIFIER L INPUT 1 Audio pin cable (not included) Amplifier 7 En Refer...; Be sure to connect the left channel (L), right channel (R), "+" (red) and "-" (black) properly. Notes • Do not connect the power cord of this unit to the PRE OUT terminals of the amplifier, make sure that the amplifier has at least two sets of PRE OUT...
...amplifier to the INPUT 3 ( L /MONO) terminal of this unit to the speaker terminals of the amplifier (see pages 9 - 11 when your amplifier has no subwoofer (line out) terminal. Subwoofer L MONO L OUTPUT R TO SPEAKERS L R INPUT 3 R INPUT 2 R FROM AMPLIFIER L INPUT 1 Audio pin cable (not included) Amplifier 7 En Refer...; Be sure to connect the left channel (L), right channel (R), "+" (red) and "-" (black) properly. Notes • Do not connect the power cord of this unit to the PRE OUT terminals of the amplifier, make sure that the amplifier has at least two sets of PRE OUT...

Owner's Manual
Page 18
... ■Storing the setting In the following procedure, PRESET 1 is turned back on the front panel flash. Remote control 1 3 1 POWER STANDBY SLEEP B.A.S.S. PHASE MEMORY PRESET 1 2 3 SLEEP HIGH CUT VOLUME Press SLEEP. y • In step 3, pressing a stored ... 1. PHASE MEMORY PRESET 1 2 3 1 2 HIGH CUT VOLUME 1 Front panel STANDBY/ON indicator SUBWOOFER SYSTEM Soavo-900SW 1 2 3 1 2 3 STANDBY /ON PHASE B.A.S.S. Note If the power is cleared. POWER STANDBY SLEEP B.A.S.S. The color of your favorite settings (volume, high-cut for more than one week,...
... ■Storing the setting In the following procedure, PRESET 1 is turned back on the front panel flash. Remote control 1 3 1 POWER STANDBY SLEEP B.A.S.S. PHASE MEMORY PRESET 1 2 3 SLEEP HIGH CUT VOLUME Press SLEEP. y • In step 3, pressing a stored ... 1. PHASE MEMORY PRESET 1 2 3 1 2 HIGH CUT VOLUME 1 Front panel STANDBY/ON indicator SUBWOOFER SYSTEM Soavo-900SW 1 2 3 1 2 3 STANDBY /ON PHASE B.A.S.S. Note If the power is cleared. POWER STANDBY SLEEP B.A.S.S. The color of your favorite settings (volume, high-cut for more than one week,...
Owner's Manual
Page 19
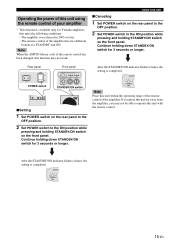
... * This function is available only for Yamaha amplifiers that meet the following conditions: - After the STANDBY/ON indicator flashes 2 times, the setting is completed. SUBW STANDBY /ON 15 En The amplifier was released in 2005 or later. - Rear panel POWER ON OFF POWER switch Front panel SUBWOOFER SYSTEM Soavo-900SW 1 2 31 2 3 STANDBY /ON PHASE B.A.S.S. PRESET STANDBY...
... * This function is available only for Yamaha amplifiers that meet the following conditions: - After the STANDBY/ON indicator flashes 2 times, the setting is completed. SUBW STANDBY /ON 15 En The amplifier was released in 2005 or later. - Rear panel POWER ON OFF POWER switch Front panel SUBWOOFER SYSTEM Soavo-900SW 1 2 31 2 3 STANDBY /ON PHASE B.A.S.S. PRESET STANDBY...
Owner's Manual
Page 22
...within a maximum range of 6 m and no more , this unit turns into the standby mode automatically. • When an enormous amount of your authorized Yamaha dealer or service center. The remote control does not work. It is not securely connected. The volume is not output. To turn on this unit... again, press STANDBY/ON switch on with the remote control of the amplifier. (when setting "Operating the power of this unit or cut off -axis from the subwoofer output terminal of the amplifier or the component connected to this unit or break up the parallel surface by standing ...
...within a maximum range of 6 m and no more , this unit turns into the standby mode automatically. • When an enormous amount of your authorized Yamaha dealer or service center. The remote control does not work. It is not securely connected. The volume is not output. To turn on this unit... again, press STANDBY/ON switch on with the remote control of the amplifier. (when setting "Operating the power of this unit or cut off -axis from the subwoofer output terminal of the amplifier or the component connected to this unit or break up the parallel surface by standing ...


