
Owner's Manual
Page 2
.... • Do not place the following objects on or pinched particularly at least 20 cm above, behind and on both sides of the obsolete outlet. 10 Protect the power cord from tip-over. 13 Unplug this apparatus near any way, such as radiators, heat registers, stoves, or other . i En The exclamation...
.... • Do not place the following objects on or pinched particularly at least 20 cm above, behind and on both sides of the obsolete outlet. 10 Protect the power cord from tip-over. 13 Unplug this apparatus near any way, such as radiators, heat registers, stoves, or other . i En The exclamation...
Owner's Manual
Page 4
...to consume a very small quantity of this might cause an electric shock since this YAMAHA subwoofer system. YAMAHA shall not be the same as it is connected to the unit and/or personal injury. 10 Do not place the following operating precautions before concluding that the unit is faulty. ... electronic instruments, etc. In this state, this unit: - Please read this unit near the YST port of this unit. A burning candle etc. YAMAHA will radiate from the TV set , contact your unit. Should this happen, move this unit away from this before operating your dealer. 4 The voltage...
...to consume a very small quantity of this might cause an electric shock since this YAMAHA subwoofer system. YAMAHA shall not be the same as it is connected to the unit and/or personal injury. 10 Do not place the following operating precautions before concluding that the unit is faulty. ... electronic instruments, etc. In this state, this unit: - Please read this unit near the YST port of this unit. A burning candle etc. YAMAHA will radiate from the TV set , contact your unit. Should this happen, move this unit away from this before operating your dealer. 4 The voltage...
Owner's Manual
Page 7
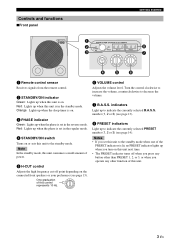
... on or sets this unit to the standby mode when one of this unit is set in the reverse mode. PRESET STANDBY /ON 4 140Hz H-CUT 5 10 VOLUME 6 8 7 0 40Hz 40Hz 1 Remote control sensor Receives signals from the remote control. 2 STANDBY/ON indicator Green: Lights up when the phase is in ... unit is set in the standby mode. One graduation of the PRESET indicators is lit, no PRESET indicator lights up when this control represents 10 Hz. Controls and functions ■Front panel GETTING STARTED 1 2 3 SUBWOOFER SYSTEM Soavo-900SW 1 2 3 1 2 3 STANDBY /ON PHASE B.A.S.S.
... on or sets this unit to the standby mode when one of this unit is set in the reverse mode. PRESET STANDBY /ON 4 140Hz H-CUT 5 10 VOLUME 6 8 7 0 40Hz 40Hz 1 Remote control sensor Receives signals from the remote control. 2 STANDBY/ON indicator Green: Lights up when the phase is in ... unit is set in the standby mode. One graduation of the PRESET indicators is lit, no PRESET indicator lights up when this control represents 10 Hz. Controls and functions ■Front panel GETTING STARTED 1 2 3 SUBWOOFER SYSTEM Soavo-900SW 1 2 3 1 2 3 STANDBY /ON PHASE B.A.S.S.

Owner's Manual
Page 8
... See page 12 for connection information. 2 INPUT 3 terminals See pages 7 - 8 for connection information. 3 INPUT 2 (LFE) terminals See page 8 for connection information. 4 OUTPUT terminals See page 10 for connection information. 5 INPUT 1 terminals See pages...
... See page 12 for connection information. 2 INPUT 3 terminals See pages 7 - 8 for connection information. 3 INPUT 2 (LFE) terminals See page 8 for connection information. 4 OUTPUT terminals See page 10 for connection information. 5 INPUT 1 terminals See pages...
Owner's Manual
Page 11
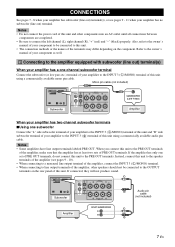
... your amplifier to this unit using a commercially available mono pin cable. CONNECTIONS See pages 7 - 8 when your amplifier has subwoofer (line out) terminal(s), or see pages 9 - 10). • When connecting to a monaural line output terminal of the amplifier, connect the INPUT 3 ( L /MONO) terminal. • When connecting to line output terminals of the...
... your amplifier to this unit using a commercially available mono pin cable. CONNECTIONS See pages 7 - 8 when your amplifier has subwoofer (line out) terminal(s), or see pages 9 - 10). • When connecting to a monaural line output terminal of the amplifier, connect the INPUT 3 ( L /MONO) terminal. • When connecting to line output terminals of the...

Owner's Manual
Page 13
...the bare wire into the hole. Refer to the following instructions to make connections. ■Connecting to the speaker cable ■Banana plug connection 12 10 mm (3/8") 1 2 4 3 5 1 Tighten the knob. 2 Insert the banana plug connecter into the end of the corresponding terminal. 1 Remove approximately... 10 mm (3/8") of insulation from this unit or the speakers, or both of them . • Make sure that the + and - Notes • Do not let the...
...the bare wire into the hole. Refer to the following instructions to make connections. ■Connecting to the speaker cable ■Banana plug connection 12 10 mm (3/8") 1 2 4 3 5 1 Tighten the knob. 2 Insert the banana plug connecter into the end of the corresponding terminal. 1 Remove approximately... 10 mm (3/8") of insulation from this unit or the speakers, or both of them . • Make sure that the + and - Notes • Do not let the...

Owner's Manual
Page 14
... RR IINNPPUUT T3 3 RR IINNPPUUTT2 2 RR FROMFARMOPMLIFIER LL AIMNPPLUIFTIE1R Front speaker (L) L MONO L OUTPUT R TO SPEAKERS L R INPUT 3 R INPUT 2 R FROM AMPLIFIER L INPUT 1 Subwoofer (R) Speaker terminals Amplifier Subwoofer (L) 10 En
... RR IINNPPUUT T3 3 RR IINNPPUUTT2 2 RR FROMFARMOPMLIFIER LL AIMNPPLUIFTIE1R Front speaker (L) L MONO L OUTPUT R TO SPEAKERS L R INPUT 3 R INPUT 2 R FROM AMPLIFIER L INPUT 1 Subwoofer (R) Speaker terminals Amplifier Subwoofer (L) 10 En

Owner's Manual
Page 15
... you connect in this way, follow "When your amplifier has two sets of front speaker terminals and both sets of front speaker terminals" on page 10. ■Using one set of front speaker terminals of the amplifier to the INPUT 1 terminals of this unit, and connect another set of front speaker...
... you connect in this way, follow "When your amplifier has two sets of front speaker terminals and both sets of front speaker terminals" on page 10. ■Using one set of front speaker terminals of the amplifier to the INPUT 1 terminals of this unit, and connect another set of front speaker...

Owner's Manual
Page 18
...PRESET STANDBY /ON 0 40Hz 100Hz H-CUT 10 VOLUME 1 ■Memory back-up Even ... setting Press PRESET you turn off this unit by pressing a PRESET, pressing another PRESET is used as PRESET 1. SUBW -900SW 31 2 3 PRESET STANDBY /ON Pressing SLEEP again cancels the sleep timer. 3 Press PRESET 1. y • In... , phase and B.A.S.S. PHASE MEMORY PRESET 1 2 3 1 2 HIGH CUT VOLUME 1 Front panel STANDBY/ON indicator SUBWOOFER SYSTEM Soavo-900SW 1 2 3 1 2 3 STANDBY /ON PHASE B.A.S.S. USING THIS UNIT Storing the sound balance settings You can store up ....
...PRESET STANDBY /ON 0 40Hz 100Hz H-CUT 10 VOLUME 1 ■Memory back-up Even ... setting Press PRESET you turn off this unit by pressing a PRESET, pressing another PRESET is used as PRESET 1. SUBW -900SW 31 2 3 PRESET STANDBY /ON Pressing SLEEP again cancels the sleep timer. 3 Press PRESET 1. y • In... , phase and B.A.S.S. PHASE MEMORY PRESET 1 2 3 1 2 HIGH CUT VOLUME 1 Front panel STANDBY/ON indicator SUBWOOFER SYSTEM Soavo-900SW 1 2 3 1 2 3 STANDBY /ON PHASE B.A.S.S. USING THIS UNIT Storing the sound balance settings You can store up ....
Owner's Manual
Page 19
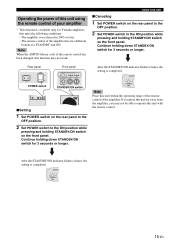
... SUBWOOFER SYSTEM Soavo-900SW 1 2 31 2 3 STANDBY /ON PHASE B.A.S.S. If you place this unit using the remote control of your amplifier * This function is available only for STANDBY and ON. After the STANDBY/ON indicator flashes 2 times, the setting is completed. The remote control of the amplifier has two different buttons for Yamaha amplifiers...
... SUBWOOFER SYSTEM Soavo-900SW 1 2 31 2 3 STANDBY /ON PHASE B.A.S.S. If you place this unit using the remote control of your amplifier * This function is available only for STANDBY and ON. After the STANDBY/ON indicator flashes 2 times, the setting is completed. The remote control of the amplifier has two different buttons for Yamaha amplifiers...
Owner's Manual
Page 20
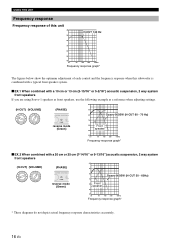
... suspension, 2 way system front speakers dB (H-CUT) (VOLUME) (PHASE) 90 0 40Hz 140Hz H-CUT 10 VOLUME OOFER SYSTEM S 1 PHASE reverse mode (Green) 80 70 60 Front speaker 50 Soavo-900SW (H-CUT 50 - 60Hz) 40 20 50 100 200 500Hz Frequency response graph* * These diagrams do not... depict actual frequency response characteristics accurately. 16 En dB (H-CUT) (VOLUME) 140Hz 0 40Hz H-CUT 10 VOLUME (PHASE) OOFER SYSTEM S 1 PHASE reverse mode (Green) 90 80 Soavo-900SW (H-CUT 60 - 70 Hz) 70 60 Front speaker 50 40 20 50 100 200 500Hz Frequency response graph...
... suspension, 2 way system front speakers dB (H-CUT) (VOLUME) (PHASE) 90 0 40Hz 140Hz H-CUT 10 VOLUME OOFER SYSTEM S 1 PHASE reverse mode (Green) 80 70 60 Front speaker 50 Soavo-900SW (H-CUT 50 - 60Hz) 40 20 50 100 200 500Hz Frequency response graph* * These diagrams do not... depict actual frequency response characteristics accurately. 16 En dB (H-CUT) (VOLUME) 140Hz 0 40Hz H-CUT 10 VOLUME (PHASE) OOFER SYSTEM S 1 PHASE reverse mode (Green) 90 80 Soavo-900SW (H-CUT 60 - 70 Hz) 70 60 Front speaker 50 40 20 50 100 200 500Hz Frequency response graph...

Owner's Manual
Page 23
Advanced Yamaha Active Servo Technology II Power Consumption 180 W Driver 25 cm (10") cone woofer Magnetic shielding type Amplifier Output (100 Hz, 4 ohms, 10% T.H.D 600 W Standby Power Consumption 0.5 W Dimensions (W x H x D 410 mm x 457 mm x 462 mm (16-1/8" x 17" x 18-3/16") Frequency Response 18 Hz - 160 Hz Weight 32 kg (70 ...
Advanced Yamaha Active Servo Technology II Power Consumption 180 W Driver 25 cm (10") cone woofer Magnetic shielding type Amplifier Output (100 Hz, 4 ohms, 10% T.H.D 600 W Standby Power Consumption 0.5 W Dimensions (W x H x D 410 mm x 457 mm x 462 mm (16-1/8" x 17" x 18-3/16") Frequency Response 18 Hz - 160 Hz Weight 32 kg (70 ...

