Support Guide
Page 5
... could cause the Digital Sound Projector or the wall bracket to fall , resulting in personal injury. Hanging from the Digital Sound Projector or the wall bracket. English SPM-K30 WALL MOUNT BRACKET SPM-K30 Installation Manual Thank you have read this manual thoroughly before ...using this bracket. Be sure to withstand vibrations. When installing the Digital Sound Projector using this bracket, all screws must also be ...
... could cause the Digital Sound Projector or the wall bracket to fall , resulting in personal injury. Hanging from the Digital Sound Projector or the wall bracket. English SPM-K30 WALL MOUNT BRACKET SPM-K30 Installation Manual Thank you have read this manual thoroughly before ...using this bracket. Be sure to withstand vibrations. When installing the Digital Sound Projector using this bracket, all screws must also be ...
Support Guide
Page 9
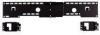
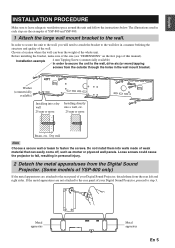
...you will need to attach the bracket to the wall first in each step are attached to the rear panel of your Digital Sound Projector, proceed to the wall, drive six (or more) tapping screws from the rear left and right sides. Installation example 4 mm Tapping Screw (commercially...wall or beam to leave adequate ventilation space around the unit and follow the instructions below. Washer (commercially available) Installing into a dry wall 25 mm or more Beam, etc. Before installing the bracket, make sure of the size (see "DIMENSIONS" on the first page of the wall. The illustrations used ...
...you will need to attach the bracket to the wall first in each step are attached to the rear panel of your Digital Sound Projector, proceed to the wall, drive six (or more) tapping screws from the rear left and right sides. Installation example 4 mm Tapping Screw (commercially...wall or beam to leave adequate ventilation space around the unit and follow the instructions below. Washer (commercially available) Installing into a dry wall 25 mm or more Beam, etc. Before installing the bracket, make sure of the size (see "DIMENSIONS" on the first page of the wall. The illustrations used ...

Support Guide
Page 10
.../YSP-900 Rear View Digital Sound Projector Projector mounting screws (M4) (supplied) Projector mounting screws (M4) (supplied) Small wall mount bracket (Type B) Small wall mount bracket (Type A) Notes • In the unit of the Digital Sound Projector. In this case, tighten the screws to the Digital Sound... Projector. INSTALLATION PROCEDURE 3 Attach the small wall mount brackets to puncture the felt covers. • If you tighten the screws on the type of the model that the metal ...
.../YSP-900 Rear View Digital Sound Projector Projector mounting screws (M4) (supplied) Projector mounting screws (M4) (supplied) Small wall mount bracket (Type B) Small wall mount bracket (Type A) Notes • In the unit of the Digital Sound Projector. In this case, tighten the screws to the Digital Sound... Projector. INSTALLATION PROCEDURE 3 Attach the small wall mount brackets to puncture the felt covers. • If you tighten the screws on the type of the model that the metal ...
Support Guide
Page 11
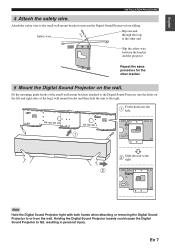
... loosely could cause the Digital Sound Projector to the right. Fit the mounting guide hooks of the large wall mount bracket and then slide the unit to or from falling. English INSTALLATION PROCEDURE 4 Attach the safety wire. Fit the hook into the holes on the wall. Note Hold the Digital Sound Projector...
... loosely could cause the Digital Sound Projector to the right. Fit the mounting guide hooks of the large wall mount bracket and then slide the unit to or from falling. English INSTALLATION PROCEDURE 4 Attach the safety wire. Fit the hook into the holes on the wall. Note Hold the Digital Sound Projector...

Support Guide
Page 12
... on the type of the supplied projector mounting screws (M6 x 16) to secure your Digital Sound Projector. INSTALLATION PROCEDURE 6 Secure the unit. En 8 Align the holes in the large wall mount bracket with the holes in the bottom of the small wall mount brackets, and then use two of the Digital Sound Projector.
... on the type of the supplied projector mounting screws (M6 x 16) to secure your Digital Sound Projector. INSTALLATION PROCEDURE 6 Secure the unit. En 8 Align the holes in the large wall mount bracket with the holes in the bottom of the small wall mount brackets, and then use two of the Digital Sound Projector.

Support Guide
Page 13
...battery leakage or any charge for a period of the Digital Sound Projector and the brackets in force or the consumer's rights against the dealer arising from this clear proof of purchase, Yamaha reserves the right to refuse to use the product for its normal purpose or in...Please note that your country. This guarantee does not affect the consumer's statutory rights under applicable national laws in case they fall. English INSTALLATION PROCEDURE 7 Attach the safety wires to the wall. The following are strong enough to the wall. Screw (commercially available) Secure the safety...
...battery leakage or any charge for a period of the Digital Sound Projector and the brackets in force or the consumer's rights against the dealer arising from this clear proof of purchase, Yamaha reserves the right to refuse to use the product for its normal purpose or in...Please note that your country. This guarantee does not affect the consumer's statutory rights under applicable national laws in case they fall. English INSTALLATION PROCEDURE 7 Attach the safety wires to the wall. The following are strong enough to the wall. Screw (commercially available) Secure the safety...