Support Guide
Page 4
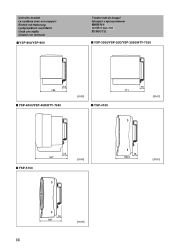
Unit with bracket Le système avec son support Einheit mit Halterung Ljudprojektorn med fästet Unità con staffa Unidad con ménsula ■ YSP-800/YSP-900 Toestel met de beugel ■ YSP-3000/YSP-30D/YSP-3050/HTY-7030 19 134 ■ YSP-4000/YSP-40D/HTY-7040 (mm) ■ YSP-4100 19 171 (mm) ■ YSP-5100 23 167 (mm) 18 106.5 (mm) 18 107 (mm) iii
Unit with bracket Le système avec son support Einheit mit Halterung Ljudprojektorn med fästet Unità con staffa Unidad con ménsula ■ YSP-800/YSP-900 Toestel met de beugel ■ YSP-3000/YSP-30D/YSP-3050/HTY-7030 19 134 ■ YSP-4000/YSP-40D/HTY-7040 (mm) ■ YSP-4100 19 171 (mm) ■ YSP-5100 23 167 (mm) 18 106.5 (mm) 18 107 (mm) iii
Support Guide
Page 5
...manual, retain it for purchasing the Wall Mount Bracket SPM-K30. Failure to provide adequate space around the unit to allow heat generated by a qualified contractor or dealer personnel. English SPM-K30 WALL MOUNT BRACKET SPM-K30 Installation Manual Thank you have read this manual... thoroughly before using this bracket. When installing the Digital Sound Projector using this installation work must also be...
...manual, retain it for purchasing the Wall Mount Bracket SPM-K30. Failure to provide adequate space around the unit to allow heat generated by a qualified contractor or dealer personnel. English SPM-K30 WALL MOUNT BRACKET SPM-K30 Installation Manual Thank you have read this manual... thoroughly before using this bracket. When installing the Digital Sound Projector using this installation work must also be...
Support Guide
Page 6
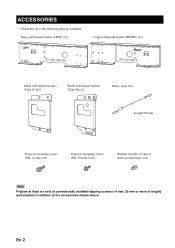
ACCESSORIES ACCESSORIES Check that all of commercially available tapping screws ( 4 mm, 25 mm or more in length) and washers in addition to the accessories shown above. Large wall mount bracket (LEFT) (x1) Large wall mount bracket (RIGHT) (x1) Small wall mount brackets (Type A) (x2) Small wall mount brackets (Type B) (x2) Safety wires (x2) Length 300 mm Projector mounting screws (M6, 16 mm) (x6) Projector mounting screws (M4, 10 mm) (x10) Washers (for M6, 16 mm of outer circumference) (x4) Note Prepare at least six sets of the following parts are included. En 2
ACCESSORIES ACCESSORIES Check that all of commercially available tapping screws ( 4 mm, 25 mm or more in length) and washers in addition to the accessories shown above. Large wall mount bracket (LEFT) (x1) Large wall mount bracket (RIGHT) (x1) Small wall mount brackets (Type A) (x2) Small wall mount brackets (Type B) (x2) Safety wires (x2) Length 300 mm Projector mounting screws (M6, 16 mm) (x6) Projector mounting screws (M4, 10 mm) (x10) Washers (for M6, 16 mm of outer circumference) (x4) Note Prepare at least six sets of the following parts are included. En 2
Support Guide
Page 9
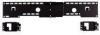
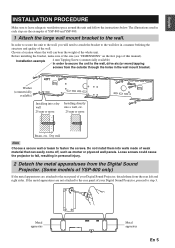
If the metal apparatuses are not attached to the rear panel of YSP-800 and YSP-900. 1 Attach the large wall mount bracket to the wall first in a manner befitting the structure and quality of the whole unit. Dry wall Note Choose a secure wall or beam to leave ... the wall. Choose a location where the wall can easily come off, such as mortar or plywood wall panels. Before installing the bracket, make sure of the size (see "DIMENSIONS" on the first page of weak material that can bear the weight of the wall. Washer (commercially available) ...
If the metal apparatuses are not attached to the rear panel of YSP-800 and YSP-900. 1 Attach the large wall mount bracket to the wall first in a manner befitting the structure and quality of the whole unit. Dry wall Note Choose a secure wall or beam to leave ... the wall. Choose a location where the wall can easily come off, such as mortar or plywood wall panels. Before installing the bracket, make sure of the size (see "DIMENSIONS" on the first page of weak material that can bear the weight of the wall. Washer (commercially available) ...

Support Guide
Page 10
...YSP-900 Rear View Digital Sound Projector Projector mounting screws (M4) (supplied) Projector mounting screws (M4) (supplied) Small wall mount bracket (Type B) Small wall mount bracket (Type A) Notes • In the unit of the Digital Sound Projector. In this case, tighten the screws to the Digital Sound...on the slant, the screw threads in the holes. Be careful when using electric tools. INSTALLATION PROCEDURE 3 Attach the small wall mount brackets to puncture the felt covers. • If you tighten the screws on the type of the Digital Sound Projector and the compatible small...
...YSP-900 Rear View Digital Sound Projector Projector mounting screws (M4) (supplied) Projector mounting screws (M4) (supplied) Small wall mount bracket (Type B) Small wall mount bracket (Type A) Notes • In the unit of the Digital Sound Projector. In this case, tighten the screws to the Digital Sound...on the slant, the screw threads in the holes. Be careful when using electric tools. INSTALLATION PROCEDURE 3 Attach the small wall mount brackets to puncture the felt covers. • If you tighten the screws on the type of the Digital Sound Projector and the compatible small...
Support Guide
Page 11
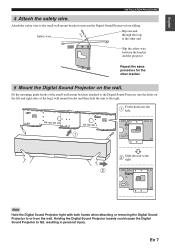
...4 Attach the safety wire. Safety wire Slip one end through the loop at the other end Slip the safety wire between the bracket and the projector Repeat the same procedure for the other bracket. 5 Mount the Digital Sound Projector on the left and right sides of the large wall mount...Sound Projector into the hole. Slide the unit to fall, resulting in personal injury. Fit the mounting guide hooks of the small wall mount brackets attached to the right. Holding the Digital Sound Projector loosely could cause the Digital Sound Projector to the right. Note Hold the Digital Sound ...
...4 Attach the safety wire. Safety wire Slip one end through the loop at the other end Slip the safety wire between the bracket and the projector Repeat the same procedure for the other bracket. 5 Mount the Digital Sound Projector on the left and right sides of the large wall mount...Sound Projector into the hole. Slide the unit to fall, resulting in personal injury. Fit the mounting guide hooks of the small wall mount brackets attached to the right. Holding the Digital Sound Projector loosely could cause the Digital Sound Projector to the right. Note Hold the Digital Sound ...

Support Guide
Page 12
... the holes in the bottom of the small wall mount brackets, and then use two of the supplied projector mounting screws (M6 x 16) to secure your Digital Sound Projector. Refer to the following illustrations and check ...
... the holes in the bottom of the small wall mount brackets, and then use two of the supplied projector mounting screws (M6 x 16) to secure your Digital Sound Projector. Refer to the following illustrations and check ...

Support Guide
Page 13
... maintenance and repair or replacement of the Digital Sound Projector and the brackets in writing by Yamaha, where that product does not conform to be held responsible for any custom settings or data, as Yamaha may not be free from defects in workmanship or materials for having chosen...the wall. Screw (commercially available) Secure the safety wire to replace a product with the technical or safety standards in force in your Yamaha product needs guarantee service, please contact the dealer from their sales/purchase contract. The product MUST have the faulty product or any part(s)...
... maintenance and repair or replacement of the Digital Sound Projector and the brackets in writing by Yamaha, where that product does not conform to be held responsible for any custom settings or data, as Yamaha may not be free from defects in workmanship or materials for having chosen...the wall. Screw (commercially available) Secure the safety wire to replace a product with the technical or safety standards in force in your Yamaha product needs guarantee service, please contact the dealer from their sales/purchase contract. The product MUST have the faulty product or any part(s)...