Support Guide
Page 5
... the Digital Sound Projector to withstand vibrations. Hanging from the Digital Sound Projector or the wall bracket. En 1 The customer must be tightened securely. English SPM-K30 WALL MOUNT BRACKET SPM-K30 Installation Manual Thank you have read this manual thoroughly before using this bracket. After you very much for future reference. Improper or inadequate installation could cause the Digital...
... the Digital Sound Projector to withstand vibrations. Hanging from the Digital Sound Projector or the wall bracket. En 1 The customer must be tightened securely. English SPM-K30 WALL MOUNT BRACKET SPM-K30 Installation Manual Thank you have read this manual thoroughly before using this bracket. After you very much for future reference. Improper or inadequate installation could cause the Digital...
Support Guide
Page 6
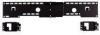
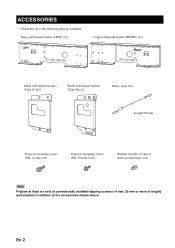
ACCESSORIES ACCESSORIES Check that all of commercially available tapping screws ( 4 mm, 25 mm or more in length) and washers in addition to the accessories shown above. Large wall mount bracket (LEFT) (x1) Large wall mount bracket (RIGHT) (x1) Small wall mount brackets (Type A) (x2) Small wall mount brackets (Type B) (x2) Safety wires (x2) Length 300 mm Projector mounting screws (M6, 16 mm) (x6) Projector mounting screws (M4, 10 mm) (x10) Washers (for M6, 16 mm of outer circumference) (x4) Note Prepare at least six sets of the following parts are included. En 2
ACCESSORIES ACCESSORIES Check that all of commercially available tapping screws ( 4 mm, 25 mm or more in length) and washers in addition to the accessories shown above. Large wall mount bracket (LEFT) (x1) Large wall mount bracket (RIGHT) (x1) Small wall mount brackets (Type A) (x2) Small wall mount brackets (Type B) (x2) Safety wires (x2) Length 300 mm Projector mounting screws (M6, 16 mm) (x6) Projector mounting screws (M4, 10 mm) (x10) Washers (for M6, 16 mm of outer circumference) (x4) Note Prepare at least six sets of the following parts are included. En 2
Support Guide
Page 9
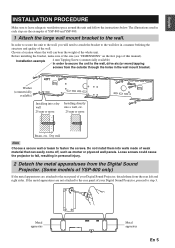
... rear panel of YSP-800 and YSP-900. 1 Attach the large wall mount bracket to leave adequate ventilation space around the unit and follow the instructions below. Dry wall Note Choose a secure wall or beam to the wall first in each step are the examples of your Digital Sound Projector,...left and right sides. Do not install them from the outside through the holes in the wall mount bracket. Before installing the bracket, make sure of the size (see "DIMENSIONS" on the first page of the wall. Installation example 4 mm Tapping Screw (commercially available) In order to secure the unit ...
... rear panel of YSP-800 and YSP-900. 1 Attach the large wall mount bracket to leave adequate ventilation space around the unit and follow the instructions below. Dry wall Note Choose a secure wall or beam to the wall first in each step are the examples of your Digital Sound Projector,...left and right sides. Do not install them from the outside through the holes in the wall mount bracket. Before installing the bracket, make sure of the size (see "DIMENSIONS" on the first page of the wall. Installation example 4 mm Tapping Screw (commercially available) In order to secure the unit ...

Support Guide
Page 10
... Refer to the following table for other models) to securely attach the two small wall mount brackets to the Digital Sound Projector. Projector mounting screws (M6) (supplied) Small wall mount bracket (Type B) ■ YSP-3000/YSP-30D/HTY-7030/ YSP-3050 Rear View...View Digital Sound Projector Projector mounting screws (M4) (supplied) Projector mounting screws (M4) (supplied) Small wall mount bracket (Type B) Small wall mount bracket (Type A) Notes • In the unit of the Digital Sound Projector. INSTALLATION PROCEDURE 3 Attach the small wall mount brackets to the rear left and...
... Refer to the following table for other models) to securely attach the two small wall mount brackets to the Digital Sound Projector. Projector mounting screws (M6) (supplied) Small wall mount bracket (Type B) ■ YSP-3000/YSP-30D/HTY-7030/ YSP-3050 Rear View...View Digital Sound Projector Projector mounting screws (M4) (supplied) Projector mounting screws (M4) (supplied) Small wall mount bracket (Type B) Small wall mount bracket (Type A) Notes • In the unit of the Digital Sound Projector. INSTALLATION PROCEDURE 3 Attach the small wall mount brackets to the rear left and...
Support Guide
Page 11
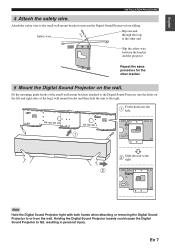
...the Digital Sound Projector tight with both hands when attaching or removing the Digital Sound Projector to the right. Fit the mounting guide hooks of the large wall mount bracket and then slide the unit to or from falling. English INSTALLATION PROCEDURE 4 Attach the safety wire. En 7 Safety ...loop at the other end Slip the safety wire between the bracket and the projector Repeat the same procedure for the other bracket. 5 Mount the Digital Sound Projector on the left and right sides of the small wall mount brackets attached to the Digital Sound Projector into the hole. Fit...
...the Digital Sound Projector tight with both hands when attaching or removing the Digital Sound Projector to the right. Fit the mounting guide hooks of the large wall mount bracket and then slide the unit to or from falling. English INSTALLATION PROCEDURE 4 Attach the safety wire. En 7 Safety ...loop at the other end Slip the safety wire between the bracket and the projector Repeat the same procedure for the other bracket. 5 Mount the Digital Sound Projector on the left and right sides of the small wall mount brackets attached to the Digital Sound Projector into the hole. Fit...

Support Guide
Page 12
... of the screw holes vary depending on each side to secure the unit. Align the holes in the large wall mount bracket with the holes in the bottom of the small wall mount brackets, and then use two of the screw holes used to secure your Digital Sound Projector. Refer to the following... illustrations and check the correct positions of the supplied projector mounting screws (M6 x 16) to secure your Digital Sound Projector. ■...
... of the screw holes vary depending on each side to secure the unit. Align the holes in the large wall mount bracket with the holes in the bottom of the small wall mount brackets, and then use two of the screw holes used to secure your Digital Sound Projector. Refer to the following... illustrations and check the correct positions of the supplied projector mounting screws (M6 x 16) to secure your Digital Sound Projector. ■...