
Owner's Manual
Page 2
...the volume. * After playing, wipe the entire guitar down, including strings, with a good polishing cloth. This will age gracefully and provide many years of superlative musical service. Congratulations on your YAMAHA electric guitar will remove corrosive skin oils and acids, and ...protect the plating, finish, and strings. * Avoid exposing the guitar to direct sunlight and extremes of the YAMAHA electric guitar. With reasonable care, your purchase of heat...
...the volume. * After playing, wipe the entire guitar down, including strings, with a good polishing cloth. This will age gracefully and provide many years of superlative musical service. Congratulations on your YAMAHA electric guitar will remove corrosive skin oils and acids, and ...protect the plating, finish, and strings. * Avoid exposing the guitar to direct sunlight and extremes of the YAMAHA electric guitar. With reasonable care, your purchase of heat...

Owner's Manual
Page 5
... wrench into the truss rod nut and turn or less towards the appropriate direction as shown in the drawing. Truss Rod Adjustment Procedure Make sure guitar is as follows: Step 1: Tune strings to proper pitch, and depress the strings by placing a capo directly behind the 16th fret with truss rods, we...
... wrench into the truss rod nut and turn or less towards the appropriate direction as shown in the drawing. Truss Rod Adjustment Procedure Make sure guitar is as follows: Step 1: Tune strings to proper pitch, and depress the strings by placing a capo directly behind the 16th fret with truss rods, we...
Owner's Manual
Page 6
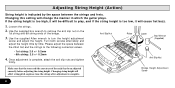
... string: 2.0 +/- 0.2mm • 6th string: 2.5 +/- 0.2mm 4. Once adjustment is complete. If the string height is too high, it will change the manner in which the guitar plays. Bridge Height Adjustment Screw 6 Anti Slip Nut Raise Lower Box Wrench (Supplied) Anti Slip Nut Make sure that the truss rod (the curvature of...
... string: 2.0 +/- 0.2mm • 6th string: 2.5 +/- 0.2mm 4. Once adjustment is complete. If the string height is too high, it will change the manner in which the guitar plays. Bridge Height Adjustment Screw 6 Anti Slip Nut Raise Lower Box Wrench (Supplied) Anti Slip Nut Make sure that the truss rod (the curvature of...
Owner's Manual
Page 7
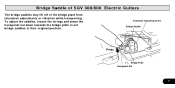
Intonation Adjusting Screw Bridge Saddle Press Bridge Plate Hexagonal Nut 7 Bridge Saddle of SGV 300/800 Electric Guitars The bridge saddles may lift off of the bridge plate from intonation adjustments or vibration while transporting. To adjust the saddles, loosen the strings and press the hexagonal nut down towards the bridge plate to set bridge saddles in their original position.
Intonation Adjusting Screw Bridge Saddle Press Bridge Plate Hexagonal Nut 7 Bridge Saddle of SGV 300/800 Electric Guitars The bridge saddles may lift off of the bridge plate from intonation adjustments or vibration while transporting. To adjust the saddles, loosen the strings and press the hexagonal nut down towards the bridge plate to set bridge saddles in their original position.
Owner's Manual
Page 9
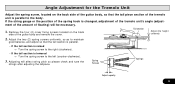
Angle Adjustment for the Tremolo Unit Adjust the spring screw, located on the back side of the guitar body and remove the cover. If the string gauge or the position of the spring hook is changed, adjustment of the tremolo unit's angle (adjustment ... the height uniformly 2. Adjusting will be necessary. 1. Spring Screws Springs Adjust equally. 9 Remove the four (4) cover fixing screws located on the back side of the guitar body, so that the tail section is parallel. • If the tail section is raised → Turn the spring screw to the right (clockwise). •...
Angle Adjustment for the Tremolo Unit Adjust the spring screw, located on the back side of the guitar body and remove the cover. If the string gauge or the position of the spring hook is changed, adjustment of the tremolo unit's angle (adjustment ... the height uniformly 2. Adjusting will be necessary. 1. Spring Screws Springs Adjust equally. 9 Remove the four (4) cover fixing screws located on the back side of the guitar body, so that the tail section is parallel. • If the tail section is raised → Turn the spring screw to the right (clockwise). •...


