Owner's Manual
Page 2
... Tel: 3-9693-5111 NEW ZEALAND Music Works LTD P.O.BOX 6246 Wellesley, Auckland 4680, New Zealand Tel: 9-634-0099 COUNTRIES AND TRUST TERRITORIES IN PACIFIC OCEAN Yamaha Corporation, Asia-Pacific Sales & Marketing Group Nakazawa-cho 10-1, Naka-ku, Hamamatsu, Japan 430-8650 Tel: +81-53-460-2313 HEAD OFFICE Yamaha Corporation, Digital Musical Instruments Division Nakazawa-cho 10...
... Tel: 3-9693-5111 NEW ZEALAND Music Works LTD P.O.BOX 6246 Wellesley, Auckland 4680, New Zealand Tel: 9-634-0099 COUNTRIES AND TRUST TERRITORIES IN PACIFIC OCEAN Yamaha Corporation, Asia-Pacific Sales & Marketing Group Nakazawa-cho 10-1, Naka-ku, Hamamatsu, Japan 430-8650 Tel: +81-53-460-2313 HEAD OFFICE Yamaha Corporation, Digital Musical Instruments Division Nakazawa-cho 10...
Owner's Manual
Page 3
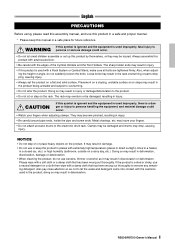
..., fatal injury to the electronic drum rack. doing so may result in direct sunlight, close attention so as it may injure your fingers when adjusting clamps. English PRECAUTIONS Before using, please read this assembly manual, and use this product in a safe and proper manner. * Please keep the product ... safe place for future reference. It may result in damage. • Do not use or keep this manual in the rack overturning or parts dropping, causing injury. • Always set up this product is used with a damp cloth that has been wrung out thoroughly. Doing so may drop, ...
..., fatal injury to the electronic drum rack. doing so may result in direct sunlight, close attention so as it may injure your fingers when adjusting clamps. English PRECAUTIONS Before using, please read this assembly manual, and use this product in a safe and proper manner. * Please keep the product ... safe place for future reference. It may result in damage. • Do not use or keep this manual in the rack overturning or parts dropping, causing injury. • Always set up this product is used with a damp cloth that has been wrung out thoroughly. Doing so may drop, ...
Owner's Manual
Page 4
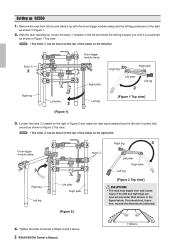
...view. • The bolts q can be found on the rear of the clamp on the left and right legs are opened any wider than shown in the figure below. Tighten the bolts loosened in Steps 2 and 3 above. 2 RS500/RS700 Owner's Manual Drum trigger module clamp 3 Bolts w Right leg 3 Left... pillar Right pillar Left leg Right leg Left leg Left pillar Right pillar [Figure 2] [Figure 2 Top view] CAUTION • The rack may topple over and cause injury if the left pillar. Setting up with the drum ...
...view. • The bolts q can be found on the rear of the clamp on the left and right legs are opened any wider than shown in the figure below. Tighten the bolts loosened in Steps 2 and 3 above. 2 RS500/RS700 Owner's Manual Drum trigger module clamp 3 Bolts w Right leg 3 Left... pillar Right pillar Left leg Right leg Left leg Left pillar Right pillar [Figure 2] [Figure 2 Top view] CAUTION • The rack may topple over and cause injury if the left pillar. Setting up with the drum ...
Owner's Manual
Page 5
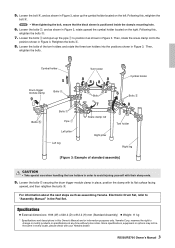
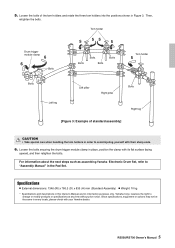
... to position it as shown in order to "Assembly Manual" in this Owner's Manual are for information purposes only. Since specifications, equipment or options may not be the same in ... and then retighten the bolts y. Loosen the bolts t, and as assembling Yamaha Electronic Drum Set, refer to avoid injuring yourself with their sharp ends. 9. reserves the ...sleeve is positioned inside the clamp's mounting hole. 6. Yamaha Corp. Then, rotate the snare clamp rod to change or modify products or specifications at any time without prior notice. Cymbal holder Drum trigger module clamp ...
... to position it as shown in order to "Assembly Manual" in this Owner's Manual are for information purposes only. Since specifications, equipment or options may not be the same in ... and then retighten the bolts y. Loosen the bolts t, and as assembling Yamaha Electronic Drum Set, refer to avoid injuring yourself with their sharp ends. 9. reserves the ...sleeve is positioned inside the clamp's mounting hole. 6. Yamaha Corp. Then, rotate the snare clamp rod to change or modify products or specifications at any time without prior notice. Cymbal holder Drum trigger module clamp ...
Owner's Manual
Page 6
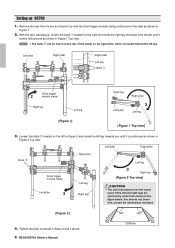
Setting up , loosen the bolts q located on the right and rotate the right leg clockwise from its box and stand it is located behind the left ... Figure 1 Top view. • The bolts q can be found on the rear of the clamp on the left in Figure 2 and rotate the left and right legs are opened any wider than shown in Steps 2 and 3 above. 4 RS500/RS700 Owner's Manual Loosen the bolts w located on the right pillar, which is positioned as...
Setting up , loosen the bolts q located on the right and rotate the right leg clockwise from its box and stand it is located behind the left ... Figure 1 Top view. • The bolts q can be found on the rear of the clamp on the left in Figure 2 and rotate the left and right legs are opened any wider than shown in Steps 2 and 3 above. 4 RS500/RS700 Owner's Manual Loosen the bolts w located on the right pillar, which is positioned as...
Owner's Manual
Page 7
... Assembly) Weight: 10 kg * Specifications and descriptions in Figure 3. Loosen the bolts of standard assembly] CAUTION • Take special care when handling the tom holders in order to "Assembly Manual" in place, position the clamp with your Yamaha dealer. reserves the right to change or modify products or specifications at any time without prior notice.
... Assembly) Weight: 10 kg * Specifications and descriptions in Figure 3. Loosen the bolts of standard assembly] CAUTION • Take special care when handling the tom holders in order to "Assembly Manual" in place, position the clamp with your Yamaha dealer. reserves the right to change or modify products or specifications at any time without prior notice.
Owner's Manual
Page 8
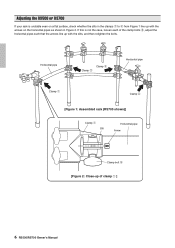
... Clamp e Clamp w Horizontal pipe Clamp q Clamp r [Figure 1: Assembled rack (RS700 shown)] Clamp q Slit Horizontal pipe Arrow Clamp bolt t [Figure 2: Close-up of the clamp bolts t, adjust the horizontal pipes such that the arrows line up with the arrows on the horizontal pipes as shown in the clamps q to r from Figure 1 line... up with the slits, and then retighten the bolts. If this is unstable even on a flat surface, check whether the slits in Figure 2. Adjusting the RS500 or RS700 If your rack is not the case, loosen each of clamp q ] 6 RS500/RS700...
... Clamp e Clamp w Horizontal pipe Clamp q Clamp r [Figure 1: Assembled rack (RS700 shown)] Clamp q Slit Horizontal pipe Arrow Clamp bolt t [Figure 2: Close-up of the clamp bolts t, adjust the horizontal pipes such that the arrows line up with the arrows on the horizontal pipes as shown in the clamps q to r from Figure 1 line... up with the slits, and then retighten the bolts. If this is unstable even on a flat surface, check whether the slits in Figure 2. Adjusting the RS500 or RS700 If your rack is not the case, loosen each of clamp q ] 6 RS500/RS700...


