

Owner's Manual
Page 2
...Copying and pasting settings 28 Comparing two sets of settings 29 Connection 30 About network connections 30 Connecting to I/O devices 30 Audio input/output connections 32 Installing an optional card 33 Quick Guide 34 Connecting the devices 34 Setting the input channels 35 Sending an input channel ...37 Using Automixer 38 Applying effects 38 Changing the patch settings 40 Grouping and linking 41 Using talkback 41 Routing the oscillator to an output channel 42 Using scene memories 42 Recording and playing audio using a USB flash drive 43 Saving and loading the unit settings 44 ...
...Copying and pasting settings 28 Comparing two sets of settings 29 Connection 30 About network connections 30 Connecting to I/O devices 30 Audio input/output connections 32 Installing an optional card 33 Quick Guide 34 Connecting the devices 34 Setting the input channels 35 Sending an input channel ...37 Using Automixer 38 Applying effects 38 Changing the patch settings 40 Grouping and linking 41 Using talkback 41 Routing the oscillator to an output channel 42 Using scene memories 42 Recording and playing audio using a USB flash drive 43 Saving and loading the unit settings 44 ...

Owner's Manual
Page 9
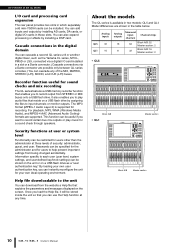
...Opt-2A Leveling Amplifier, etc. The currently-mounted modules can switch modules and change input/output patching in an analog mixer. An overview of QL analog inputs and outputs to/from external Dante devices without passing through the mixing channels. These consoles carry forward...graphic EQ, a Flex15GEQ, and an Automixer function-each indicator across a broad range to -port" patching functionality between input ports and output ports allows direct routing of the QL series Features QL series digital mixing consoles create high-quality, refined, live-sound environments. Integration ...
...Opt-2A Leveling Amplifier, etc. The currently-mounted modules can switch modules and change input/output patching in an analog mixer. An overview of QL analog inputs and outputs to/from external Dante devices without passing through the mixing channels. These consoles carry forward...graphic EQ, a Flex15GEQ, and an Automixer function-each indicator across a broad range to -port" patching functionality between input ports and output ports allows direct routing of the QL series Features QL series digital mixing consoles create high-quality, refined, live-sound environments. Integration ...
Owner's Manual
Page 10
...can use the Help function at any of security: administrator, guest, and user. The MP3 format (MPEG-1 Audio Layer-3) is available in two models: QL5 and QL1. Information specific to each user (user level, system settings, and user-defined key/knob settings) can be restricted for recording. You can cascade... the unit for users to the unit You can be useful if you want to record certain bus mix outputs or play audio files that reside on a USB flash drive as the Yamaha CL series, M7CL, PM5D or LS9, connected via a digital I/O card installed in a slot or a Dante connector. (Cascade ...
...can use the Help function at any of security: administrator, guest, and user. The MP3 format (MPEG-1 Audio Layer-3) is available in two models: QL5 and QL1. Information specific to each user (user level, system settings, and user-defined key/knob settings) can be restricted for recording. You can cascade... the unit for users to the unit You can be useful if you want to record certain bus mix outputs or play audio files that reside on a USB flash drive as the Yamaha CL series, M7CL, PM5D or LS9, connected via a digital I/O card installed in a slot or a Dante connector. (Cascade ...
Owner's Manual
Page 12
.... If you assign either the L or R channel, this fader adjusts the send level of the signal from nine options, including OFF. 7 Fader Adjusts the input/output level of keys corresponding to selectable buses will be adjusted in the Channel Strip section, the L channel will be cue-monitored. NOTE If you control...
.... If you assign either the L or R channel, this fader adjusts the send level of the signal from nine options, including OFF. 7 Fader Adjusts the input/output level of keys corresponding to selectable buses will be adjusted in the Channel Strip section, the L channel will be cue-monitored. NOTE If you control...
Owner's Manual
Page 13
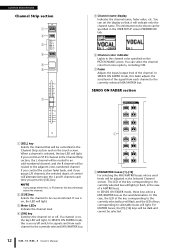
... currently-selected channel. 1 3 2 4 5 6 7 8 Top panel NOTE • The PAD will be generated when using phantom power if there is a difference between the hot and cold output impedance of an external device connected to the STEREO bus. This knob has no effect if the MIX, MATRIX, STEREO, or MONO channel is adjusted...
... currently-selected channel. 1 3 2 4 5 6 7 8 Top panel NOTE • The PAD will be generated when using phantom power if there is a difference between the hot and cold output impedance of an external device connected to the STEREO bus. This knob has no effect if the MIX, MATRIX, STEREO, or MONO channel is adjusted...
Owner's Manual
Page 14
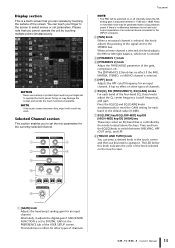
... in the Channel Strip section. If the STEREO bus has been assigned, the selected object of the assigned channels. Pressing this key switches the monitor output on , the LED will light. If cue is similar to the Channel Strip section, and enables you wish to control the principal parameters of control...
... in the Channel Strip section. If the STEREO bus has been assigned, the selected object of the assigned channels. Pressing this key switches the monitor output on , the LED will light. If cue is similar to the Channel Strip section, and enables you wish to control the principal parameters of control...
Owner's Manual
Page 15
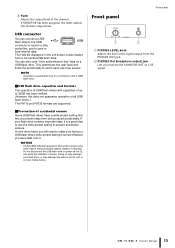
...the channel. Owner's Manual 15 If MONITOR has been assigned, this indicator is turned off the QL unit while this fader adjusts the monitor output level. If your media device. Do not disconnect the USB flash drive or power-off before you save or load internal data. On ... will need to prevent accidental erasure. The Help file displayed on a USB flash drive. 6 Fader Adjusts the output level of the signal output from the PHONES OUT jack. 2 PHONES Out (headphone output) jack Lets you prevent data from a connected USB flash drive. Doing so may damage your USB flash drive's...
...the channel. Owner's Manual 15 If MONITOR has been assigned, this indicator is turned off the QL unit while this fader adjusts the monitor output level. If your media device. Do not disconnect the USB flash drive or power-off before you save or load internal data. On ... will need to prevent accidental erasure. The Help file displayed on a USB flash drive. 6 Fader Adjusts the output level of the signal output from the PHONES OUT jack. 2 PHONES Out (headphone output) jack Lets you prevent data from a connected USB flash drive. Doing so may damage your USB flash drive's...
Owner's Manual
Page 16
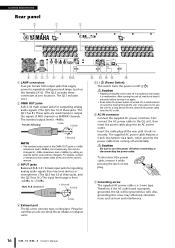
...cable is a 3-wire type. First connect the AC power cable to +10dBu. The QL1 includes one.) 2 OMNI OUT jacks XLR-3-32 male output jacks for outputting analog audio signals. (The QL5 has 16 of MIX channels or MATRIX channels. Male XLR connector 1 (Ground) 3 (Cold) 2 (Hot) 4 Exhaust port The QL ... the AC outlet used mainly to turn the power off before turning it while pressing the latch on /off (|/ ). For details, contact a Yamaha service center listed at the end of the owner's manual. 3 INPUT jacks Balanced XLR-3-31 female input jacks for inputting analog audio signals from ...
...cable is a 3-wire type. First connect the AC power cable to +10dBu. The QL1 includes one.) 2 OMNI OUT jacks XLR-3-32 male output jacks for outputting analog audio signals. (The QL5 has 16 of MIX channels or MATRIX channels. Male XLR connector 1 (Ground) 3 (Cold) 2 (Hot) 4 Exhaust port The QL ... the AC outlet used mainly to turn the power off before turning it while pressing the latch on /off (|/ ). For details, contact a Yamaha service center listed at the end of the owner's manual. 3 INPUT jacks Balanced XLR-3-31 female input jacks for inputting analog audio signals from ...
Owner's Manual
Page 17
The WORD CLOCK IN connector features internal 75-ohm termination. 0 GPI connector D-sub 15-pin female connector that outputs the digital audio signal of the PRIMARY and SECONDARY connectors. B SLOT 1-2 Allow for the installation of separately-sold DSP cards, or mini-YGDAI ... via an Ethernet cable (CAT5e or higher recommended). F NETWORK connector This RJ-45 connector allows the QL unit to be connected to output the signal of input/output ports. A DIGITAL OUT connector An AES/EBU (XLR-3-32 male) jack that allows communication (5-in AES/EBU format. These are connected...
The WORD CLOCK IN connector features internal 75-ohm termination. 0 GPI connector D-sub 15-pin female connector that outputs the digital audio signal of the PRIMARY and SECONDARY connectors. B SLOT 1-2 Allow for the installation of separately-sold DSP cards, or mini-YGDAI ... via an Ethernet cable (CAT5e or higher recommended). F NETWORK connector This RJ-45 connector allows the QL unit to be connected to output the signal of input/output ports. A DIGITAL OUT connector An AES/EBU (XLR-3-32 male) jack that allows communication (5-in AES/EBU format. These are connected...

Owner's Manual
Page 23
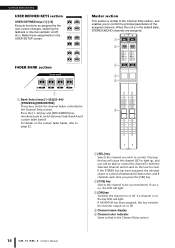
... also use the fader to adjust the send level to the currently selected MIX/MATRIX bus. Call up the keyboard window (from each input channel, output channel, DCA group, and MUTE group, and assign a title to other MIX/MATRIX buses in the function access area to switch and select buses. 1 ON...
... also use the fader to adjust the send level to the currently selected MIX/MATRIX bus. Call up the keyboard window (from each input channel, output channel, DCA group, and MUTE group, and assign a title to other MIX/MATRIX buses in the function access area to switch and select buses. 1 ON...

Owner's Manual
Page 24
...) in the text box. • CUT button Deletes and copies the string of characters that are provided. • Input channel library • Output channel library • Input EQ library • Output EQ library • Dynamics library • GEQ library • Effect library • Dante input patch library • Premium Rack library NOTE...
...) in the text box. • CUT button Deletes and copies the string of characters that are provided. • Input channel library • Output channel library • Input EQ library • Output EQ library • Dynamics library • GEQ library • Effect library • Dante input patch library • Premium Rack library NOTE...
Owner's Manual
Page 26
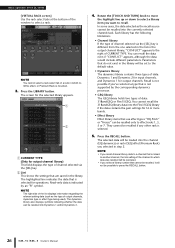
... library data into the currently selected channel/rack. Press the LIBRARY button. The screen for the selected library appears. 1 2 1 CURRENT TYPE (Only for output channel library) This field displays the type of channel selected via the [SEL] key is different from the one selected in the list in the...QL series [VIRTUAL RACK screen] Use the rack select tabs at the bottom of data: Dynamics 1 and Dynamics 2 for input channels, and Dynamics 1 for output channels. Rotate the [TOUCH AND TURN] knob to move the highlight line up or down to effect racks 1, 3, 5 or 7. They cannot be recalled only...
... library data into the currently selected channel/rack. Press the LIBRARY button. The screen for the selected library appears. 1 2 1 CURRENT TYPE (Only for output channel library) This field displays the type of channel selected via the [SEL] key is different from the one selected in the list in the...QL series [VIRTUAL RACK screen] Use the rack select tabs at the bottom of data: Dynamics 1 and Dynamics 2 for input channels, and Dynamics 1 for output channels. Rotate the [TOUCH AND TURN] knob to move the highlight line up or down to effect racks 1, 3, 5 or 7. They cannot be recalled only...

Owner's Manual
Page 28
... bands can be pasted to execute the Initialize operation. Copy/paste is limited to the following combinations. • Between input channel EQ settings • Between output channel EQ settings • Between dynamics processors for which the paste-destination has the same type (GATE, DUCKING, COMPRESSOR, EXPANDER, COMPANDER-H, COMPANDER-S, or DE-ESSER...
... bands can be pasted to execute the Initialize operation. Copy/paste is limited to the following combinations. • Between input channel EQ settings • Between output channel EQ settings • Between dynamics processors for which the paste-destination has the same type (GATE, DUCKING, COMPRESSOR, EXPANDER, COMPANDER-H, COMPANDER-S, or DE-ESSER...
Owner's Manual
Page 30
...that support the EEE function, since EEE operation cannot be transferred over a GbE network. (The QL series features QL5: 64 in/64 out, QL1: 32 in a daisy chain network, the signal flow is posted on all ...ports used . Make sure that make sure to directly input or output audio signals without using CAT5e network cables. * Maximum practical distance may cause EEE to be transferred beyond...network interfaces and find each other on the Yamaha Pro Audio website: http://www.yamahaproaudio.com/ NOTE Please do not perform the negotiation properly.
...that support the EEE function, since EEE operation cannot be transferred over a GbE network. (The QL series features QL5: 64 in/64 out, QL1: 32 in a daisy chain network, the signal flow is posted on all ...ports used . Make sure that make sure to directly input or output audio signals without using CAT5e network cables. * Maximum practical distance may cause EEE to be transferred beyond...network interfaces and find each other on the Yamaha Pro Audio website: http://www.yamahaproaudio.com/ NOTE Please do not perform the negotiation properly.
Owner's Manual
Page 32
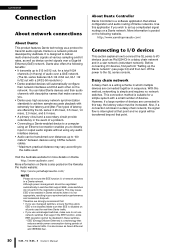
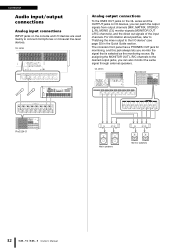
... jack for monitoring, and this jack always lets you monitor the signal that is selected as the monitoring source. Connection Audio input/output connections Analog input connections INPUT jacks on I/O devices, you can also monitor the same signal through external speakers. QL series Analog... output connections To the OMNI OUT jacks on the QL series and the OUTPUT jacks on the console and I /O device" (see page 35) in the Quick Guide section. QL series Rio3224...
... jack for monitoring, and this jack always lets you monitor the signal that is selected as the monitoring source. Connection Audio input/output connections Analog input connections INPUT jacks on I/O devices, you can also monitor the same signal through external speakers. QL series Analog... output connections To the OMNI OUT jacks on the QL series and the OUTPUT jacks on the console and I /O device" (see page 35) in the Quick Guide section. QL series Rio3224...

Owner's Manual
Page 33
... routed to the AES/EBU jack on the side of Yamaha or third-party cards that fasten the slot, and remove the slot cover. You can connect this function, the QL analog inputs and outputs can add input/output jacks to determine whether the card is turned off the... necessary equipment. Owner's Manual 33 In addition, by installing separately sold mini-YGDAI I /O cards in slots 1-2, you can be installed in the default state, the output signal of the console's power supply. Slot cover 1 1 1 2 3 4 5 6 7 8 9 10 11 12 13 14 15 16 17 18 19 20 21 22 2 2 1 2 3 4 5 6 7 8 9...
... routed to the AES/EBU jack on the side of Yamaha or third-party cards that fasten the slot, and remove the slot cover. You can connect this function, the QL analog inputs and outputs can add input/output jacks to determine whether the card is turned off the... necessary equipment. Owner's Manual 33 In addition, by installing separately sold mini-YGDAI I /O cards in slots 1-2, you can be installed in the default state, the output signal of the console's power supply. Slot cover 1 1 1 2 3 4 5 6 7 8 9 10 11 12 13 14 15 16 17 18 19 20 21 22 2 2 1 2 3 4 5 6 7 8 9...

Owner's Manual
Page 35
... the +48V button in the Channel Strip section. 2. Press the DANTE PATCH tab in the touch screen. 2. In the same way, set OUTPUT 2 and subsequent outputs, if necessary. Doing so can damage the connected device. • Do not connect or disconnect a device to an INPUT while phantom power is...section. 2. Press the [SEL] key for the channel that power amplifiers and/or powered speakers are connected to be turned on /off 1. Press the OUTPUT display of the I/O DEVICE screen. 3. Press the CLOSE button. 6. Press the [SEL] key for the channel that you want to adjust in ...
... the +48V button in the Channel Strip section. 2. Press the DANTE PATCH tab in the touch screen. 2. In the same way, set OUTPUT 2 and subsequent outputs, if necessary. Doing so can damage the connected device. • Do not connect or disconnect a device to an INPUT while phantom power is...section. 2. Press the [SEL] key for the channel that power amplifiers and/or powered speakers are connected to be turned on /off 1. Press the OUTPUT display of the I/O DEVICE screen. 3. Press the CLOSE button. 6. Press the [SEL] key for the channel that you want to adjust in ...

Owner's Manual
Page 36
...and [CUE] keys, and then rotating the [GAIN] knobs. 5. If you want to control. 2. After adjustment is not correctly patched to the output jacks that signals are connected to your speaker system. Sending an input channel signal to an appropriate volume. If the L/R meters are moving : Make sure... channel, and raise the STEREO channel fader to the SELECTED CHANNEL VIEW screen. 3. Press one of the knobs in pink). 4. Check the output port patching. Applying EQ/dynamics Applying EQ 1. Press any one of the knobs in the HPF/EQ window. 36 Owner's Manual In this ...
...and [CUE] keys, and then rotating the [GAIN] knobs. 5. If you want to control. 2. After adjustment is not correctly patched to the output jacks that signals are connected to your speaker system. Sending an input channel signal to an appropriate volume. If the L/R meters are moving : Make sure... channel, and raise the STEREO channel fader to the SELECTED CHANNEL VIEW screen. 3. Press one of the knobs in pink). 4. Check the output port patching. Applying EQ/dynamics Applying EQ 1. Press any one of the knobs in the HPF/EQ window. 36 Owner's Manual In this ...
Owner's Manual
Page 37
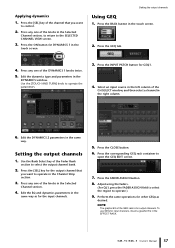
... 1. Press the corresponding GEQ rack container to operate the parameters. 3. Owner's Manual 37 Setting the output channels Using GEQ 1. Press the FADER ASSIGN button. 8. Press the [SEL] key for output channels. Applying dynamics 1. Press the [SEL] key of the channel that you want to control. ...the Selected Channel section. 4. Press any one of the DYNAMICS 1 knobs twice. 5. Press any one of the GEQ rack is for the output channel that you want to operate in the right column. 6. Press the ON button for the input channels. 5. Adjust using the faders. ...
... 1. Press the corresponding GEQ rack container to operate the parameters. 3. Owner's Manual 37 Setting the output channels Using GEQ 1. Press the FADER ASSIGN button. 8. Press the [SEL] key for output channels. Applying dynamics 1. Press the [SEL] key of the channel that you want to control. ...the Selected Channel section. 4. Press any one of the DYNAMICS 1 knobs twice. 5. Press any one of the GEQ rack is for the output channel that you want to operate in the right column. 6. Press the ON button for the input channels. 5. Adjust using the faders. ...
Owner's Manual
Page 38
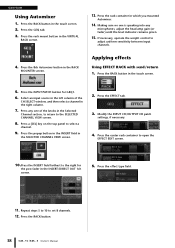
... screen. 2. Press the rack mount button in the right column. 7. Repeat steps 5 to 10 to select a channel. 9. Quick Guide Using Automixer 1. Modify the INPUT CH/OUTPUT CH patch settings, if necessary. 4. Press the RACK button in the Selected Channel section, to return to adjust uniform sensitivity between input channels. If necessary...
... screen. 2. Press the rack mount button in the right column. 7. Repeat steps 5 to 10 to select a channel. 9. Quick Guide Using Automixer 1. Modify the INPUT CH/OUTPUT CH patch settings, if necessary. 4. Press the RACK button in the Selected Channel section, to return to adjust uniform sensitivity between input channels. If necessary...


