

Firmware Update Guide
Page 2
... Preparing for the update You will be formatted in a computer, refer to documentations supplied with the following items ready to "QL5/ QL1 Reference Manual." ■ Checking the version number You may check the QL main firmware version number and the Dante firmware version number from... the version field in FAT16. http://www.yamahaproaudio.com/downloads/ QL5/QL1 Firmware Update Guide 2 Straight or cross.) ● Formatted (FAT12...
... Preparing for the update You will be formatted in a computer, refer to documentations supplied with the following items ready to "QL5/ QL1 Reference Manual." ■ Checking the version number You may check the QL main firmware version number and the Dante firmware version number from... the version field in FAT16. http://www.yamahaproaudio.com/downloads/ QL5/QL1 Firmware Update Guide 2 Straight or cross.) ● Formatted (FAT12...
Firmware Update Guide
Page 7
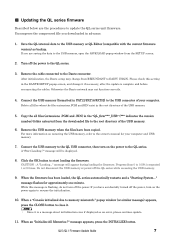
... or 2 times. Remove the USB memory when the files have accidentally turned off the power. Click the OK button to the owner's manual for approximately one minute. After initialization, the Dante setup may not function correctly. 4. While this setting in advance. 1. If you are... the procedures to the QL series. 3. CAUTION:A "Loading..." QL5/QL1 Firmware Update Guide 7 Do not disconnect the USB memory or power-off the power to update the QL series unit firmware. Connect the...
... or 2 times. Remove the USB memory when the files have accidentally turned off the power. Click the OK button to the owner's manual for approximately one minute. After initialization, the Dante setup may not function correctly. 4. While this setting in advance. 1. If you are... the procedures to the QL series. 3. CAUTION:A "Loading..." QL5/QL1 Firmware Update Guide 7 Do not disconnect the USB memory or power-off the power to update the QL series unit firmware. Connect the...

Owner's Manual
Page 1
EN Owner's Manual Keep This Manual For Future Reference.
EN Owner's Manual Keep This Manual For Future Reference.

Owner's Manual
Page 2
Contents PRECAUTIONS 5 Introduction 8 Accessories 8 About utility software 8 About firmware updates 8 About the Owner's Manual 8 Conventions in this manual 8 An overview of the QL series 9 Features 9 About the models 10 Controls and functions 11 Top panel 11 Front panel 15 Rear panel 16 Touch ... (Calibration function 46 Troubleshooting 48 Attaching the RK1 rackmount kit (sold separately 50 General specifications 51 Dimensional Diagrams 52 Index 53 Block Diagram End of Manual Level Diagram End of...
Contents PRECAUTIONS 5 Introduction 8 Accessories 8 About utility software 8 About firmware updates 8 About the Owner's Manual 8 Conventions in this manual 8 An overview of the QL series 9 Features 9 About the models 10 Controls and functions 11 Top panel 11 Front panel 15 Rear panel 16 Touch ... (Calibration function 46 Troubleshooting 48 Attaching the RK1 rackmount kit (sold separately 50 General specifications 51 Dimensional Diagrams 52 Index 53 Block Diagram End of Manual Level Diagram End of...

Owner's Manual
Page 4
...to the operation of Equipment: Digital Mixing Console Model Name: QL5/QL1 This device complies with the requirements listed in this product to the terminal which is marked by the letter E or by YAMAHA CORPORATION OF AMERICA. (class B) ADVARSEL! The wire which...product. 2. FCC INFORMATION (U.S.A.) 1. Operation is marked with the letter L or coloured RED. (3 wires) 4 Owner's Manual (class b korea) Modifications not expressly approved by Yamaha may apply, See www.dtsc.ca.gov/hazardouswaste/perchlorate. * This applies only to products distributed by the FCC, to radio...
...to the operation of Equipment: Digital Mixing Console Model Name: QL5/QL1 This device complies with the requirements listed in this product to the terminal which is marked by the letter E or by YAMAHA CORPORATION OF AMERICA. (class B) ADVARSEL! The wire which...product. 2. FCC INFORMATION (U.S.A.) 1. Operation is marked with the letter L or coloured RED. (3 wires) 4 Owner's Manual (class b korea) Modifications not expressly approved by Yamaha may apply, See www.dtsc.ca.gov/hazardouswaste/perchlorate. * This applies only to products distributed by the FCC, to radio...
Owner's Manual
Page 5
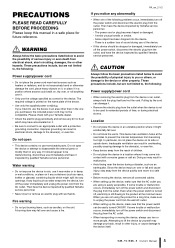
... dropped into any containers (such as correct for extended periods of serious injury or even death from becoming too high. Pulling by qualified Yamaha service personnel. If some trouble or malfunction occurs, immediately turn off the power switch and disconnect the plug from the device or an ... it . • Only use two or more people. Doing so may not be malfunctioning, discontinue use of the device. • If this manual in the one of the following : Power supply/power cord • When removing the electric plug from the AC outlet. • When transporting or...
... dropped into any containers (such as correct for extended periods of serious injury or even death from becoming too high. Pulling by qualified Yamaha service personnel. If some trouble or malfunction occurs, immediately turn off the power switch and disconnect the plug from the device or an ... it . • Only use two or more people. Doing so may not be malfunctioning, discontinue use of the device. • If this manual in the one of the following : Power supply/power cord • When removing the electric plug from the AC outlet. • When transporting or...
Owner's Manual
Page 6
..., and avoid use or modifications to the device, or data that is fully depleted, have the device inspected by qualified Yamaha service personnel. • Do not rest your fingers or hands in any gaps or openings on the device (vents)....or dropping foreign objects (paper, plastic, metal, etc.) into any hearing loss or ringing in the ears, consult a physician. Yamaha cannot be held responsible for damage caused by yourself. Doing so may cause an explosion and/or damage to the device(s). If...unplug the power cord from the AC outlet when cleaning the device. PA_en_2 2/2 6 Owner's Manual
..., and avoid use or modifications to the device, or data that is fully depleted, have the device inspected by qualified Yamaha service personnel. • Do not rest your fingers or hands in any gaps or openings on the device (vents)....or dropping foreign objects (paper, plastic, metal, etc.) into any hearing loss or ringing in the ears, consult a physician. Yamaha cannot be held responsible for damage caused by yourself. Doing so may cause an explosion and/or damage to the device(s). If...unplug the power cord from the AC outlet when cleaning the device. PA_en_2 2/2 6 Owner's Manual

Owner's Manual
Page 7
...please contact your local municipality, your waste disposal service or the point of sale where you purchased the items. [For business users in this manual are wired as follows (IEC60268 standard): pin 1: ground, pin 2: hot (+), and pin 3: cold (-). Connectors • XLR-type connectors...other property, follow the notices below. By disposing of these items, please contact your Yamaha dealer and have occurred, leave the device for the correct method of disposal. (weee_eu_en_01) Owner's Manual 7 When turning the power off, the power amplifier/the device should not be ...
...please contact your local municipality, your waste disposal service or the point of sale where you purchased the items. [For business users in this manual are wired as follows (IEC60268 standard): pin 1: ground, pin 2: hot (+), and pin 3: cold (-). Connectors • XLR-type connectors...other property, follow the notices below. By disposing of these items, please contact your Yamaha dealer and have occurred, leave the device for the correct method of disposal. (weee_eu_en_01) Owner's Manual 7 When turning the power off, the power amplifier/the device should not be ...
Owner's Manual
Page 8
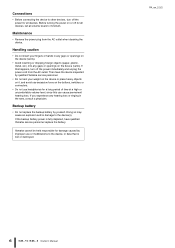
... your QL series console, and to the firmware update guide available on the panel are available for choosing a Yamaha QL series QL5/QL1 Digital Mixing Console. Accessories • AC power cord • Owner's Manual (this owner's manual carefully before the [ ] (e.g., SCENE MEMORY [STORE] key). Information about downloading, installing and setting up console settings or...
... your QL series console, and to the firmware update guide available on the panel are available for choosing a Yamaha QL series QL5/QL1 Digital Mixing Console. Accessories • AC power cord • Owner's Manual (this owner's manual carefully before the [ ] (e.g., SCENE MEMORY [STORE] key). Information about downloading, installing and setting up console settings or...

Owner's Manual
Page 9
... passing through the mixing channels. To use effects or the graphic EQ, you can switch modules and change input/output patching in a "Fader Bank". Owner's Manual 9 You can adjust the brightness of each of mixer and I /O device. Each channel strip offers easy visual identification. You can use . If multiple QL units...
... passing through the mixing channels. To use effects or the graphic EQ, you can switch modules and change input/output patching in a "Fader Bank". Owner's Manual 9 You can adjust the brightness of each of mixer and I /O device. Each channel strip offers easy visual identification. You can use . If multiple QL units...
Owner's Manual
Page 10
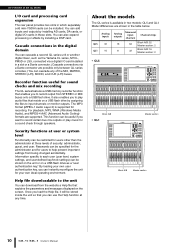
...that explains the parameters and messages displayed on the screen. Model differences are shown in two models: QL5 and QL1. For playback, MP3, WMA (Windows Media Audio), and MPEG-4 AAC (Advanced Audio Coding... mix recording The QL series features a USB memory recorder function that reside on a USB flash drive as the Yamaha CL series, M7CL, PM5D or LS9, connected via a digital I/O card installed in a slot or a Dante...key." Analog inputs Analog outputs Monaural input channels Channel strips QL5 32 16 64 Block A/B: 32 Master section: 2 QL1 16 8 32 Block A/B: 16 Master section: 2...
...that explains the parameters and messages displayed on the screen. Model differences are shown in two models: QL5 and QL1. For playback, MP3, WMA (Windows Media Audio), and MPEG-4 AAC (Advanced Audio Coding... mix recording The QL series features a USB memory recorder function that reside on a USB flash drive as the Yamaha CL series, M7CL, PM5D or LS9, connected via a digital I/O card installed in a slot or a Dante...key." Analog inputs Analog outputs Monaural input channels Channel strips QL5 32 16 64 Block A/B: 32 Master section: 2 QL1 16 8 32 Block A/B: 16 Master section: 2...
Owner's Manual
Page 11
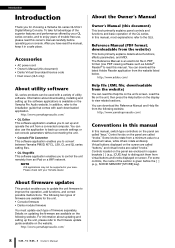
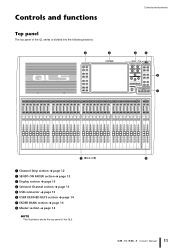
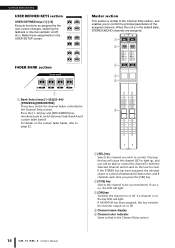
Controls and functions Top panel The top panel of the QL series is divided into the following sections. 2 3 Controls and functions 45 6 7 1 (Block A/B) 1 Channel Strip section page 12 2 SENDS ON FADER section page 12 3 Display section page 13 4 Selected Channel section page 13 5 USB connector page 15 6 USER DEFINED KEYS section page 14 7 FADER BANK section page 14 8 Master section page 14 NOTE This illustration shows the top panel of the QL5. 8 Owner's Manual 11
Controls and functions Top panel The top panel of the QL series is divided into the following sections. 2 3 Controls and functions 45 6 7 1 (Block A/B) 1 Channel Strip section page 12 2 SENDS ON FADER section page 12 3 Display section page 13 4 Selected Channel section page 13 5 USB connector page 15 6 USER DEFINED KEYS section page 14 7 FADER BANK section page 14 8 Master section page 14 NOTE This illustration shows the top panel of the QL5. 8 Owner's Manual 11
Owner's Manual
Page 12
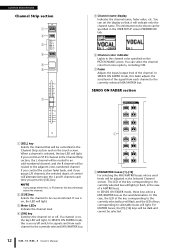
... select the channel. 2 [CUE] key Selects the channel to the adjacent even-numbered channel. For MATRIX buses, the [9]-[16] keys will be selected. 12 Owner's Manual The information to be shown can select the channel color from each channel to an odd-numbered channel, and the R channel will light. 3 Meter LEDs...
... select the channel. 2 [CUE] key Selects the channel to the adjacent even-numbered channel. For MATRIX buses, the [9]-[16] keys will be selected. 12 Owner's Manual The information to be shown can select the channel color from each channel to an odd-numbered channel, and the R channel will light. 3 Meter LEDs...
Owner's Manual
Page 13
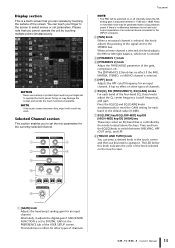
... so may be switched on the touch screen. 1 [GAIN] knob Adjusts the head amp's analog gain for other types of the gate, compressor, etc. Owner's Manual 13 Alternately, it with a soft dry cloth. Display section This is a touch screen that you cannot operate the unit by touching multiple points simultaneously.
... so may be switched on the touch screen. 1 [GAIN] knob Adjusts the head amp's analog gain for other types of the gate, compressor, etc. Owner's Manual 13 Alternately, it with a soft dry cloth. Display section This is a touch screen that you cannot operate the unit by touching multiple points simultaneously.
Owner's Manual
Page 14
... Strip section, and enables you will light. Pressing this key switches the monitor output on the custom fader banks, refer to page 22. 14 Owner's Manual 1 [SEL] key Selects the channel you press the [SEL] key. 2 [CUE] key Selects the channel to control. Make these assignments in the USER SETUP screen...
... Strip section, and enables you will light. Pressing this key switches the monitor output on the custom fader banks, refer to page 22. 14 Owner's Manual 1 [SEL] key Selects the channel you press the [SEL] key. 2 [CUE] key Selects the channel to control. Make these assignments in the USER SETUP screen...
Owner's Manual
Page 15
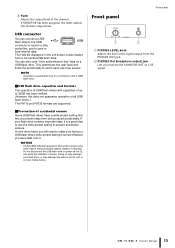
... drive. If your USB flash drive's write-protect setting is shown. Front panel Front panel 1 2 1 PHONES LEVEL knob Adjusts the level of the channel. Owner's Manual 15
... drive. If your USB flash drive's write-protect setting is shown. Front panel Front panel 1 2 1 PHONES LEVEL knob Adjusts the level of the channel. Owner's Manual 15
Owner's Manual
Page 16
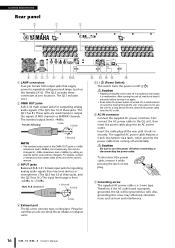
... is +4dBu (maximum level +24dBu), but if necessary, this screw may effectively eliminate noise such as the Yamaha LA1L). (The QL5 includes these connectors at the end of the owner's manual. 3 INPUT jacks Balanced XLR-3-31 female input jacks for inputting analog audio signals from the AC outlet. 6...the AC power cable to separately-sold gooseneck lamps (such as hum and interference. 16 Owner's Manual The QL1 includes one.) 2 OMNI OUT jacks XLR-3-32 male output jacks for outputting analog audio signals. (The QL5 has 16 of these jacks. B CDE F 5 | / (Power Switch) This switch turns...
... is +4dBu (maximum level +24dBu), but if necessary, this screw may effectively eliminate noise such as the Yamaha LA1L). (The QL5 includes these connectors at the end of the owner's manual. 3 INPUT jacks Balanced XLR-3-31 female input jacks for inputting analog audio signals from the AC outlet. 6...the AC power cable to separately-sold gooseneck lamps (such as hum and interference. 16 Owner's Manual The QL1 includes one.) 2 OMNI OUT jacks XLR-3-32 male output jacks for outputting analog audio signals. (The QL5 has 16 of these jacks. B CDE F 5 | / (Power Switch) This switch turns...
Owner's Manual
Page 17
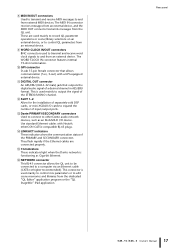
... to output the signal of input/output ports. B SLOT 1-2 Allow for the installation of separately-sold DSP cards, or mini-YGDAI I /O device. Rear panel Owner's Manual 17 They flash rapidly if the Ethernet cables are used to transmit and receive word clock signals to expand the number of the STEREO/MONO...
... to output the signal of input/output ports. B SLOT 1-2 Allow for the installation of separately-sold DSP cards, or mini-YGDAI I /O device. Rear panel Owner's Manual 17 They flash rapidly if the Ethernet cables are used to transmit and receive word clock signals to expand the number of the STEREO/MONO...
Owner's Manual
Page 18
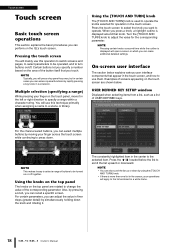
... touch screen while continuing to operate. Examples of buttons to scroll the list upward or downward. The constantly highlighted item in a white frame. 18 Owner's Manual Press the / located below . NOTE • You can access special functions by pressing a knob, you can make additional detailed settings. When you can also scroll...
... touch screen while continuing to operate. Examples of buttons to scroll the list upward or downward. The constantly highlighted item in a white frame. 18 Owner's Manual Press the / located below . NOTE • You can access special functions by pressing a knob, you can make additional detailed settings. When you can also scroll...
Owner's Manual
Page 19
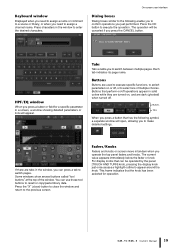
... when you press a button or field for operation. Buttons that has the following enable you to confirm operations you to switch between multiple pages. Owner's Manual 19 Press the OK button to execute the operation. Keyboard window Displayed when you need to assign a channel name.
... when you press a button or field for operation. Buttons that has the following enable you to confirm operations you to switch between multiple pages. Owner's Manual 19 Press the OK button to execute the operation. Keyboard window Displayed when you need to assign a channel name.

