
Firmware Update Guide
Page 4
... in "Preparing for the update" (DanteFirmwareUpdateManager-x.x.x.exe) and follow the on-screen instructions to install the firmware. In such case, click [Install this driver software anyway]. ・ You may appear. In such case, download the Bonjour installer from the compressed file. C:\temp). ・ The "Windows Security" dialog box may be prompted to... of installation of the Dante Firmware Update Manager. Double-click the Dante Firmware Update Manager installer downloaded in a directory that consists only of ASCII characters (e.g. QL5/QL1 Firmware Update Guide 4
... in "Preparing for the update" (DanteFirmwareUpdateManager-x.x.x.exe) and follow the on-screen instructions to install the firmware. In such case, click [Install this driver software anyway]. ・ You may appear. In such case, download the Bonjour installer from the compressed file. C:\temp). ・ The "Windows Security" dialog box may be prompted to... of installation of the Dante Firmware Update Manager. Double-click the Dante Firmware Update Manager installer downloaded in a directory that consists only of ASCII characters (e.g. QL5/QL1 Firmware Update Guide 4

Firmware Update Guide
Page 10
... procedure from the step 4. The update operation will begin. If update still fails, follow the instructions stated in such case. Check that , the computer and the QL are not connected properly. Click [Start]. QL5/QL1 Firmware Update Guide 10 For Windows 7/8, select the [Private Network] checkbox and click [Allow access]. 7. Update takes...
... procedure from the step 4. The update operation will begin. If update still fails, follow the instructions stated in such case. Check that , the computer and the QL are not connected properly. Click [Start]. QL5/QL1 Firmware Update Guide 10 For Windows 7/8, select the [Private Network] checkbox and click [Allow access]. 7. Update takes...
Firmware Update Guide
Page 11
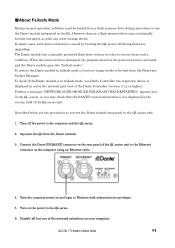
... drive during firmware upgrading. Turn on and login to recover the Dante module integrated in the network grid view of the QL series unit. QL5/QL1 Firmware Update Guide 11 Further, a message "NETWORK AUDIO MODULE FAILED AND WAS RESTARTED." ■About Failsafe Mode During normal operation, software...the power to the QL series. 6. Disable all but one of the QL series unit to recover from the Dante network. 3. In many cases, such data corruption is in failsafe mode, use the Dante module integrated in the QL screen, so you may occasionally become corrupted, as with...
... drive during firmware upgrading. Turn on and login to recover the Dante module integrated in the network grid view of the QL series unit. QL5/QL1 Firmware Update Guide 11 Further, a message "NETWORK AUDIO MODULE FAILED AND WAS RESTARTED." ■About Failsafe Mode During normal operation, software...the power to the QL series. 6. Disable all but one of the QL series unit to recover from the Dante network. 3. In many cases, such data corruption is in failsafe mode, use the Dante module integrated in the QL screen, so you may occasionally become corrupted, as with...

Owner's Manual
Page 4
... INFORMATION STATEMENT (DECLARATION OF CONFORMITY PROCEDURE) Responsible Party: Yamaha Corporation of America Address: 6600 Orangethorpe Ave., Buena Park, Calif. 90620 Telephone: 714-522-9011 Type of Equipment: Digital Mixing Console Model Name: QL5/QL1 This device complies with the coloured markings identifying the... product MUST be connected to the operation of radio or TV interference, relocate/reorient the antenna. In the case of other electronic devices. See user manual instructions if interference to radio reception is coloured BROWN must accept any interference received...
... INFORMATION STATEMENT (DECLARATION OF CONFORMITY PROCEDURE) Responsible Party: Yamaha Corporation of America Address: 6600 Orangethorpe Ave., Buena Park, Calif. 90620 Telephone: 714-522-9011 Type of Equipment: Digital Mixing Console Model Name: QL5/QL1 This device complies with the coloured markings identifying the... product MUST be connected to the operation of radio or TV interference, relocate/reorient the antenna. In the case of other electronic devices. See user manual instructions if interference to radio reception is coloured BROWN must accept any interference received...

Owner's Manual
Page 7
... users in the European Union] If you will be attached to the speaker to prevent slippage when it becomes fully depleted. In this case, contact your national legislation and the Directives 2002/96/EC. Connectors • XLR-type connectors are the property of Ricoh Co., Ltd.../damage to the product, damage to data, or damage to other countries. • The bitmap fonts used in this instrument have qualified Yamaha service personnel replace the backup battery. Handling and Maintenance • Do not use paint thinners, solvents, cleaning fluids, or chemicalimpregnated wiping cloths...
... users in the European Union] If you will be attached to the speaker to prevent slippage when it becomes fully depleted. In this case, contact your national legislation and the Directives 2002/96/EC. Connectors • XLR-type connectors are the property of Ricoh Co., Ltd.../damage to the product, damage to data, or damage to other countries. • The bitmap fonts used in this instrument have qualified Yamaha service personnel replace the backup battery. Handling and Maintenance • Do not use paint thinners, solvents, cleaning fluids, or chemicalimpregnated wiping cloths...
Owner's Manual
Page 12
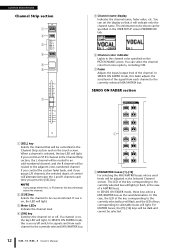
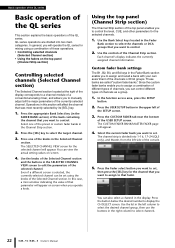
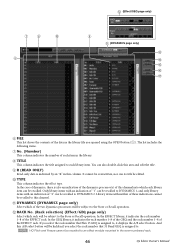
The information to be shown can be adjusted in the Channel Strip section and on the touch screen. In SENDS ON FADER mode, this case, the LED of the key corresponding to the currently-selected MIX/MATRIX bus. If cue is on /off . In SENDS ON FADER mode, these keys ... assign L/R channels, the selected object of a MATRIX bus). If you control the custom fader bank, and if you control an ST IN channel in the case of control will light. 3 Meter LEDs Indicate the channel level. 4 [ON] key Switches the channel on the PATCH/NAME screen. The LED of the signal...
The information to be shown can be adjusted in the Channel Strip section and on the touch screen. In SENDS ON FADER mode, this case, the LED of the key corresponding to the currently-selected MIX/MATRIX bus. If cue is on /off . In SENDS ON FADER mode, these keys ... assign L/R channels, the selected object of a MATRIX bus). If you control the custom fader bank, and if you control an ST IN channel in the case of control will light. 3 Meter LEDs Indicate the channel level. 4 [ON] key Switches the channel on the PATCH/NAME screen. The LED of the signal...
Owner's Manual
Page 18
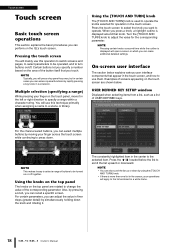
... on the top panel The knobs on the top panel are shown below. NOTE Typically, you will press a top panel key once, but in certain cases you can access special functions by pressing a knob, you can adjust the value in succession. Multiple selection (specifying a range) While pressing your finger on /off...
... on the top panel The knobs on the top panel are shown below. NOTE Typically, you will press a top panel key once, but in certain cases you can access special functions by pressing a knob, you can adjust the value in succession. Multiple selection (specifying a range) While pressing your finger on /off...
Owner's Manual
Page 22
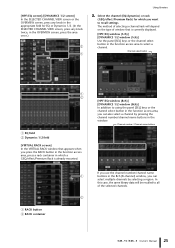
...edit the parameters of the SETUP screen. 3. Select one of the currently selected channel. These banks are divided into 1-16, 17-24 (QL5 only), and Master, from the left column to select the desired channel group, then use the buttons in the Fader Bank section to select... of the USER SETUP screen. Each channel's display indicates the currently assigned channel information. Use the controls of the QL series. Operations in this case, a mini window indicating the value of the console. 5. Press the appropriate Bank Select key (in the Channel Strip section. 2. Use the ...
...edit the parameters of the SETUP screen. 3. Select one of the currently selected channel. These banks are divided into 1-16, 17-24 (QL5 only), and Master, from the left column to select the desired channel group, then use the buttons in the Fader Bank section to select... of the USER SETUP screen. Each channel's display indicates the currently assigned channel information. Use the controls of the QL series. Operations in this case, a mini window indicating the value of the console. 5. Press the appropriate Bank Select key (in the Channel Strip section. 2. Use the ...
Owner's Manual
Page 25
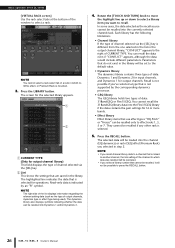
... channel number/channel name buttons in which you press the RACK button in the function access area, press a rack container in the window. In this case, the same library data will depend on the type of window that appears when you want to all of selecting a channel/rack will be recalled...
... channel number/channel name buttons in which you press the RACK button in the function access area, press a rack container in the window. In this case, the same library data will depend on the type of window that appears when you want to all of selecting a channel/rack will be recalled...
Owner's Manual
Page 26
... linked to which data was recalled will be recalled into the Flex15GEQ library if the data contains the gain settings for output channels. In some cases, the data selected as the type of output channels, dynamics type or effect type being used). Recall is not possible if you recall channel library...
... linked to which data was recalled will be recalled into the Flex15GEQ library if the data contains the gain settings for output channels. In some cases, the data selected as the type of output channels, dynamics type or effect type being used). Recall is not possible if you recall channel library...

Owner's Manual
Page 28
... for which the paste-destination has the same type (GATE, DUCKING, COMPRESSOR, EXPANDER, COMPANDER-H, COMPANDER-S, or DE-ESSER) as the copy-source. In this case, the same content will be initialized using the tool buttons in the 8ch/ALL window, you want to initialize. 3. GEQ settings can return the EQ...or rack. Press the PASTE button. If you can use the 8ch/ALL window to select multiple channels as the paste-destination. NOTE In the case of EQ/dynamics, you paste, the settings will overwrite the paste-destination. • If nothing has been copied to the buffer memory, the PASTE...
... for which the paste-destination has the same type (GATE, DUCKING, COMPRESSOR, EXPANDER, COMPANDER-H, COMPANDER-S, or DE-ESSER) as the copy-source. In this case, the same content will be initialized using the tool buttons in the 8ch/ALL window, you want to initialize. 3. GEQ settings can return the EQ...or rack. Press the PASTE button. If you can use the 8ch/ALL window to select multiple channels as the paste-destination. NOTE In the case of EQ/dynamics, you paste, the settings will overwrite the paste-destination. • If nothing has been copied to the buffer memory, the PASTE...
Ql Editor Installation Guide
Page 9
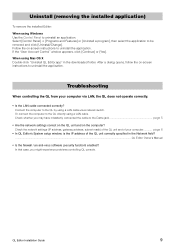
... the IP address of the QL unit correctly specified in the downloaded folder. Connect the computer to the QL by using a LAN cable. In that case, you may have mistakenly connected the cable to the QL directly using a LAN cable via LAN, the QL does not operate correctly. • Is the...
... the IP address of the QL unit correctly specified in the downloaded folder. Connect the computer to the QL by using a LAN cable. In that case, you may have mistakenly connected the cable to the QL directly using a LAN cable via LAN, the QL does not operate correctly. • Is the...
Ql Editor Owner's Manual
Page 46
It cannot be overwritten, nor can be recalled to DYNAMICS 2. In the case of dynamics, there is assigned to the Store or Recall operation. A DYNAMICS (DYNAMICS page only) Select which rack will be hidden if you select the ...
It cannot be overwritten, nor can be recalled to DYNAMICS 2. In the case of dynamics, there is assigned to the Store or Recall operation. A DYNAMICS (DYNAMICS page only) Select which rack will be hidden if you select the ...

Ql Editor Owner's Manual
Page 78
... or from a drive of your computer. 6 FILE This area lists the scenes in the file you opened file, executing SAVE or SAVE AS in this case, you can edit the QL's scene memories.
... or from a drive of your computer. 6 FILE This area lists the scenes in the file you opened file, executing SAVE or SAVE AS in this case, you can edit the QL's scene memories.

Ql Stagemix V4.2 User Guide
Page 3
Yamaha Professional Audio QL StageMix User Guide 5.2.6 PEQ COPY/PASTE 27 5.3 GRAPHIC EQ EDITING 28 5.3.1 Navigation in the GEQ Editing Section 29 5.3.7 GEQ ON 29 5.3.8 GEQ ...-Select 41 8.0 SCENE MEMORY 42 8.1 CURRENT SCENE 42 8.2 DECREMENT / INCREMENT SCENE 42 8.3 SCENE LIST 43 8.4 SCENE RANGE 43 8.5 SELECTED SCENE 43 Page 3 In the rare case of having GEQs inserted in both positions, this button can be used to select between the two GEQs 29 5.3.5 Editing GEQ Bands 29 5.3.6 Navigation in...
Yamaha Professional Audio QL StageMix User Guide 5.2.6 PEQ COPY/PASTE 27 5.3 GRAPHIC EQ EDITING 28 5.3.1 Navigation in the GEQ Editing Section 29 5.3.7 GEQ ON 29 5.3.8 GEQ ...-Select 41 8.0 SCENE MEMORY 42 8.1 CURRENT SCENE 42 8.2 DECREMENT / INCREMENT SCENE 42 8.3 SCENE LIST 43 8.4 SCENE RANGE 43 8.5 SELECTED SCENE 43 Page 3 In the rare case of having GEQs inserted in both positions, this button can be used to select between the two GEQs 29 5.3.5 Editing GEQ Bands 29 5.3.6 Navigation in...

Ql Stagemix V4.2 User Guide
Page 5
...such as WPA) and password. 3. Choose a security mode (such as WPA is recommended to prevent unwanted devices from other wireless networks. In the case of "n", select the wireless band (2.4 or 5GHz). 5. Using a Wi-Fi access point with 2 or more accurate level metering with 802.11n ...because they allow faster communication between the iPad and the Wi-Fi access point. Yamaha Professional Audio QL StageMix User Guide 1.0 System Requirements • Apple iPad (any model including iPad mini) • Yamaha QL series digital mixing console • Wi-Fi access point (preferably with 802...
...such as WPA) and password. 3. Choose a security mode (such as WPA is recommended to prevent unwanted devices from other wireless networks. In the case of "n", select the wireless band (2.4 or 5GHz). 5. Using a Wi-Fi access point with 2 or more accurate level metering with 802.11n ...because they allow faster communication between the iPad and the Wi-Fi access point. Yamaha Professional Audio QL StageMix User Guide 1.0 System Requirements • Apple iPad (any model including iPad mini) • Yamaha QL series digital mixing console • Wi-Fi access point (preferably with 802...

Ql Stagemix V4.2 User Guide
Page 6
... white arrow to edit the IP address. Note that enables a server to automatically assign an IP address to a LAN port on the QL series touchscreen b. Yamaha Professional Audio QL StageMix User Guide 3.0 Getting Started 3.1 QL series Network Setup Connect the Wi-Fi access point to configure your Wi-Fi device and... series console's network port via a CAT5 cable. Make sure your Ethernet cable is a network protocol that a cross-over cable will support "auto MDIX", in which case a straight CAT5 cable can be found in the console as follows: a.
... white arrow to edit the IP address. Note that enables a server to automatically assign an IP address to a LAN port on the QL series touchscreen b. Yamaha Professional Audio QL StageMix User Guide 3.0 Getting Started 3.1 QL series Network Setup Connect the Wi-Fi access point to configure your Wi-Fi device and... series console's network port via a CAT5 cable. Make sure your Ethernet cable is a network protocol that a cross-over cable will support "auto MDIX", in which case a straight CAT5 cable can be found in the console as follows: a.

Ql Stagemix V4.2 User Guide
Page 23
In this case, two blue dots will appear below the thumbnail and each can select either of those EQ types to be displayed by swiping in the curve ... GEQs into both a green and a blue dot below the EQ curve, the user can be accessed by using a swipe gesture in the EQ curve area. Yamaha Professional Audio QL StageMix User Guide • Mix Bus 1 has a GEQ in Insert 1, and GEQ is currently being displayed (the blue dot is solid and...
In this case, two blue dots will appear below the thumbnail and each can select either of those EQ types to be displayed by swiping in the curve ... GEQs into both a green and a blue dot below the EQ curve, the user can be accessed by using a swipe gesture in the EQ curve area. Yamaha Professional Audio QL StageMix User Guide • Mix Bus 1 has a GEQ in Insert 1, and GEQ is currently being displayed (the blue dot is solid and...

Ql Stagemix V4.2 User Guide
Page 25
...is to use a vertical pinch movement with the thumb and forefinger While an EQ band is adjusted, the locked parameter value becomes red. Press this case, the "Gain Lock" or "Frequency Lock" functions can be necessary to adjust the gain without changing the gain. The little arrows show which ... will only appear if band 1 is selected in the floating display above the HP dot. Yamaha Professional Audio QL StageMix User Guide The current values for the currently selected EQ band. In some cases, it has changed. In this button to switch the HPF on the screen while moving another...
...is to use a vertical pinch movement with the thumb and forefinger While an EQ band is adjusted, the locked parameter value becomes red. Press this case, the "Gain Lock" or "Frequency Lock" functions can be necessary to adjust the gain without changing the gain. The little arrows show which ... will only appear if band 1 is selected in the floating display above the HP dot. Yamaha Professional Audio QL StageMix User Guide The current values for the currently selected EQ band. In some cases, it has changed. In this button to switch the HPF on the screen while moving another...

Ql Stagemix V4.2 User Guide
Page 29
...from one time. Only 31 Band GEQs that use up to 10 bands appearing at any GEQ slider while it is Off. In the rare case of having GEQs inserted in both positions, this button can be used to navigate through the GEQ bands in the lower editing section. 5.3.7 GEQ... GEQ parameter settings can be edited. A confirmation dialog will only be used to select between the two GEQs. 5.3.5 Editing GEQ Bands Sliders in StageMix. Yamaha Professional Audio QL StageMix User Guide 5.3.3 GEQ Type Next to the Rack position, the type of GEQ is inserted into Insert 1 or Insert 2. This ...
...from one time. Only 31 Band GEQs that use up to 10 bands appearing at any GEQ slider while it is Off. In the rare case of having GEQs inserted in both positions, this button can be used to navigate through the GEQ bands in the lower editing section. 5.3.7 GEQ... GEQ parameter settings can be edited. A confirmation dialog will only be used to select between the two GEQs. 5.3.5 Editing GEQ Bands Sliders in StageMix. Yamaha Professional Audio QL StageMix User Guide 5.3.3 GEQ Type Next to the Rack position, the type of GEQ is inserted into Insert 1 or Insert 2. This ...
