
Owner's Manual
Page 3
...INFORMATION STATEMENT (DECLARATION OF CONFORMITY PROCEDURE) Responsible Party : Yamaha Corporation of America Address : 6600 Orangethorpe Ave., Buena Park, Calif. 90620 Telephone : 714-522-9011 Type of Equipment : RECORDER Model Name : POCKETRAK PR7 This device complies with this product in the space below.... Operation is required. An independent license for future reference. * This applies only to products distributed by YAMAHA CORPORATION OF AMERICA. (FCC DoC) IMPORTANT Please record the serial number of the unit. Model Serial No. Owner's Manual 3 Retain this Owner's Manual in...
...INFORMATION STATEMENT (DECLARATION OF CONFORMITY PROCEDURE) Responsible Party : Yamaha Corporation of America Address : 6600 Orangethorpe Ave., Buena Park, Calif. 90620 Telephone : 714-522-9011 Type of Equipment : RECORDER Model Name : POCKETRAK PR7 This device complies with this product in the space below.... Operation is required. An independent license for future reference. * This applies only to products distributed by YAMAHA CORPORATION OF AMERICA. (FCC DoC) IMPORTANT Please record the serial number of the unit. Model Serial No. Owner's Manual 3 Retain this Owner's Manual in...

Owner's Manual
Page 6
... data that used in combination with general household waste. Otherwise, the card may malfunction or data on the card may be damaged. • If the recorder does not recognize the installed microSD card when the power to the unit is turned on, first turn off the power, remove the card, insert...
... data that used in combination with general household waste. Otherwise, the card may malfunction or data on the card may be damaged. • If the recorder does not recognize the installed microSD card when the power to the unit is turned on, first turn off the power, remove the card, insert...
Owner's Manual
Page 7
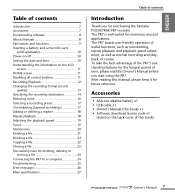
... Yamaha POCKETRAK PR7 recorder. Accessories • AAA-size alkaline battery x1 • USB cable x1 • Owner's Manual (this book) x1 • Software download license code x1 (listed on the LCD screen 11 HOME screen 11 Disabling all control buttons 11 Recording/Playback 12 Changing the recording ...information on the back cover of this book) Owner's Manual 7 The PR7 boasts user-friendly operation of useful functions, such as overdubbing, repeat playback and playback speed adjustment, as well as normal recording and playback, of time, please read this manual, please keep it ...
... Yamaha POCKETRAK PR7 recorder. Accessories • AAA-size alkaline battery x1 • USB cable x1 • Owner's Manual (this book) x1 • Software download license code x1 (listed on the LCD screen 11 HOME screen 11 Disabling all control buttons 11 Recording/Playback 12 Changing the recording ...information on the back cover of this book) Owner's Manual 7 The PR7 boasts user-friendly operation of useful functions, such as overdubbing, repeat playback and playback speed adjustment, as well as normal recording and playback, of time, please read this manual, please keep it ...
Owner's Manual
Page 8
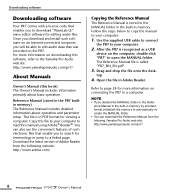
... basic operation. NOTE • If you will be able to edit audio data that was recorded on downloading this software, refer to the Yamaha Pro Audio website: http://www.yamahaproaudio.com/pr7/ About Manuals Owner's Manual (this manual using Adobe® Reader®. For more information... to copy the manual to your computer. 2. You can download the Reference Manual from the following Yamaha Pro Audio web site: http://www.yamahaproaudio.com/pr7/ 8 Owner's Manual After the PR7 is in memory by accident, format (initialize) the memory to automatically recreate the MANUAL folder. &#...
... basic operation. NOTE • If you will be able to edit audio data that was recorded on downloading this software, refer to the Yamaha Pro Audio website: http://www.yamahaproaudio.com/pr7/ About Manuals Owner's Manual (this manual using Adobe® Reader®. For more information... to copy the manual to your computer. 2. You can download the Reference Manual from the following Yamaha Pro Audio web site: http://www.yamahaproaudio.com/pr7/ 8 Owner's Manual After the PR7 is in memory by accident, format (initialize) the memory to automatically recreate the MANUAL folder. &#...

Owner's Manual
Page 9
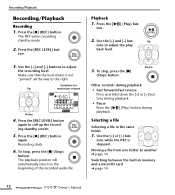
... 1 Built-in microphones 2 REC LED 3 LCD screen 4 [OVERDUB] button 5 [MARK] button 6 [MENU] button (Press and hold down this button to display the Folder screen.) 7 [●] (Record) button 8 [■] (Stop) button (Power on/Power off by pressing and holding down this button) 9 [REC LEVEL] button 0 [+]/[-] buttons A [] buttons B [ ] (Play) button C [REC SET] button...
... 1 Built-in microphones 2 REC LED 3 LCD screen 4 [OVERDUB] button 5 [MARK] button 6 [MENU] button (Press and hold down this button to display the Folder screen.) 7 [●] (Record) button 8 [■] (Stop) button (Power on/Power off by pressing and holding down this button) 9 [REC LEVEL] button 0 [+]/[-] buttons A [] buttons B [ ] (Play) button C [REC SET] button...

Owner's Manual
Page 11
...- Hold "off" Owner's Manual 11 Please refer to the "Other Functions" section in the file Option 3 kbps Option 4 File recording start time REMAIN Recording format Duration of four possible HOME screens using the system setting menu. NOTE You can also set the calendar using the [■] (...Stop) button. ing time 6 Folder/File number 7 Recording settings 8 Current mode Understanding the information on the LCD screen HOME screen You can select one of Folder/File (sound quality) the entire file...
...- Hold "off" Owner's Manual 11 Please refer to the "Other Functions" section in the file Option 3 kbps Option 4 File recording start time REMAIN Recording format Duration of four possible HOME screens using the system setting menu. NOTE You can also set the calendar using the [■] (...Stop) button. ing time 6 Folder/File number 7 Recording settings 8 Current mode Understanding the information on the LCD screen HOME screen You can select one of Folder/File (sound quality) the entire file...
Owner's Manual
Page 12
... Press the [REC LEVEL] button again to adjust the play- The playback position will automatically return to adjust the recording level. Recording/Playback Recording/Playback Recording 1. Press the [REC LEVEL] but - Playback 1. Press the [●] (REC) button. Use the [+] and [-] buttons ...the right. Make sure that the level meter is stopped. Use the [+] and [-] but - 2. The PR7 enters recording standby mode. 2. Guideline for Up maximum volume Down 4. Recording starts. 6. To stop , press the [■] (Stop) button. back level. 3. Down Other controls ...
... Press the [REC LEVEL] button again to adjust the play- The playback position will automatically return to adjust the recording level. Recording/Playback Recording/Playback Recording 1. Press the [REC LEVEL] but - Playback 1. Press the [●] (REC) button. Use the [+] and [-] buttons ...the right. Make sure that the level meter is stopped. Use the [+] and [-] but - 2. The PR7 enters recording standby mode. 2. Guideline for Up maximum volume Down 4. Recording starts. 6. To stop , press the [■] (Stop) button. back level. 3. Down Other controls ...
Owner's Manual
Page 13
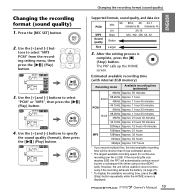
..., press the [■] (Stop) button repeatedly while the HOME screen is displayed. The PR7 calls up the HOME screen. Changing the recording format (sound quality) 1. Changing the recording format (sound quality) Supported formats, sound quality, and data size PCM MP3 Sound quality kHz ...64, 32 Better Size Larger 5. After the setting process is 2GB. If the recording file size reaches 2GB, the PR7 will be shorter than those estimated above. * The largest available recording space (for continuous recording) per file is complete, press the [■] (Stop) button. Press the ...
..., press the [■] (Stop) button repeatedly while the HOME screen is displayed. The PR7 calls up the HOME screen. Changing the recording format (sound quality) 1. Changing the recording format (sound quality) Supported formats, sound quality, and data size PCM MP3 Sound quality kHz ...64, 32 Better Size Larger 5. After the setting process is 2GB. If the recording file size reaches 2GB, the PR7 will be shorter than those estimated above. * The largest available recording space (for continuous recording) per file is complete, press the [■] (Stop) button. Press the ...

Owner's Manual
Page 14
... [+] and [-] but - Use the [+] and [-] buttons to select "rEC" (REC/for recording only) or "MSC" (MUSIC/for at least two seconds. 2. The PR7 calls up the HOME screen. 14 Owner's Manual Selecting the recording destination folder 1. Specifying the recording destination Specifying the recording destination Switching between the built-in memory) or "Sd" (microSD card), then...
... [+] and [-] but - Use the [+] and [-] buttons to select "rEC" (REC/for recording only) or "MSC" (MUSIC/for at least two seconds. 2. The PR7 calls up the HOME screen. 14 Owner's Manual Selecting the recording destination folder 1. Specifying the recording destination Specifying the recording destination Switching between the built-in memory) or "Sd" (microSD card), then...
Owner's Manual
Page 15
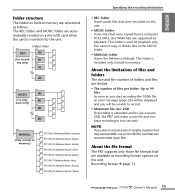
...This folder is inserted into the unit. This folder is extended and its size exceeds 2GB, the PR7 will create a new file and continue recording in two seconds. NOTE If you will be unable to record audio of folders and files are supported for playback only. You cannot copy or divide files in... large files. PCM, MP3, and WMA files are limited. • The number of files per folder: Up to 99 files As soon as recording format options on the unit. Folder structure The folders in built-in memory are structured as follows: The REC folder and MUSIC folder are available...
...This folder is inserted into the unit. This folder is extended and its size exceeds 2GB, the PR7 will create a new file and continue recording in two seconds. NOTE If you will be unable to record audio of folders and files are supported for playback only. You cannot copy or divide files in... large files. PCM, MP3, and WMA files are limited. • The number of files per folder: Up to 99 files As soon as recording format options on the unit. Folder structure The folders in built-in memory are structured as follows: The REC folder and MUSIC folder are available...

Owner's Manual
Page 16
Press the [REC SET] button. 2. Use the [+] and [-] but - tons to select "HPF" from the recording setting menu, then press the [ ] (Play) button. 3. The PR7 calls up the HOME screen. 16 Owner's Manual The PR7 calls up the HOME screen. 4. Reducing noise Reducing noise Preventing low-range noise (High-pass filter) The high-pass...
Press the [REC SET] button. 2. Use the [+] and [-] but - tons to select "HPF" from the recording setting menu, then press the [ ] (Play) button. 3. The PR7 calls up the HOME screen. 16 Owner's Manual The PR7 calls up the HOME screen. 4. Reducing noise Reducing noise Preventing low-range noise (High-pass filter) The high-pass...
Owner's Manual
Page 17
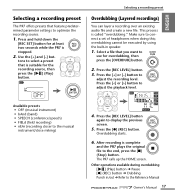
... end, press the [■] (Stop) button. The PR7 calls up the HOME screen. Press the [REC LEVEL] button. 3. Overdubbing starts. 6. Selecting a recording preset The PR7 offers presets that you want to use for overdubbing, then press the [OVERDUB] button. 2. Selecting a recording preset Overdubbing (Layered recordings) You can layer a recording over an existing audio file and create...
... end, press the [■] (Stop) button. The PR7 calls up the HOME screen. Press the [REC LEVEL] button. 3. Overdubbing starts. 6. Selecting a recording preset The PR7 offers presets that you want to use for overdubbing, then press the [OVERDUB] button. 2. Selecting a recording preset Overdubbing (Layered recordings) You can layer a recording over an existing audio file and create...
Owner's Manual
Page 18
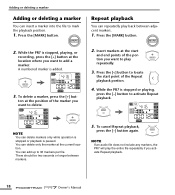
To delete a marker, press the [+] but- A numbered marker is stopped, playing, or recording, press the [+] button at the location where you want to play back between adjacent markers. 1. ton at the start and end points of the marker ... playback You can insert a marker into the file to delete. 2. Insert markers at the position of the portion you want to add a marker. While the PR7 is added. 3.
To delete a marker, press the [+] but- A numbered marker is stopped, playing, or recording, press the [+] button at the location where you want to play back between adjacent markers. 1. ton at the start and end points of the marker ... playback You can insert a marker into the file to delete. 2. Insert markers at the position of the portion you want to add a marker. While the PR7 is added. 3.

Owner's Manual
Page 19
... "SPD", then press the [ ] (Play) button. 2. After tuning is complete, press the [■] (Stop) button. Use the [+] and [-] but - The PR7 calls up the HOME screen. tons to select the desired playback speed (expressed as a percentage), then press the [ ] (Play) button. 3. After the setting process is... button. NOTE • Pressing the [MENU] button during playback enables you to change only the playback speed. • PCM: With files recorded at sampling rates of 96kHz/88.2kHz, you can use the tuner to 150%. Owner's Manual 19 Adjusting the playback speed Tuner You can set...
... "SPD", then press the [ ] (Play) button. 2. After tuning is complete, press the [■] (Stop) button. Use the [+] and [-] but - The PR7 calls up the HOME screen. tons to select the desired playback speed (expressed as a percentage), then press the [ ] (Play) button. 3. After the setting process is... button. NOTE • Pressing the [MENU] button during playback enables you to change only the playback speed. • PCM: With files recorded at sampling rates of 96kHz/88.2kHz, you can use the tuner to 150%. Owner's Manual 19 Adjusting the playback speed Tuner You can set...
Owner's Manual
Page 25
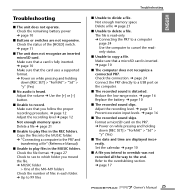
Copy the files into the MUSIC folder. ➔ "Connecting a computer to the PR7 and transferring a file" (Reference Manual) ■ Unable to a USB port on the computer. ■ The recorded sound is read-only. ➔ Connecting the PR7 to a computer page 24 Use the computer to cancel the readonly status. ■ Unable to the overdubbing...
Copy the files into the MUSIC folder. ➔ "Connecting a computer to the PR7 and transferring a file" (Reference Manual) ■ Unable to a USB port on the computer. ■ The recorded sound is read-only. ➔ Connecting the PR7 to a computer page 24 Use the computer to cancel the readonly status. ■ Unable to the overdubbing...
Owner's Manual
Page 26
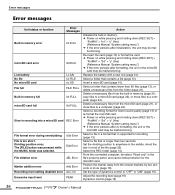
...). Set the dividing position to a computer (page 24). Delete unnecessary files from the closest markers by two seconds or more (page 18). Select a recording format for lower sound quality (page 13) or re-format the microSD card. ➔ Power on while pressing and holding down [REC SET] >... Avoid the start or end of dynamics control to a computer (page 24). From the connected computer, de-select "Read only" in recording into a microSD card REC Error File format error during overdubbing File is too short. Error messages Error messages Unit status or function Built...
...). Set the dividing position to a computer (page 24). Delete unnecessary files from the closest markers by two seconds or more (page 18). Select a recording format for lower sound quality (page 13) or re-format the microSD card. ➔ Power on while pressing and holding down [REC SET] >... Avoid the start or end of dynamics control to a computer (page 24). From the connected computer, de-select "Read only" in recording into a microSD card REC Error File format error during overdubbing File is too short. Error messages Error messages Unit status or function Built...
Owner's Manual
Page 27
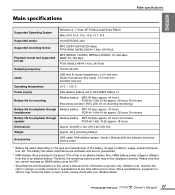
... Yamaha Corp. Therefore, the remaining battery power may not be displayed correctly. Owner's Manual 27 Main specifications Main specifications Supported Operating System Windows 8, 7, Vista, XP Professional/Home Edition Mac OS X 10.4, 10.5, 10.6, 10.7, 10.8 Supported media microSD/SDHC card Supported recording ...owner's manual are not guaranteed. * NiMH battery life is different from that you cannot recharge an NiMH battery using the PR7. * Specifications and descriptions in every locale, please check with the software download license code) * Battery life varies depending...
... Yamaha Corp. Therefore, the remaining battery power may not be displayed correctly. Owner's Manual 27 Main specifications Main specifications Supported Operating System Windows 8, 7, Vista, XP Professional/Home Edition Mac OS X 10.4, 10.5, 10.6, 10.7, 10.8 Supported media microSD/SDHC card Supported recording ...owner's manual are not guaranteed. * NiMH battery life is different from that you cannot recharge an NiMH battery using the PR7. * Specifications and descriptions in every locale, please check with the software download license code) * Battery life varies depending...
Reference Manual
Page 1
... keyboard. Using the functional tree table The functional tree table for the PR7 is convenient if you want to refer to a description of the screen or the various functions of the PR7. Viewing the previous or next page If you are using Adobe Reader ...the page link. The application will search for terminology, use a terminology search function and a link function. EN RECORDER Reference Manual Using the Reference Manual The PPOCKETRAK PR7 Reference Manual (this book) enables you to use the search function built into the software application that displays this book...
... keyboard. Using the functional tree table The functional tree table for the PR7 is convenient if you want to refer to a description of the screen or the various functions of the PR7. Viewing the previous or next page If you are using Adobe Reader ...the page link. The application will search for terminology, use a terminology search function and a link function. EN RECORDER Reference Manual Using the Reference Manual The PPOCKETRAK PR7 Reference Manual (this book) enables you to use the search function built into the software application that displays this book...
Reference Manual
Page 2
... Illustrations and screens that suits the musical instrument (Selecting a preset 15 Switching the external device setting 15 Recording slightly earlier than the recording start time 16 Markers 17 Marker mode screen 17 Adding a marker 17 Jumping to a marked position 18 ... PR7 7 Inserting a battery and a microSD card (sold separately 7 Turning the power on or off 7 Setting the calendar 7 HOME screen 8 Basic Operation 9 Recording/stopping/playing back/setting the recording and playback levels ..... 9 Selecting the save destination for a recorded file 10 Changing the recording format...
... Illustrations and screens that suits the musical instrument (Selecting a preset 15 Switching the external device setting 15 Recording slightly earlier than the recording start time 16 Markers 17 Marker mode screen 17 Adding a marker 17 Jumping to a marked position 18 ... PR7 7 Inserting a battery and a microSD card (sold separately 7 Turning the power on or off 7 Setting the calendar 7 HOME screen 8 Basic Operation 9 Recording/stopping/playing back/setting the recording and playback levels ..... 9 Selecting the save destination for a recorded file 10 Changing the recording format...
Reference Manual
Page 3
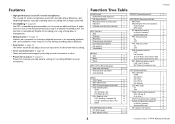
...resolve left and right phase difference, and enable high-quality, naturally-sounding stereo recording with a deep sound field. • Overdubbing ➔ page 20 The PR7's overdubbing feature enables you like during recording and/or playback. • Peak limiter ➔ page 14 The limiter... automatically adjusts excessive input levels for distortion-free recording. • Tuner and metronome ➔ page 24 ...
...resolve left and right phase difference, and enable high-quality, naturally-sounding stereo recording with a deep sound field. • Overdubbing ➔ page 20 The PR7's overdubbing feature enables you like during recording and/or playback. • Peak limiter ➔ page 14 The limiter... automatically adjusts excessive input levels for distortion-free recording. • Tuner and metronome ➔ page 24 ...


