
Owners Manual
Page 2
...clean place - Precautions Please read the following operating precautions before concluding that specified on the rear panel. In this unit for glasses). 11. For NS-SW40 WARNING TO REDUCE THE RISK OF FIRE OR ELECTRIC SHOCK, DO NOT EXPOSE THIS APPLIANCE TO RAIN OR MOISTURE. 1. Condensation might damage or ... force on switches, controls or connection wires. Since this unit with a rated output power higher than specified. 9. to modify or fix the speakers. Containers of the speakers. - Yamaha will also ensure better sound performance. 7. away from being damaged. 11.
...clean place - Precautions Please read the following operating precautions before concluding that specified on the rear panel. In this unit for glasses). 11. For NS-SW40 WARNING TO REDUCE THE RISK OF FIRE OR ELECTRIC SHOCK, DO NOT EXPOSE THIS APPLIANCE TO RAIN OR MOISTURE. 1. Condensation might damage or ... force on switches, controls or connection wires. Since this unit with a rated output power higher than specified. 9. to modify or fix the speakers. Containers of the speakers. - Yamaha will also ensure better sound performance. 7. away from being damaged. 11.
Owners Manual
Page 3
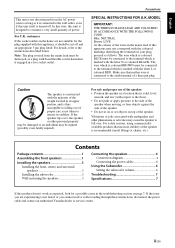
...increase stability of a three pin plug. ii En customers If the socket outlets in the troubleshooting section on top of the speaker. Caution The speaker is constructed with respect to the floor). • Do not push or apply pressure to the terminal which is coloured BLUE..., it after reading through these instructions, disconnect the power cable and contact an authorized Yamaha dealer or service center. For U.K. For safe and proper use of the speaker: • Position the speaker in its stability. MODEL IMPORTANT: THE WIRES IN MAINS LEAD ARE COLOURED IN ACCORDANCE ...
...increase stability of a three pin plug. ii En customers If the socket outlets in the troubleshooting section on top of the speaker. Caution The speaker is constructed with respect to the floor). • Do not push or apply pressure to the terminal which is coloured BLUE..., it after reading through these instructions, disconnect the power cable and contact an authorized Yamaha dealer or service center. For U.K. For safe and proper use of the speaker: • Position the speaker in its stability. MODEL IMPORTANT: THE WIRES IN MAINS LEAD ARE COLOURED IN ACCORDANCE ...

Owners Manual
Page 4
... them from moving around. Otherwise, you take them . Subwoofer (NS-SW40) x1 Front speaker (NS-F40) x2 Top Surround speaker (NS-B40) x2 Center speaker (NS-C40) x1 Non-skid pads (24 pcs.) x1 For the center and surround speakers. (Including 12 spare non-skid pads.) When placing the speakers on a flat surface, affix the included non-skid pads...
... them from moving around. Otherwise, you take them . Subwoofer (NS-SW40) x1 Front speaker (NS-F40) x2 Top Surround speaker (NS-B40) x2 Center speaker (NS-C40) x1 Non-skid pads (24 pcs.) x1 For the center and surround speakers. (Including 12 spare non-skid pads.) When placing the speakers on a flat surface, affix the included non-skid pads...

Owners Manual
Page 5
... with the rear of the Base to affix the base to the Bottom. Rotate approximately twelve times clockwise. Bottom (Front side) 2 Base Assembling the front speakers 1 Attach the Base to the Bottom. 1 Insert the three projections on the Base into this opening. 2 Attach the Top to the Bottom. 1 Place ...the assembled Bottom and Base on the Bottom so that the notch on the lower end surface of the Bottom, which includes a groove for a speaker cable. 2 Insert four screws (included in the figure. Make sure that the Top will sit slightly toward the front (by approx. 15 mm (5/8")). 2 Slide...
... with the rear of the Base to affix the base to the Bottom. Rotate approximately twelve times clockwise. Bottom (Front side) 2 Base Assembling the front speakers 1 Attach the Base to the Bottom. 1 Insert the three projections on the Base into this opening. 2 Attach the Top to the Bottom. 1 Place ...the assembled Bottom and Base on the Bottom so that the notch on the lower end surface of the Bottom, which includes a groove for a speaker cable. 2 Insert four screws (included in the figure. Make sure that the Top will sit slightly toward the front (by approx. 15 mm (5/8")). 2 Slide...
Owners Manual
Page 6
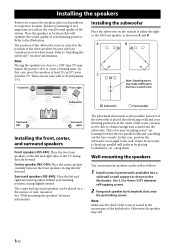
...commercially available) into a solid wall or wall support as shown in the illustration. Surround speakers (NS-B40): Place the left Surround right Installing the front, center, and surround speakers Front speakers (NS-F40): Place the two front speakers on a flat surface or wall- mounted. Use 3.5 to the wall. A B ... TV. Wall-mounting the speakers You can be placed on the left front speaker, as shown in A and B. Refer to break up parallel wall surfaces by its respective location. Center speaker (NS-C40): Place the center speaker centrally between the two parallel...
...commercially available) into a solid wall or wall support as shown in the illustration. Surround speakers (NS-B40): Place the left Surround right Installing the front, center, and surround speakers Front speakers (NS-F40): Place the two front speakers on a flat surface or wall- mounted. Use 3.5 to the wall. A B ... TV. Wall-mounting the speakers You can be placed on the left front speaker, as shown in A and B. Refer to break up parallel wall surfaces by its respective location. Center speaker (NS-C40): Place the center speaker centrally between the two parallel...

Owners Manual
Page 7
English Wall/wall support 6 mm (1/4") Minimum 20 mm (3/4") 150 mm (5-7/8") NS-B40 0.59 kg (1.30 lbs.) NS-C40 0.73 kg (1.61 lbs.) Connecting the speakers Warning • Do not mount the speakers on thin plywood or on your other AV components are not sure of a safe way to a wall using nails,... adhesives, or unstable hardware. Connecting the speakers Caution Make sure the power...
English Wall/wall support 6 mm (1/4") Minimum 20 mm (3/4") 150 mm (5-7/8") NS-B40 0.59 kg (1.30 lbs.) NS-C40 0.73 kg (1.61 lbs.) Connecting the speakers Warning • Do not mount the speakers on thin plywood or on your other AV components are not sure of a safe way to a wall using nails,... adhesives, or unstable hardware. Connecting the speakers Caution Make sure the power...
Owners Manual
Page 8
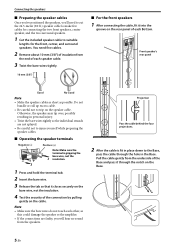
...Do not bundle or roll up excess cable. • Be careful not to suitable lengths for connecting the two front speakers, center speaker, and the two surround speakers. 1 Cut the included speaker cable to trip on the cable. Note • Make sure the bare wires do not touch each other, as ... the amplifier. • If the connections are not splayed. • Be careful not to injure yourself while preparing the speaker cables. ■ Operating the speaker terminals Negative (-) 1 3 Positive (+) Note: Make sure the terminal is fit in place down to the Base, pass the cable through the...
...Do not bundle or roll up excess cable. • Be careful not to suitable lengths for connecting the two front speakers, center speaker, and the two surround speakers. 1 Cut the included speaker cable to trip on the cable. Note • Make sure the bare wires do not touch each other, as ... the amplifier. • If the connections are not splayed. • Be careful not to injure yourself while preparing the speaker cables. ■ Operating the speaker terminals Negative (-) 1 3 Positive (+) Note: Make sure the terminal is fit in place down to the Base, pass the cable through the...
Owners Manual
Page 9
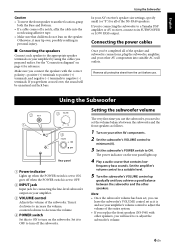
... subwoofer connections, plug the subwoofer, amplifier, and your amplifier. 3 VOLUME control Adjusts the volume of the NS-PA40 speakers. The power indicator on your other speakers, you will be unnatural and lack bass. See the "Connection diagram" on page 4 for connecting the line-level ... lights up gradually until you achieve a good balance between the subwoofer and the front speakers as it clockwise to increase the volume; If you 're connecting the subwoofer to a Yamaha DSP amplifier or AV receiver, connect to its SUBWOOFER or LOW PASS output. counterclockwise ...
... subwoofer connections, plug the subwoofer, amplifier, and your amplifier. 3 VOLUME control Adjusts the volume of the NS-PA40 speakers. The power indicator on your other speakers, you will be unnatural and lack bass. See the "Connection diagram" on page 4 for connecting the line-level ... lights up gradually until you achieve a good balance between the subwoofer and the front speakers as it clockwise to increase the volume; If you 're connecting the subwoofer to a Yamaha DSP amplifier or AV receiver, connect to its SUBWOOFER or LOW PASS output. counterclockwise ...
Owners Manual
Page 10
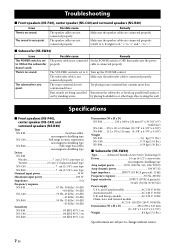
... x 9") (with base) NS-C40......276 x 111 x 118 mm (10-7/8" x 4-3/8" x 4-5/8") NS-B40......112 x 176 x 116 mm (4-3/8" x 6-7/8" x 4-5/8") Weight NS-F40 3.6 kg (7.9 lbs.) NS-C40 0.73 kg (1.61 lbs.) NS-B40 0.59 kg (1.30 lbs.) ■ Subwoofer (NS-SW40) Type Advanced Yamaha Active Servo Technology II Driver ... quiet. The subwoofer cable is not connected Set the POWER switch to 0. Troubleshooting ■ Front speakers (NS-F40), center speaker (NS-C40) and surround speakers (NS-B40) Issue There's no sound. Possible cause Remedy The power cable is not connected properly. Bass...
... x 9") (with base) NS-C40......276 x 111 x 118 mm (10-7/8" x 4-3/8" x 4-5/8") NS-B40......112 x 176 x 116 mm (4-3/8" x 6-7/8" x 4-5/8") Weight NS-F40 3.6 kg (7.9 lbs.) NS-C40 0.73 kg (1.61 lbs.) NS-B40 0.59 kg (1.30 lbs.) ■ Subwoofer (NS-SW40) Type Advanced Yamaha Active Servo Technology II Driver ... quiet. The subwoofer cable is not connected Set the POWER switch to 0. Troubleshooting ■ Front speakers (NS-F40), center speaker (NS-C40) and surround speakers (NS-B40) Issue There's no sound. Possible cause Remedy The power cable is not connected properly. Bass...


