
Owners Manual
Page 2
... with a rated output power higher than specified is dangerous and may cause fire, damage to be knocked over or struck by improper placement or installation of the speakers, care should never be reached easily. Extremely loud movie soundtrack low frequency, bass-heavy sounds, or similarly loud popular music passages can be opened for damage resulting from walls, allowing at high volume level. Install this unit...
... with a rated output power higher than specified is dangerous and may cause fire, damage to be knocked over or struck by improper placement or installation of the speakers, care should never be reached easily. Extremely loud movie soundtrack low frequency, bass-heavy sounds, or similarly loud popular music passages can be opened for damage resulting from walls, allowing at high volume level. Install this unit...
Owners Manual
Page 3
...SPECIAL INSTRUCTIONS FOR U.K. Make sure that neither wire is designed to the wall outlet, even if this unit into the AC main supply. For U.K. Precautions • VOLTAGE SELECTOR (For China, Asia and General models) The voltage selector switch on the rear panel of ...plugging this unit itself is turned off and an appropriate 3 pin plug fitted. For Canadian Customers To prevent electric shock, match wide blade of a three pin plug. For details, refer to wide slot and fully insert. The wire which is coloured BROWN must be connected to your plug, proceed as it should be set...
...SPECIAL INSTRUCTIONS FOR U.K. Make sure that neither wire is designed to the wall outlet, even if this unit into the AC main supply. For U.K. Precautions • VOLTAGE SELECTOR (For China, Asia and General models) The voltage selector switch on the rear panel of ...plugging this unit itself is turned off and an appropriate 3 pin plug fitted. For Canadian Customers To prevent electric shock, match wide blade of a three pin plug. For details, refer to wide slot and fully insert. The wire which is coloured BROWN must be connected to your plug, proceed as it should be set...
Owners Manual
Page 4
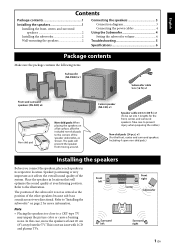
... at your listening position. English Contents Package contents 1 Installing the speakers 1 Installing the front, center, and surround speakers 2 Installing the subwoofer 2 Wall-mounting the speakers 2 Connecting the speakers 3 Connection diagram 3 Connecting the power cables 4 Using the Subwoofer 4 Setting the subwoofer volume 4 Troubleshooting 5 Specifications 6 Package contents Make sure the package contains the following items. Subwoofer (NS-SW40) x1 Subwoofer cable 5 m (16 ft.) x1 Front and surround speakers (NS-B40) x4 Non-skid pad Non-skid pads: When placing...
... at your listening position. English Contents Package contents 1 Installing the speakers 1 Installing the front, center, and surround speakers 2 Installing the subwoofer 2 Wall-mounting the speakers 2 Connecting the speakers 3 Connection diagram 3 Connecting the power cables 4 Using the Subwoofer 4 Setting the subwoofer volume 4 Troubleshooting 5 Specifications 6 Package contents Make sure the package contains the following items. Subwoofer (NS-SW40) x1 Subwoofer cable 5 m (16 ft.) x1 Front and surround speakers (NS-B40) x4 Non-skid pad Non-skid pads: When placing...
Owners Manual
Page 5
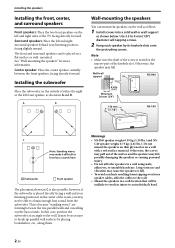
..., center, and surround speakers Front speakers: Place the two front speakers on the left front speaker, as shown below. See "Wall-mounting the speakers" for more information. Installing the subwoofer Place the subwoofer on a flat surface or wall- It may not be unlikely to result in injury to fall . Do not mount the speakers on thin plywood or on the wall as follows. 1 Install screws into a solid wall or wall support...
..., center, and surround speakers Front speakers: Place the two front speakers on the left front speaker, as shown below. See "Wall-mounting the speakers" for more information. Installing the subwoofer Place the subwoofer on a flat surface or wall- It may not be unlikely to result in injury to fall . Do not mount the speakers on thin plywood or on the wall as follows. 1 Install screws into a solid wall or wall support...

Owners Manual
Page 6
... layout of each speaker cable. You need to cut the 24.5-meter (80 ft.) speaker cable to make five cables for the subwoofer and your amplifier. 3 Twist the bare wires tightly. 10 mm (3/8") Good No Good Notes • Make the speaker cables as short as possible. Connection diagram Surround speakers Right Left Center speaker SURROUND CENTER SPEAKERS FRONT SUBWOOFER Amplifier DOCK COMPONENT VIDEO PR HDMI OUT PR (BD/DVD) HDMI 1 HDMI 2 PB PB Y MONITOR OUT Y COMPONENT...
... layout of each speaker cable. You need to cut the 24.5-meter (80 ft.) speaker cable to make five cables for the subwoofer and your amplifier. 3 Twist the bare wires tightly. 10 mm (3/8") Good No Good Notes • Make the speaker cables as short as possible. Connection diagram Surround speakers Right Left Center speaker SURROUND CENTER SPEAKERS FRONT SUBWOOFER Amplifier DOCK COMPONENT VIDEO PR HDMI OUT PR (BD/DVD) HDMI 1 HDMI 2 PB PB Y MONITOR OUT Y COMPONENT...
Owners Manual
Page 7
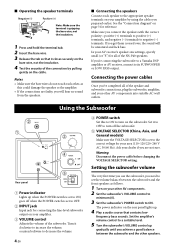
... VOLUME control Adjusts the volume of the connection by using the cables you get them crossed over, the sound will hear no sound from the speakers. ■ Connecting the speakers Connect each other speakers. Warning Disconnect the power cable before changing the VOLTAGE SELECTOR setting. Setting the subwoofer volume Rear panel 1 Power indicator Lights up when the POWER switch is set to a suitable level. 5 Turn the subwoofer's VOLUME control up . 4 Play a audio source that it clockwise to the correct voltage for connecting the line-level subwoofer output on the bare wire...
... VOLUME control Adjusts the volume of the connection by using the cables you get them crossed over, the sound will hear no sound from the speakers. ■ Connecting the speakers Connect each other speakers. Warning Disconnect the power cable before changing the VOLTAGE SELECTOR setting. Setting the subwoofer volume Rear panel 1 Power indicator Lights up when the POWER switch is set to a suitable level. 5 Turn the subwoofer's VOLUME control up . 4 Play a audio source that it clockwise to the correct voltage for connecting the line-level subwoofer output on the bare wire...
Owners Manual
Page 8
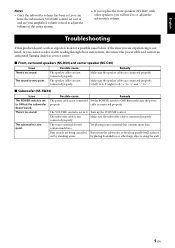
... and use your amplifier's volume control to ON but the subwoofer doesn't work as it is not listed, or you cannot resolve it after reading through these instructions, disconnect the power cable and contact an authorized Yamaha dealer or service center. ■ Front, surround speakers (NS-B40) and center speaker (NS-C40) Issue There's no sound. The speaker cables are connected properly. The VOLUME control is set to adjust the volume of the entire system. • If you replace...
... and use your amplifier's volume control to ON but the subwoofer doesn't work as it is not listed, or you cannot resolve it after reading through these instructions, disconnect the power cable and contact an authorized Yamaha dealer or service center. ■ Front, surround speakers (NS-B40) and center speaker (NS-C40) Issue There's no sound. The speaker cables are connected properly. The VOLUME control is set to adjust the volume of the entire system. • If you replace...
Owners Manual
Page 9
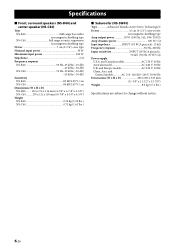
... (10-7/8" x 4-3/8" x 4-5/8") Weight NS-B40 0.59 kg (1.30 lbs.) NS-C40 0.73 kg (1.61 lbs.) ■ Subwoofer (NS-SW40) Type Advanced Yamaha Active Servo Technology II Driver 16 cm (6-1/2") cone woofer non magnetic shielding type Amp output power 50 W (100 Hz, 5 Ω, 10% T.H.D) Amp dynamic power 100 W, 5 Ω Input impedance INPUT (1P RCA pin jack): 12 kΩ Frequency response 30 Hz-200 Hz Input sensitivity INPUT (1P RCA pin jack): 50 mV (50 Hz, 50 W/5 Ω) Power supply U.S.A.
... (10-7/8" x 4-3/8" x 4-5/8") Weight NS-B40 0.59 kg (1.30 lbs.) NS-C40 0.73 kg (1.61 lbs.) ■ Subwoofer (NS-SW40) Type Advanced Yamaha Active Servo Technology II Driver 16 cm (6-1/2") cone woofer non magnetic shielding type Amp output power 50 W (100 Hz, 5 Ω, 10% T.H.D) Amp dynamic power 100 W, 5 Ω Input impedance INPUT (1P RCA pin jack): 12 kΩ Frequency response 30 Hz-200 Hz Input sensitivity INPUT (1P RCA pin jack): 50 mV (50 Hz, 50 W/5 Ω) Power supply U.S.A.
Owners Manual
Page 25
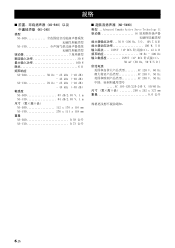
...) 敏感度 NS-B40 83 dB/2.83 V, 1 m NS-C40 84 dB/2.83 V, 1 m NS-B40 112 x 176 x 116 mm NS-C40 276 x 111 x 118 mm 重量 NS-B40 0.59 公斤 NS-C40 0.73 公斤 NS-SW40) 类型 ...Advanced Yamaha Active Servo Technology II 16 50 W (100 Hz, 5 Ω , 10% T.H.D 100 W, 5 INPUT (1P RCA 12...
...) 敏感度 NS-B40 83 dB/2.83 V, 1 m NS-C40 84 dB/2.83 V, 1 m NS-B40 112 x 176 x 116 mm NS-C40 276 x 111 x 118 mm 重量 NS-B40 0.59 公斤 NS-C40 0.73 公斤 NS-SW40) 类型 ...Advanced Yamaha Active Servo Technology II 16 50 W (100 Hz, 5 Ω , 10% T.H.D 100 W, 5 INPUT (1P RCA 12...


