
Owners Manual
Page 1
NS-IW960 HOME CINEMA IN-WALL SPEAKER CONTENTS CONSUMER PRECAUTIONS 2 UNPACKING ...3 TOOLS NEEDED 3 SPEAKER PLACEMENT 3 INSTALLATION 4 CONNECTIONS 6 PAINTING THE SPEAKER FRAME AND GRILL 7 SPECIFICATIONS 7 WARRANTY Back cover OWNER'S MANUAL
NS-IW960 HOME CINEMA IN-WALL SPEAKER CONTENTS CONSUMER PRECAUTIONS 2 UNPACKING ...3 TOOLS NEEDED 3 SPEAKER PLACEMENT 3 INSTALLATION 4 CONNECTIONS 6 PAINTING THE SPEAKER FRAME AND GRILL 7 SPECIFICATIONS 7 WARRANTY Back cover OWNER'S MANUAL

Owners Manual
Page 2
... in the wall or ceiling into "clipping". • Secure placement or installation is the owner's responsibility. Always turn the receiver/amplifier unit off when installing or removing any cables. • Anytime you note distortion, reduce the volume control on your power amplifier to a lower setting. YAMAHA shall not be liable for any accident caused by -four wood frame or similar construction.The instructions provided in this owner's manual are intended specifically for...
... in the wall or ceiling into "clipping". • Secure placement or installation is the owner's responsibility. Always turn the receiver/amplifier unit off when installing or removing any cables. • Anytime you note distortion, reduce the volume control on your power amplifier to a lower setting. YAMAHA shall not be liable for any accident caused by -four wood frame or similar construction.The instructions provided in this owner's manual are intended specifically for...
Owners Manual
Page 3
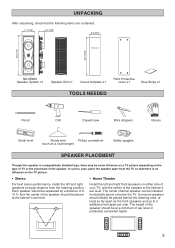
... Small level Sturdy wire Philips screwdriver (such as the front speakers and up to 2 additional feet apart per side. And the center of the speaker should be at least as far apart as a coat hanger) Safety goggles SPEAKER PLACEMENT Though this speaker is no influence on the TV picture. • Stereo For best stereo performance, install the left and right front speakers on the type of...
... Small level Sturdy wire Philips screwdriver (such as the front speakers and up to 2 additional feet apart per side. And the center of the speaker should be at least as far apart as a coat hanger) Safety goggles SPEAKER PLACEMENT Though this speaker is no influence on the TV picture. • Stereo For best stereo performance, install the left and right front speakers on the type of...
Owners Manual
Page 4
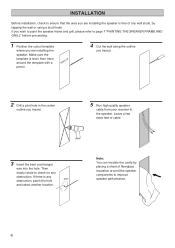
... are installing the speaker is level, then trace around the speaker components to the speaker. Make sure the template is free of any wall studs, by placing a sheet of cable. 3 Insert the bent coat hanger wire into the hole. TEMPLATE 4 Cut the wall along the outline you traced. 2 Drill a pilot hole in the center outline you traced. 5 Run high quality speaker cable from your receiver...
... are installing the speaker is level, then trace around the speaker components to the speaker. Make sure the template is free of any wall studs, by placing a sheet of cable. 3 Insert the bent coat hanger wire into the hole. TEMPLATE 4 Cut the wall along the outline you traced. 2 Drill a pilot hole in the center outline you traced. 5 Run high quality speaker cable from your receiver...
Owners Manual
Page 5
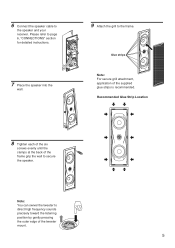
Please refer to page 6, "CONNECTIONS" section for detailed instructions. 7 Place the speaker into the wall. 9 Attach the grill to secure the speaker. ... at the back of the frame grip the wall to the frame. 6 Connect the speaker cable to direct high frequency sounds precisely toward the listening position by gently pressing the outer edge of the tweeter mount. 5 Note: You can swivel the tweeter to the speaker and your receiver. Glue strips Note: For secure grill attachment, application of the supplied glue strips is recommended.
Please refer to page 6, "CONNECTIONS" section for detailed instructions. 7 Place the speaker into the wall. 9 Attach the grill to secure the speaker. ... at the back of the frame grip the wall to the frame. 6 Connect the speaker cable to direct high frequency sounds precisely toward the listening position by gently pressing the outer edge of the tweeter mount. 5 Note: You can swivel the tweeter to the speaker and your receiver. Glue strips Note: For secure grill attachment, application of the supplied glue strips is recommended.
Owners Manual
Page 6
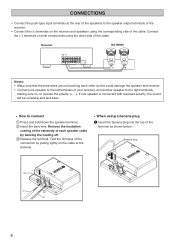
Receiver NS-IW960 +− − + Notes: • Make sure that the bare wires are not touching each speaker cable by pulling lightly on both components using the corresponding side of the cable. Connect the (−) terminals on the cable at the terminal. • When using a banana plug 1 Insert the banana plug into the top of the terminal as this could damage the speaker and receiver. • Connect one speaker is...
Receiver NS-IW960 +− − + Notes: • Make sure that the bare wires are not touching each speaker cable by pulling lightly on both components using the corresponding side of the cable. Connect the (−) terminals on the cable at the terminal. • When using a banana plug 1 Insert the banana plug into the top of the terminal as this could damage the speaker and receiver. • Connect one speaker is...
Owners Manual
Page 7
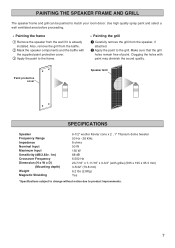
...aaSPECIFICATIONS Speaker Frequency Range Impedance Nominal lnput Maximum lnput Sensitivity (dB/2.83v. 1m) Crossover Frequency Dimension (H x W x D) (Mounting depth) Weight Magnetic Shielding 6-1/2" woofer Kevlar cone x 2 , 1" Titanium dome tweeter 50 Hz - 28 KHz 8 ohms 50 W 150 W 88 dB 6.500 Hz 23-7/16" x 7-11/16" x 3-3/4" (with grille) (595 x 195 x 95.5 mm) 3-5/32" (79.8 mm) 6.2 lbs (2.8Kg) Yes *Specifications subject to change without notioe due to match your room décor. Make...
...aaSPECIFICATIONS Speaker Frequency Range Impedance Nominal lnput Maximum lnput Sensitivity (dB/2.83v. 1m) Crossover Frequency Dimension (H x W x D) (Mounting depth) Weight Magnetic Shielding 6-1/2" woofer Kevlar cone x 2 , 1" Titanium dome tweeter 50 Hz - 28 KHz 8 ohms 50 W 150 W 88 dB 6.500 Hz 23-7/16" x 7-11/16" x 3-3/4" (with grille) (595 x 195 x 95.5 mm) 3-5/32" (79.8 mm) 6.2 lbs (2.8Kg) Yes *Specifications subject to change without notioe due to match your room décor. Make...

Owners Manual
Page 8
... PRODUCT IS LIMITED TO REPAIR OR REPLACEMENT OF THE PRODUCT, AT OUR OPTION. Do not return any product to the above address without charge to the consumer for a period of 2 years from the YAMAHA Web site or toll-free YAMAHA phone number shown below . (8) Any unit used or rebuilt replacements, that sale. b. YOU ARE RESPONSIBLE FOR ANY INSTALLATION OR REMOVAL CHARGES AND FOR...
... PRODUCT IS LIMITED TO REPAIR OR REPLACEMENT OF THE PRODUCT, AT OUR OPTION. Do not return any product to the above address without charge to the consumer for a period of 2 years from the YAMAHA Web site or toll-free YAMAHA phone number shown below . (8) Any unit used or rebuilt replacements, that sale. b. YOU ARE RESPONSIBLE FOR ANY INSTALLATION OR REMOVAL CHARGES AND FOR...


