
Owners Manual
Page 1
NS-IW760 HOME CINEMA IN-WALL SPEAKER CONTENTS CONSUMER PRECAUTIONS 2 UNPACKING ...3 TOOLS NEEDED 3 SPEAKER PLACEMENT 3 INSTALLATION 4 CONNECTIONS 6 PAINTING THE SPEAKER FRAME AND GRILL 7 SPECIFICATIONS 7 WARRANTY Back cover OWNER'S MANUAL
NS-IW760 HOME CINEMA IN-WALL SPEAKER CONTENTS CONSUMER PRECAUTIONS 2 UNPACKING ...3 TOOLS NEEDED 3 SPEAKER PLACEMENT 3 INSTALLATION 4 CONNECTIONS 6 PAINTING THE SPEAKER FRAME AND GRILL 7 SPECIFICATIONS 7 WARRANTY Back cover OWNER'S MANUAL
Owners Manual
Page 2
...sources (for any concealed studs, electrical wiring or plumbing in accordance with the applicable section of wall construction. z When installing your NS-IW760 in this owner's manual are installing the speakers. Never allow your local building codes. WARNING: Installation shall be aware of the product weight ...this owner's manual completely and consult your power amplifier to a lower setting. If they are not sure of speakers. z YAMAHA recommends installing the speaker only in two-by improper placement or installation of a safe way to CD) at high listening levels. CONSUMER ...
...sources (for any concealed studs, electrical wiring or plumbing in accordance with the applicable section of wall construction. z When installing your NS-IW760 in this owner's manual are installing the speakers. Never allow your local building codes. WARNING: Installation shall be aware of the product weight ...this owner's manual completely and consult your power amplifier to a lower setting. If they are not sure of speakers. z YAMAHA recommends installing the speaker only in two-by improper placement or installation of a safe way to CD) at high listening levels. CONSUMER ...
Owners Manual
Page 4
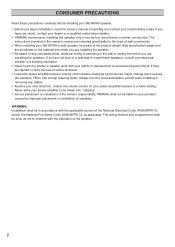
... the cutout template where you are installing the speaker. If there is level, then trace around the speaker components to improve speaker performance. 4 INSTALLATION Before installation, check to ensure that the area you are installing the speaker is free of any wall studs, by placing a sheet of cable. ... the template with a pencil. Then slowly rotate to the speaker. Make sure the template is any obstruction. Note: You can insulate the cavity by tapping the wall or using a stud finder. TEMPLATE 4 Cut the wall along the outline you traced. 2 Drill a pilot hole ...
... the cutout template where you are installing the speaker. If there is level, then trace around the speaker components to improve speaker performance. 4 INSTALLATION Before installation, check to ensure that the area you are installing the speaker is free of any wall studs, by placing a sheet of cable. ... the template with a pencil. Then slowly rotate to the speaker. Make sure the template is any obstruction. Note: You can insulate the cavity by tapping the wall or using a stud finder. TEMPLATE 4 Cut the wall along the outline you traced. 2 Drill a pilot hole ...
Owners Manual
Page 5
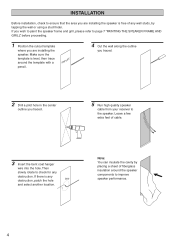
Please refer to page 6, "CONNECTIONS" section for detailed instructions. 7 Place the speaker into the wall. 9 Attach the grill to secure the speaker. Note: You can swivel the tweeter to the speaker and your receiver. Glue strips Note: For secure grill attachment, application of the tweeter mount. 5 Recommended Glue...Location 8 Tighten each of the six screws evenly until the clamps at the back of the frame grip the wall to the frame. 6 Connect the speaker cable to direct high frequency sounds precisely toward the listening position by gently pressing the outer edge of the supplied...
Please refer to page 6, "CONNECTIONS" section for detailed instructions. 7 Place the speaker into the wall. 9 Attach the grill to secure the speaker. Note: You can swivel the tweeter to the speaker and your receiver. Glue strips Note: For secure grill attachment, application of the tweeter mount. 5 Recommended Glue...Location 8 Tighten each of the six screws evenly until the clamps at the back of the frame grip the wall to the frame. 6 Connect the speaker cable to direct high frequency sounds precisely toward the listening position by gently pressing the outer edge of the supplied...
Owners Manual
Page 7
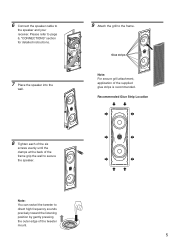
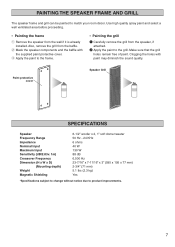
... paint to the frame. Clogging the holes with the supplied paint protective cover. 3 Apply the paint to the grill. Paint protective cover Speaker Grill SPECIFICATIONS Speaker Frequency Range Impedance Nominal Input Maximum Input Sensitivity (dB/2.83v. 1m) Crossover Frequency Dimension (H x W x D) (Mounting depth) Weight ...40 W 130 W 88 dB 6,500 Hz 23-7/16" x 7-11/16" x 3" (595 x 195 x 77 mm) 2-3/4" (71 mm) 5.1 lbs (2.3 kg) Yes *Specifications subject to change without notice due to match your room décor. z Painting the grill 1 Carefully remove the grill from the wall...
... paint to the frame. Clogging the holes with the supplied paint protective cover. 3 Apply the paint to the grill. Paint protective cover Speaker Grill SPECIFICATIONS Speaker Frequency Range Impedance Nominal Input Maximum Input Sensitivity (dB/2.83v. 1m) Crossover Frequency Dimension (H x W x D) (Mounting depth) Weight ...40 W 130 W 88 dB 6,500 Hz 23-7/16" x 7-11/16" x 3" (595 x 195 x 77 mm) 2-3/4" (71 mm) 5.1 lbs (2.3 kg) Yes *Specifications subject to change without notice due to match your room décor. z Painting the grill 1 Carefully remove the grill from the wall...


