
Owners Manual
Page 1
NS-IW760 HOME CINEMA IN-WALL SPEAKER CONTENTS CONSUMER PRECAUTIONS 2 UNPACKING ...3 TOOLS NEEDED 3 SPEAKER PLACEMENT 3 INSTALLATION 4 CONNECTIONS 6 PAINTING THE SPEAKER FRAME AND GRILL 7 SPECIFICATIONS 7 WARRANTY Back cover OWNER'S MANUAL
NS-IW760 HOME CINEMA IN-WALL SPEAKER CONTENTS CONSUMER PRECAUTIONS 2 UNPACKING ...3 TOOLS NEEDED 3 SPEAKER PLACEMENT 3 INSTALLATION 4 CONNECTIONS 6 PAINTING THE SPEAKER FRAME AND GRILL 7 SPECIFICATIONS 7 WARRANTY Back cover OWNER'S MANUAL
Owners Manual
Page 2
... this owner's manual are installing the speaker. YAMAHA shall not be in -wall speaker, be such as applicable. The wiring method and compartment shall be aware of the product weight (See specification page) and the sturdiness of any cables. z When installing your NS-IW760 in accordance with your power amplifier/receiver to interfere with the operation of wall construction. Never allow your local building codes. z Secure placement or installation is the owner's responsibility. Never change input...
... this owner's manual are installing the speaker. YAMAHA shall not be in -wall speaker, be such as applicable. The wiring method and compartment shall be aware of the product weight (See specification page) and the sturdiness of any cables. z When installing your NS-IW760 in accordance with your power amplifier/receiver to interfere with the operation of wall construction. Never allow your local building codes. z Secure placement or installation is the owner's responsibility. Never change input...
Owners Manual
Page 3
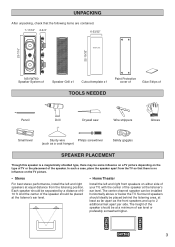
..." NS-IW760 Speaker System x1 Speaker Grill x1 Cutout template x1 Paint Protective cover x1 Glue Strips x1 TOOLS NEEDED Pencil Drill Drywall saw Wire strippers Gloves Small level Sturdy wire Philips screwdriver (such as the front speakers and up to 2 additional feet apart per side. And the center of the speaker should be at least as far apart as a coat hanger) Safety goggles SPEAKER PLACEMENT...
..." NS-IW760 Speaker System x1 Speaker Grill x1 Cutout template x1 Paint Protective cover x1 Glue Strips x1 TOOLS NEEDED Pencil Drill Drywall saw Wire strippers Gloves Small level Sturdy wire Philips screwdriver (such as the front speakers and up to 2 additional feet apart per side. And the center of the speaker should be at least as far apart as a coat hanger) Safety goggles SPEAKER PLACEMENT...
Owners Manual
Page 4
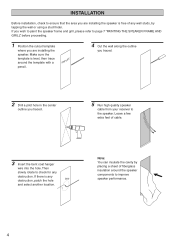
... high quality speaker cable from your receiver to check for any obstruction. Make sure the template is any wall studs, by placing a sheet of cable. 3 Insert the bent coat hanger wire into the hole. If there is level, then trace around the speaker components to improve speaker performance. 4 Note: You can insulate the cavity by tapping the wall or using a stud finder...
... high quality speaker cable from your receiver to check for any obstruction. Make sure the template is any wall studs, by placing a sheet of cable. 3 Insert the bent coat hanger wire into the hole. If there is level, then trace around the speaker components to improve speaker performance. 4 Note: You can insulate the cavity by tapping the wall or using a stud finder...
Owners Manual
Page 5
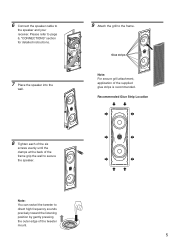
... evenly until the clamps at the back of the frame grip the wall to the speaker and your receiver. Note: You can swivel the tweeter to the frame. Please refer to page 6, "CONNECTIONS" section for detailed instructions. 7 Place the speaker into the wall. 9 Attach the grill to direct high frequency sounds precisely toward the listening position by gently pressing the outer edge...
... evenly until the clamps at the back of the frame grip the wall to the speaker and your receiver. Note: You can swivel the tweeter to the frame. Please refer to page 6, "CONNECTIONS" section for detailed instructions. 7 Place the speaker into the wall. 9 Attach the grill to direct high frequency sounds precisely toward the listening position by gently pressing the outer edge...
Owners Manual
Page 6
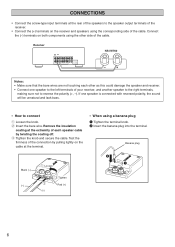
... the banana plug into the terminal. NS-IW760 Notes: z Make sure that the bare wires are not touching each speaker cable by pulling lightly on the receiver and speakers using the corresponding side of the receiver. z How to reverse the polarity (+, -). z Connect the (+) terminals on the cable at the rear of the speakers to the speaker output terminals of the cable. Banana plug Black (-) (-) 1 Loosen 3 Tighten 2 Red (+) (+) 2 1 6 z Connect one speaker is connected with reversed...
... the banana plug into the terminal. NS-IW760 Notes: z Make sure that the bare wires are not touching each speaker cable by pulling lightly on the receiver and speakers using the corresponding side of the receiver. z How to reverse the polarity (+, -). z Connect the (+) terminals on the cable at the rear of the speakers to the speaker output terminals of the cable. Banana plug Black (-) (-) 1 Loosen 3 Tighten 2 Red (+) (+) 2 1 6 z Connect one speaker is connected with reversed...
Owners Manual
Page 7
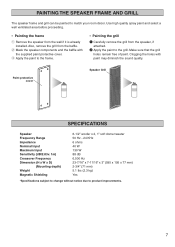
... protective cover. 3 Apply the paint to the grill. Make sure that the grill holes remain free of paint. z Painting the grill 1 Carefully remove the grill from the wall if it is already installed. Paint protective cover Speaker Grill SPECIFICATIONS Speaker Frequency Range Impedance Nominal Input Maximum Input Sensitivity (dB/2.83v. 1m) Crossover Frequency Dimension (H x W x D) (Mounting depth) Weight Magnetic Shielding 6-1/2" woofer x 2, 1" soft dome tweeter 50 Hz - 24 KHz 6 ohms 40 W 130 W 88 dB 6,500 Hz 23-7/16...
... protective cover. 3 Apply the paint to the grill. Make sure that the grill holes remain free of paint. z Painting the grill 1 Carefully remove the grill from the wall if it is already installed. Paint protective cover Speaker Grill SPECIFICATIONS Speaker Frequency Range Impedance Nominal Input Maximum Input Sensitivity (dB/2.83v. 1m) Crossover Frequency Dimension (H x W x D) (Mounting depth) Weight Magnetic Shielding 6-1/2" woofer x 2, 1" soft dome tweeter 50 Hz - 24 KHz 6 ohms 40 W 130 W 88 dB 6,500 Hz 23-7/16...
Owners Manual
Page 8
... the YAMAHA Web site or toll-free YAMAHA phone number shown below . (8) Any unit used or rebuilt replacements, that meet or exceed Yamaha specifications for new parts, in your authorized YAMAHA dealer or the YAMAHA Electronics Corporation, USA, Service Department if you have any questions. Repair or attempted repair by this warranty, without a written Return Authorization issued by the warranty. YOU ARE RESPONSIBLE FOR ANY INSTALLATION OR REMOVAL CHARGES...
... the YAMAHA Web site or toll-free YAMAHA phone number shown below . (8) Any unit used or rebuilt replacements, that meet or exceed Yamaha specifications for new parts, in your authorized YAMAHA dealer or the YAMAHA Electronics Corporation, USA, Service Department if you have any questions. Repair or attempted repair by this warranty, without a written Return Authorization issued by the warranty. YOU ARE RESPONSIBLE FOR ANY INSTALLATION OR REMOVAL CHARGES...


