Owner's Manual
Page 2
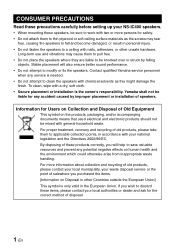
...performance. • Do not attempt to clean the speakers with chemical solvents as the screws may cause them to thin plywood or soft ceiling surface materials as this might damage the finish. Contact qualified Yamaha service personnel when any accident caused by falling objects....soft cloth. • Secure placement or installation is the owner's responsibility. CONSUMER PRECAUTIONS Read these precautions carefully before setting up your NS-IC400 speakers. • When mounting these items, please contact your local authorities or dealer and ask for any service is needed. • ...
...performance. • Do not attempt to clean the speakers with chemical solvents as the screws may cause them to thin plywood or soft ceiling surface materials as this might damage the finish. Contact qualified Yamaha service personnel when any accident caused by falling objects....soft cloth. • Secure placement or installation is the owner's responsibility. CONSUMER PRECAUTIONS Read these precautions carefully before setting up your NS-IC400 speakers. • When mounting these items, please contact your local authorities or dealer and ask for any service is needed. • ...
Owner's Manual
Page 4
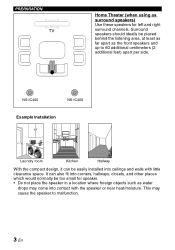
... 60 additional centimeters (2 additional feet) apart per side. This may come into ceilings and walls with the speaker or near heat/moisture. Surround speakers should ideally be easily installed into contact with little clearance space. NS-IC400 NS-IC400 Example Installation Laundry room Kitchen Hallway With the compact design, it can also fit into corners...
... 60 additional centimeters (2 additional feet) apart per side. This may come into ceilings and walls with the speaker or near heat/moisture. Surround speakers should ideally be easily installed into contact with little clearance space. NS-IC400 NS-IC400 Example Installation Laundry room Kitchen Hallway With the compact design, it can also fit into corners...
Owner's Manual
Page 5
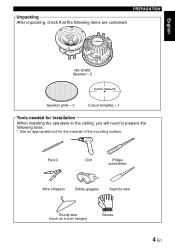
Pencil Drill Philips screwdriver Wire strippers Safety goggles Keyhole saw Sturdy wire (such as a coat hanger) Gloves 4 En English NS-IC400 Speaker × 2 Speaker grille × 2 Cutout template × 1 Tools needed for installation When installing the speakers to the ceiling, you will need to prepare the following items are contained. PREPARATION Unpacking After unpacking, check that the following tools. * Use an appropriate tool for the material of the mounting surface.
Pencil Drill Philips screwdriver Wire strippers Safety goggles Keyhole saw Sturdy wire (such as a coat hanger) Gloves 4 En English NS-IC400 Speaker × 2 Speaker grille × 2 Cutout template × 1 Tools needed for installation When installing the speakers to the ceiling, you will need to prepare the following items are contained. PREPARATION Unpacking After unpacking, check that the following tools. * Use an appropriate tool for the material of the mounting surface.

Owner's Manual
Page 6
... picture color or cause a buzzing noise. A B C D NS-IC400 Diameter A φ 139 mm (5-1/2") Depth B 84 mm (3-3/8") Depth C 79 mm (3-1/8") Diameter D φ 122 mm (4-3/4") 5 En This is sufficient space on the ceiling for installing the speakers in a ceiling. If you have any concealed studs, electrical wiring or plumbing in -ceiling speakers, be distorted. • Be aware of the...
... picture color or cause a buzzing noise. A B C D NS-IC400 Diameter A φ 139 mm (5-1/2") Depth B 84 mm (3-3/8") Depth C 79 mm (3-1/8") Diameter D φ 122 mm (4-3/4") 5 En This is sufficient space on the ceiling for installing the speakers in a ceiling. If you have any concealed studs, electrical wiring or plumbing in -ceiling speakers, be distorted. • Be aware of the...
Owner's Manual
Page 7
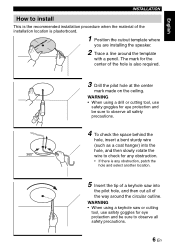
... as a coat hanger) into the pilot hole, and then cut all of the hole is plasterboard. 1 Position the cutout template where you are installing the speaker. 2 Trace a line around the circular outline. WARNING • When using a keyhole saw into the hole, and then slowly rotate the 360° wire to check... the recommended installation procedure when the material of the installation location is also required. 3 Drill the pilot hole at the center mark made on the ceiling.
... as a coat hanger) into the pilot hole, and then cut all of the hole is plasterboard. 1 Position the cutout template where you are installing the speaker. 2 Trace a line around the circular outline. WARNING • When using a keyhole saw into the hole, and then slowly rotate the 360° wire to check... the recommended installation procedure when the material of the installation location is also required. 3 Drill the pilot hole at the center mark made on the ceiling.
Owner's Manual
Page 8
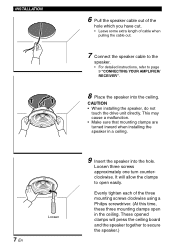
... approximately one turn counterclockwise. It will press the ceiling board and the speaker together to open in a ceiling. 9 Insert the speaker into the ceiling. These opened clamps will allow the clamps to secure the speaker.) CAUTION • When installing the speaker, do not touch the drive unit directly. This... may cause a malfunction. • Make sure that mounting clamps are turned inward when installing the speaker in the ceiling. INSTALLATION 7 En Loosen 6 Pull the speaker cable out of the hole which you have cut. • Leave some extra length of the three ...
... approximately one turn counterclockwise. It will press the ceiling board and the speaker together to open in a ceiling. 9 Insert the speaker into the ceiling. These opened clamps will allow the clamps to secure the speaker.) CAUTION • When installing the speaker, do not touch the drive unit directly. This... may cause a malfunction. • Make sure that mounting clamps are turned inward when installing the speaker in the ceiling. INSTALLATION 7 En Loosen 6 Pull the speaker cable out of the hole which you have cut. • Leave some extra length of the three ...
Owner's Manual
Page 9
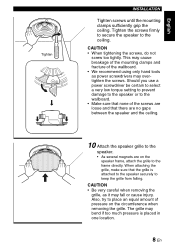
...only hand tools as it may fall or cause injury. Also, try to the ceiling. When attaching the grille, make sure that there are no gaps between the speaker and the ceiling. 10 Attach the speaker grille to the speaker. • As several magnets are loose and that the grille is placed in...careful when removing the grille, as power screwdrivers may bend if too much pressure is attached to the speaker securely to the frame directly. Tighten the screws firmly to secure the speaker to place an equal amount of the screws are on the circumference when removing the grille. Should you...
...only hand tools as it may fall or cause injury. Also, try to the ceiling. When attaching the grille, make sure that there are no gaps between the speaker and the ceiling. 10 Attach the speaker grille to the speaker. • As several magnets are loose and that the grille is placed in...careful when removing the grille, as power screwdrivers may bend if too much pressure is attached to the speaker securely to the frame directly. Tighten the screws firmly to secure the speaker to place an equal amount of the screws are on the circumference when removing the grille. Should you...


