Owner's Manual
Page 2
... Users on Collection and Disposal of these products correctly, you will also ensure better sound performance. • Do not attempt to modify or fix the speakers. Yamaha shall not be liable for the correct method of speakers. CONSUMER PRECAUTIONS Read these precautions carefully before setting up your NS-IC400 speakers. • When mounting these speakers, be sure to work with two or more information...
... Users on Collection and Disposal of these products correctly, you will also ensure better sound performance. • Do not attempt to modify or fix the speakers. Yamaha shall not be liable for the correct method of speakers. CONSUMER PRECAUTIONS Read these precautions carefully before setting up your NS-IC400 speakers. • When mounting these speakers, be sure to work with two or more information...
Owner's Manual
Page 3
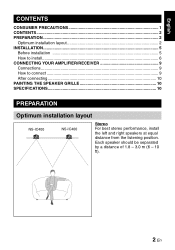
Each speaker should be separated by a distance of 1.8 - 3.0 m (6 - 10 ft). 2 En English CONTENTS CONSUMER PRECAUTIONS 1 CONTENTS...2 PREPARATION ...2 Optimum installation layout 2 INSTALLATION...5 Before installation 5 How to install...6 CONNECTING YOUR AMPLIFIER/RECEIVER 9 Connections ...9 How to connect 9 After connecting 10 PAINTING THE SPEAKER GRILLE 10 SPECIFICATIONS 10 PREPARATION Optimum installation layout NS-IC400 NS-IC400 Stereo For best stereo performance, install the left and right speakers at equal distance from the listening position.
Each speaker should be separated by a distance of 1.8 - 3.0 m (6 - 10 ft). 2 En English CONTENTS CONSUMER PRECAUTIONS 1 CONTENTS...2 PREPARATION ...2 Optimum installation layout 2 INSTALLATION...5 Before installation 5 How to install...6 CONNECTING YOUR AMPLIFIER/RECEIVER 9 Connections ...9 How to connect 9 After connecting 10 PAINTING THE SPEAKER GRILLE 10 SPECIFICATIONS 10 PREPARATION Optimum installation layout NS-IC400 NS-IC400 Stereo For best stereo performance, install the left and right speakers at equal distance from the listening position.
Owner's Manual
Page 4
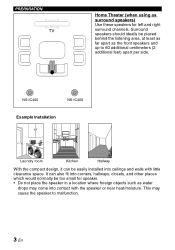
It can be easily installed into ceilings and walls with the speaker or near heat/moisture. PREPARATION TV Home Theater (when using as the front speakers and up to malfunction. 3 En Surround speakers should ideally be too small for left and right surround channels. NS-IC400 NS-IC400 Example Installation Laundry room Kitchen Hallway With the compact design, it can also fit into contact with little clearance space...
It can be easily installed into ceilings and walls with the speaker or near heat/moisture. PREPARATION TV Home Theater (when using as the front speakers and up to malfunction. 3 En Surround speakers should ideally be too small for left and right surround channels. NS-IC400 NS-IC400 Example Installation Laundry room Kitchen Hallway With the compact design, it can also fit into contact with little clearance space...
Owner's Manual
Page 5
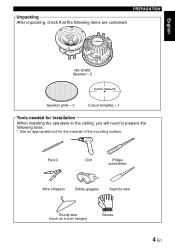
PREPARATION Unpacking After unpacking, check that the following tools. * Use an appropriate tool for the material of the mounting surface. Pencil Drill Philips screwdriver Wire strippers Safety goggles Keyhole saw Sturdy wire (such as a coat hanger) Gloves 4 En English NS-IC400 Speaker × 2 Speaker grille × 2 Cutout template × 1 Tools needed for installation When installing the speakers to the ceiling, you will need to prepare the following items are contained.
PREPARATION Unpacking After unpacking, check that the following tools. * Use an appropriate tool for the material of the mounting surface. Pencil Drill Philips screwdriver Wire strippers Safety goggles Keyhole saw Sturdy wire (such as a coat hanger) Gloves 4 En English NS-IC400 Speaker × 2 Speaker grille × 2 Cutout template × 1 Tools needed for installation When installing the speakers to the ceiling, you will need to prepare the following items are contained.

Owner's Manual
Page 6
... codes. In this speaker, consult a professional installer or a building contractor. • When installing your dealer or a qualified audio/video installer. • Before installing the speakers, run the speaker cables to ensure that the area you have any concealed studs, electrical wiring or plumbing in -ceiling speakers, be distorted. • Be aware of any ceiling joints or studs by tapping the ceiling or using a stud finder. • Make...
... codes. In this speaker, consult a professional installer or a building contractor. • When installing your dealer or a qualified audio/video installer. • Before installing the speakers, run the speaker cables to ensure that the area you have any concealed studs, electrical wiring or plumbing in -ceiling speakers, be distorted. • Be aware of any ceiling joints or studs by tapping the ceiling or using a stud finder. • Make...
Owner's Manual
Page 7
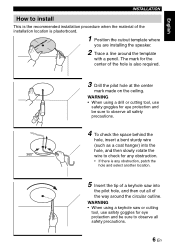
... the pilot hole at the center mark made on the ceiling. English INSTALLATION How to install This is the recommended installation procedure when the material of the installation location is plasterboard. 1 Position the cutout template where you are installing the speaker. 2 Trace a line around the circular outline. WARNING • When using a keyhole saw or cutting tool, use safety goggles for eye...
... the pilot hole at the center mark made on the ceiling. English INSTALLATION How to install This is the recommended installation procedure when the material of the installation location is plasterboard. 1 Position the cutout template where you are installing the speaker. 2 Trace a line around the circular outline. WARNING • When using a keyhole saw or cutting tool, use safety goggles for eye...
Owner's Manual
Page 8
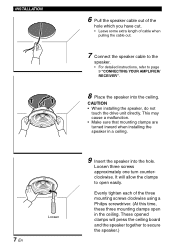
... three screws approximately one turn counterclockwise. This may cause a malfunction. • Make sure that mounting clamps are turned inward when installing the speaker in the ceiling. Evenly tighten each of cable when pulling the cable out. 7 Connect the speaker cable to the speaker. • For detailed instructions, refer to page 9 "CONNECTING YOUR AMPLIFIER/ RECEIVER". 8 Place the speaker into the hole. INSTALLATION 7 En Loosen 6 Pull the speaker cable out of the hole...
... three screws approximately one turn counterclockwise. This may cause a malfunction. • Make sure that mounting clamps are turned inward when installing the speaker in the ceiling. Evenly tighten each of cable when pulling the cable out. 7 Connect the speaker cable to the speaker. • For detailed instructions, refer to page 9 "CONNECTING YOUR AMPLIFIER/ RECEIVER". 8 Place the speaker into the hole. INSTALLATION 7 En Loosen 6 Pull the speaker cable out of the hole...
Owner's Manual
Page 9
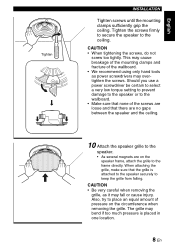
... too tightly. Tighten INSTALLATION Tighten screws until the mounting clamps sufficiently grip the ceiling. When attaching the grille, make sure that there are no gaps between the speaker and the ceiling. 10 Attach the speaker grille to the speaker. • As several magnets are loose and that the grille is placed in one location. 8 En English Should you use a power screwdriver be certain...
... too tightly. Tighten INSTALLATION Tighten screws until the mounting clamps sufficiently grip the ceiling. When attaching the grille, make sure that there are no gaps between the speaker and the ceiling. 10 Attach the speaker grille to the speaker. • As several magnets are loose and that the grille is placed in one location. 8 En English Should you use a power screwdriver be certain...
Owner's Manual
Page 10
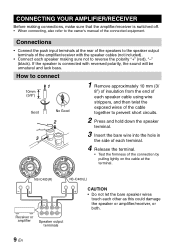
... pulling lightly on the cable at the rear of the speakers to the speaker output terminals of the connected equipment. Connections • Connect the push input terminals at the terminal. -+ NS-IC400 (R) -+ NS-IC400 (L) -+ -+ Receiver or amplifier R +- If the speaker is connected with the speaker cables (not included). • Connect each speaker making connections, make sure that the amplifier/receiver is switched off. • When connecting, also refer to reverse the polarity "+" (red), "-" (black). How to connect 1 10mm (3/8") Good No Good 2 3 1 Remove...
... pulling lightly on the cable at the rear of the speakers to the speaker output terminals of the connected equipment. Connections • Connect the push input terminals at the terminal. -+ NS-IC400 (R) -+ NS-IC400 (L) -+ -+ Receiver or amplifier R +- If the speaker is connected with the speaker cables (not included). • Connect each speaker making connections, make sure that the amplifier/receiver is switched off. • When connecting, also refer to reverse the polarity "+" (red), "-" (black). How to connect 1 10mm (3/8") Good No Good 2 3 1 Remove...

Owner's Manual
Page 11
... changing input sources. SPECIFICATIONS Type Driver Full range Frequency response Impedance Nominal Input Maximum input Sensitivity Dimensions (with grille) Weight (with grille) NS-IC400 Full range open back type 10 cm (4") cone type 95 Hz to 40 kHz (-10dB) 8 ohms 30 W 90 W 85 dB / 2.83 V, 1 m φ150 × 86.5D mm (φ5-7/8" × 3-3/8"D) 0.8 kg (1.76 lbs) * Specifications subject to change input sources (for example, FM to CD) at high listening levels. PAINTING THE SPEAKER GRILLE The speaker grilles...
... changing input sources. SPECIFICATIONS Type Driver Full range Frequency response Impedance Nominal Input Maximum input Sensitivity Dimensions (with grille) Weight (with grille) NS-IC400 Full range open back type 10 cm (4") cone type 95 Hz to 40 kHz (-10dB) 8 ohms 30 W 90 W 85 dB / 2.83 V, 1 m φ150 × 86.5D mm (φ5-7/8" × 3-3/8"D) 0.8 kg (1.76 lbs) * Specifications subject to change input sources (for example, FM to CD) at high listening levels. PAINTING THE SPEAKER GRILLE The speaker grilles...

Owner's Manual
Page 12
... right to refuse to provide free of charge service and the product may be held responsible for any part(s) repaired, or replaced at the customer's expense. 2. b. The original invoice or sales receipt (showing date of purchase, product code and dealer's name) MUST accompany the defective product, along with Yamaha's instructions on our website (http://www.yamaha-hifi.com/ or http://www...
... right to refuse to provide free of charge service and the product may be held responsible for any part(s) repaired, or replaced at the customer's expense. 2. b. The original invoice or sales receipt (showing date of purchase, product code and dealer's name) MUST accompany the defective product, along with Yamaha's instructions on our website (http://www.yamaha-hifi.com/ or http://www...


