
Owners Manual
Page 1
A II A NS-AW190/NS-AW390 INDOOR / OUTDOOR SPEAKER SYSTEM I Ilf CONTENTS CONSUMER PRECAUTIONS 2 UNPACKING 3 MOUNTING THE SPEAKERS 4 CONNECTIONS TO YOUR AMPLIFIER 6 SETTING UP THE SPEAKERS 7 SPECIFICATIONS 8 OWNER'S MANUAL
A II A NS-AW190/NS-AW390 INDOOR / OUTDOOR SPEAKER SYSTEM I Ilf CONTENTS CONSUMER PRECAUTIONS 2 UNPACKING 3 MOUNTING THE SPEAKERS 4 CONNECTIONS TO YOUR AMPLIFIER 6 SETTING UP THE SPEAKERS 7 SPECIFICATIONS 8 OWNER'S MANUAL
Owners Manual
Page 2
...off when installing or removing input cables. • Anytime you note distortion, reduce the volume control on your particular wall's construction. YAMAHA shall not be knocked over or struck by improper placement or installation of hanger for example, FM to CD) at high listening levels....that they are firmly secured. Never allow your NS-AW190/NS-AW390 speakers. • When installing these speakers outdoors, try to minimize their exposure to rain and snow by mounting the speaker in personal injury. • Do not fasten the speakers to walls with chemical solvents as the screws ...
...off when installing or removing input cables. • Anytime you note distortion, reduce the volume control on your particular wall's construction. YAMAHA shall not be knocked over or struck by improper placement or installation of hanger for example, FM to CD) at high listening levels....that they are firmly secured. Never allow your NS-AW190/NS-AW390 speakers. • When installing these speakers outdoors, try to minimize their exposure to rain and snow by mounting the speaker in personal injury. • Do not fasten the speakers to walls with chemical solvents as the screws ...
Owners Manual
Page 3
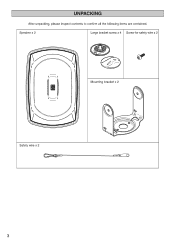
t,i. - Speaker x 2 Large bracket screw x 4 Screw for safety wire x 2 _______, i --------- ( AD) %O ----i - O 0 3 UNPACKING After unpacking, please inspect contents to confirm all the following items are contained. Mounting bracket x 2 Safety wire x 2 .---- -
t,i. - Speaker x 2 Large bracket screw x 4 Screw for safety wire x 2 _______, i --------- ( AD) %O ----i - O 0 3 UNPACKING After unpacking, please inspect contents to confirm all the following items are contained. Mounting bracket x 2 Safety wire x 2 .---- -
Owners Manual
Page 4
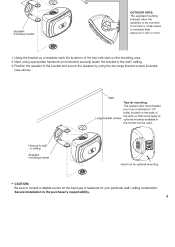
...for mounting: The spakers also have threded insrt nuts (matched for 1/4" bolts) located on the mounting area. 2. Position the speaker in the bracket and secure the speaker by using appropriate hardware (not included) securely fasten the bracket to rain or snow. 1. • 0 C Supplied mounting ...bracket OUTDOOR NOTE: The supplied mounting I brackets allow the speakers to be used. 114 • • Insert nut for optional mounting. * CAUTION: Be sure to consult a reliable source for the best type...
...for mounting: The spakers also have threded insrt nuts (matched for 1/4" bolts) located on the mounting area. 2. Position the speaker in the bracket and secure the speaker by using appropriate hardware (not included) securely fasten the bracket to rain or snow. 1. • 0 C Supplied mounting ...bracket OUTDOOR NOTE: The supplied mounting I brackets allow the speakers to be used. 114 • • Insert nut for optional mounting. * CAUTION: Be sure to consult a reliable source for the best type...
Owners Manual
Page 5
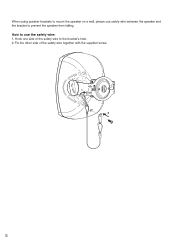
Fix the other side of the safety wire to the bracket's hole. 2. How to use safety wire between the speaker and the bracket to prevent the speaker from falling. When using speaker brackets to mount the speaker on a wall, please use the safety wire: 1. Hook one side of the safety wire together with the supplied screw. 5
Fix the other side of the safety wire to the bracket's hole. 2. How to use safety wire between the speaker and the bracket to prevent the speaker from falling. When using speaker brackets to mount the speaker on a wall, please use the safety wire: 1. Hook one side of the safety wire together with the supplied screw. 5
Owners Manual
Page 6
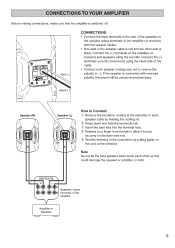
... wire into the terminal hole. ® Release your finger from the tab to allow it to lock securely on the amplifier (or receiver) and speakers using the black side of the cable. • Connect each other side is red and the other as this could damage the...the amplifier (or receiver) with reversed polarity, the sound will be unnatural and lack bass. Speaker (R) er\ v se3 Speaker (L) How to Connect CI Remove the insulation coating at the rear of the speakers to the speaker output terminals of the speaker cable is black. Connect the (+) terminals on the bare wire end. ® Test ...
... wire into the terminal hole. ® Release your finger from the tab to allow it to lock securely on the amplifier (or receiver) and speakers using the black side of the cable. • Connect each other side is red and the other as this could damage the...the amplifier (or receiver) with reversed polarity, the sound will be unnatural and lack bass. Speaker (R) er\ v se3 Speaker (L) How to Connect CI Remove the insulation coating at the rear of the speakers to the speaker output terminals of the speaker cable is black. Connect the (+) terminals on the bare wire end. ® Test ...
Owners Manual
Page 7
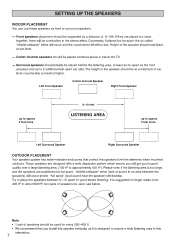
... ft2 to ensure a wide listening area in the stereo effect. Please note: if the listening area is too large, and the speakers are positioned too far apart, "middle-omission" effect (lack of sound in an area between 6'-10' apart for good stereo listening.... Try to approx 2 feet more Left Surround Speaker Right Surround Speaker OUTDOOR PLACEMENT Your speaker system has water-resistant enclosures that you will develop. Left Front Speaker Center channel Speaker Right Front Speaker up to approx 2 feet more 6-10 feet LISTENIANRGEt 1 up to approximately...
... ft2 to ensure a wide listening area in the stereo effect. Please note: if the listening area is too large, and the speakers are positioned too far apart, "middle-omission" effect (lack of sound in an area between 6'-10' apart for good stereo listening.... Try to approx 2 feet more Left Surround Speaker Right Surround Speaker OUTDOOR PLACEMENT Your speaker system has water-resistant enclosures that you will develop. Left Front Speaker Center channel Speaker Right Front Speaker up to approx 2 feet more 6-10 feet LISTENIANRGEt 1 up to approximately...
Owners Manual
Page 8
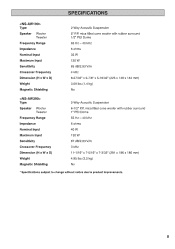
...83 V/m 4 kHz 8-27/32" x 5-7/8" x 5-19/32" (225 x 149 x 142 mm) 3.09 lbs (1.4 kg) No Type Speaker Woofer Tweeter Frequency Range Impedance Nominal Input Maximum Input Sensitivity Crossover Frequency Dimension (H x W x D) Weight Magnetic Shielding 2-Way Acoustic Suspension 6-1/2" P.P. ...lbs (2.2 kg) No * Specifications subject to change without notice due to product improvements. 8 SPECIFICATIONS Type Speaker Woofer Tweeter Frequency Range Impedance Nominal Input Maximum Input Sensitivity Crossover Frequency Dimension (H x W x D) Weight Magnetic Shielding 2-Way Acoustic Suspension 5" P.P.
...83 V/m 4 kHz 8-27/32" x 5-7/8" x 5-19/32" (225 x 149 x 142 mm) 3.09 lbs (1.4 kg) No Type Speaker Woofer Tweeter Frequency Range Impedance Nominal Input Maximum Input Sensitivity Crossover Frequency Dimension (H x W x D) Weight Magnetic Shielding 2-Way Acoustic Suspension 6-1/2" P.P. ...lbs (2.2 kg) No * Specifications subject to change without notice due to product improvements. 8 SPECIFICATIONS Type Speaker Woofer Tweeter Frequency Range Impedance Nominal Input Maximum Input Sensitivity Crossover Frequency Dimension (H x W x D) Weight Magnetic Shielding 2-Way Acoustic Suspension 5" P.P.
Owners Manual
Page 9
... product. (Claims must be delivered to contact your Owner's manual. How you can get Warranty Service: (1) YAMAHA Speaker Systems requiring service must be accompanied by YAMAHA, please contact YAMAHA's Service Department. (5) Any unit used for warranty service. YAMAHA SHALL NOT BE LIABLE FOR INCIDENTAL OR CONSEQUENTIAL DAMAGES OR DAMAGES OF ANY OTHER KIND OR CHARACTER...
... product. (Claims must be delivered to contact your Owner's manual. How you can get Warranty Service: (1) YAMAHA Speaker Systems requiring service must be accompanied by YAMAHA, please contact YAMAHA's Service Department. (5) Any unit used for warranty service. YAMAHA SHALL NOT BE LIABLE FOR INCIDENTAL OR CONSEQUENTIAL DAMAGES OR DAMAGES OF ANY OTHER KIND OR CHARACTER...


