Owners Manual
Page 1
A II A NS-AW190/NS-AW390 INDOOR / OUTDOOR SPEAKER SYSTEM I Ilf CONTENTS CONSUMER PRECAUTIONS 2 UNPACKING 3 MOUNTING THE SPEAKERS 4 CONNECTIONS TO YOUR AMPLIFIER 6 SETTING UP THE SPEAKERS 7 SPECIFICATIONS 8 OWNER'S MANUAL
A II A NS-AW190/NS-AW390 INDOOR / OUTDOOR SPEAKER SYSTEM I Ilf CONTENTS CONSUMER PRECAUTIONS 2 UNPACKING 3 MOUNTING THE SPEAKERS 4 CONNECTIONS TO YOUR AMPLIFIER 6 SETTING UP THE SPEAKERS 7 SPECIFICATIONS 8 OWNER'S MANUAL
Owners Manual
Page 2
... particular wall's construction. CONSUMER PRECAUTIONS Read these precautions carefully before changing input sources. Always turn the receiver / amplifier unit off when installing or removing input cables. • Anytime you note distortion, reduce the volume control on your power amplifier / receiver to CD) at high listening levels. Secure installation is essential that they are dented or bent, the sound will also ensure better sound performance. • Never touch the woofer or tweeter...
... particular wall's construction. CONSUMER PRECAUTIONS Read these precautions carefully before changing input sources. Always turn the receiver / amplifier unit off when installing or removing input cables. • Anytime you note distortion, reduce the volume control on your power amplifier / receiver to CD) at high listening levels. Secure installation is essential that they are dented or bent, the sound will also ensure better sound performance. • Never touch the woofer or tweeter...
Owners Manual
Page 3
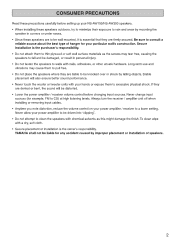
O 0 3 Mounting bracket x 2 Safety wire x 2 .---- - t,i. - Speaker x 2 Large bracket screw x 4 Screw for safety wire x 2 _______, i --------- ( AD) %O ----i - UNPACKING After unpacking, please inspect contents to confirm all the following items are contained.
O 0 3 Mounting bracket x 2 Safety wire x 2 .---- - t,i. - Speaker x 2 Large bracket screw x 4 Screw for safety wire x 2 _______, i --------- ( AD) %O ----i - UNPACKING After unpacking, please inspect contents to confirm all the following items are contained.
Owners Manual
Page 4
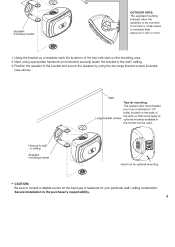
... or snow. 1. Secure installation is the purchaser's responsibility. 4 Using the bracket as a template mark the locations of the key hole slots on the back of the units so that some types of fasteners for your particular wall / ceiling construction. Position the speaker in corners or under eaves to minimize their exposure to wall or ceiling Supplied mounting bracket Wall Tips for mounting: The spakers also...
... or snow. 1. Secure installation is the purchaser's responsibility. 4 Using the bracket as a template mark the locations of the key hole slots on the back of the units so that some types of fasteners for your particular wall / ceiling construction. Position the speaker in corners or under eaves to minimize their exposure to wall or ceiling Supplied mounting bracket Wall Tips for mounting: The spakers also...
Owners Manual
Page 5
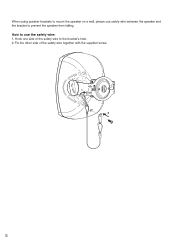
Hook one side of the safety wire together with the supplied screw. 5 How to use safety wire between the speaker and the bracket to prevent the speaker from falling. Fix the other side of the safety wire to the bracket's hole. 2. When using speaker brackets to mount the speaker on a wall, please use the safety wire: 1.
Hook one side of the safety wire together with the supplied screw. 5 How to use safety wire between the speaker and the bracket to prevent the speaker from falling. Fix the other side of the safety wire to the bracket's hole. 2. When using speaker brackets to mount the speaker on a wall, please use the safety wire: 1.
Owners Manual
Page 6
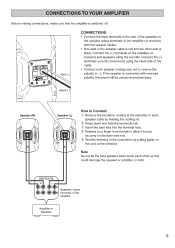
... cord at the terminal. Note Do not let the bare speaker wires touch each speaker cable by pulling lightly on the amplifier (or receiver) and speakers using the black side of the cable. • Connect each speaker making connections, make sure that the amplifier is black. Speaker (R) er\ v se3 Speaker (L) How to Connect CI Remove the insulation coating at the rear of the speakers to the speaker output terminals of the amplifier Amplifier or Receiver 6 CONNECTIONS TO YOUR AMPLIFIER Before making...
... cord at the terminal. Note Do not let the bare speaker wires touch each speaker cable by pulling lightly on the amplifier (or receiver) and speakers using the black side of the cable. • Connect each speaker making connections, make sure that the amplifier is black. Speaker (R) er\ v se3 Speaker (L) How to Connect CI Remove the insulation coating at the rear of the speakers to the speaker output terminals of the amplifier Amplifier or Receiver 6 CONNECTIONS TO YOUR AMPLIFIER Before making...
Owners Manual
Page 7
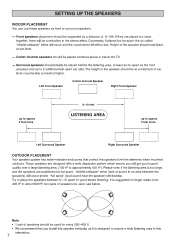
... far apart as front or surround speakers. - SETTING UP THE SPEAKERS INDOOR PLACEMENT You can use these speakers as the front speakers and up to approx 2 feet more Left Surround Speaker Right Surround Speaker OUTDOOR PLACEMENT Your speaker system has water-resistant enclosures that you will develop. If they are placed too close together, there will be used , see below the TV. - Center channel speakers should be placed centered above...
... far apart as front or surround speakers. - SETTING UP THE SPEAKERS INDOOR PLACEMENT You can use these speakers as the front speakers and up to approx 2 feet more Left Surround Speaker Right Surround Speaker OUTDOOR PLACEMENT Your speaker system has water-resistant enclosures that you will develop. If they are placed too close together, there will be used , see below the TV. - Center channel speakers should be placed centered above...
Owners Manual
Page 8
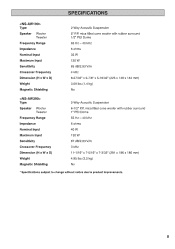
... mm) 3.09 lbs (1.4 kg) No Type Speaker Woofer Tweeter Frequency Range Impedance Nominal Input Maximum Input Sensitivity Crossover Frequency Dimension (H x W x D) Weight Magnetic Shielding 2-Way Acoustic Suspension 6-1/2" P.P. mica filled cone woofer with rubber surround 1" PEI Dome 55 Hz - 40 kHz 6 ohms 40 W 130 W 87 dB/2.83 V/m 3 kHz 11-1/16" x 7-5/16" x 7-3/32" (281 x 186 x 180 mm) 4.85 lbs (2.2 kg) No * Specifications subject to change without notice due to product improvements. 8
... mm) 3.09 lbs (1.4 kg) No Type Speaker Woofer Tweeter Frequency Range Impedance Nominal Input Maximum Input Sensitivity Crossover Frequency Dimension (H x W x D) Weight Magnetic Shielding 2-Way Acoustic Suspension 6-1/2" P.P. mica filled cone woofer with rubber surround 1" PEI Dome 55 Hz - 40 kHz 6 ohms 40 W 130 W 87 dB/2.83 V/m 3 kHz 11-1/16" x 7-5/16" x 7-3/32" (281 x 186 x 180 mm) 4.85 lbs (2.2 kg) No * Specifications subject to change without notice due to product improvements. 8
Owners Manual
Page 9
... resulting from our authorized dealers. YOU ARE RESPONSIBLE FOR ANY INSTALLATION OR REMOVAL CHARGES AND FOR ANY INITIAL SHIPPING CHARGES. if the repairs are covered by YAMAHA, please contact YAMAHA's Service Department. (5) Any unit used for Warranty coverage. Warranty service is enforceable only by a detailed explanation of the problem(s) requiring service And Bill of Sale as to whether a dealer has been authorized...
... resulting from our authorized dealers. YOU ARE RESPONSIBLE FOR ANY INSTALLATION OR REMOVAL CHARGES AND FOR ANY INITIAL SHIPPING CHARGES. if the repairs are covered by YAMAHA, please contact YAMAHA's Service Department. (5) Any unit used for Warranty coverage. Warranty service is enforceable only by a detailed explanation of the problem(s) requiring service And Bill of Sale as to whether a dealer has been authorized...

Owners Manual
Page 10
r P/N 430068 YAMAHA YAMAHA ELECTRONICS CORPORATION, USA 6660 ORANGETHORPE AVE., BUENA PARK, CA 90620 http://www.yamaha.com/yec Phone: 1-800-492-6242 Printed in China
r P/N 430068 YAMAHA YAMAHA ELECTRONICS CORPORATION, USA 6660 ORANGETHORPE AVE., BUENA PARK, CA 90620 http://www.yamaha.com/yec Phone: 1-800-492-6242 Printed in China


