
NP-32/NP-12 Owners Manual
Page 4
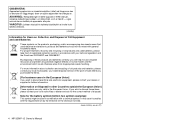
... to discard these products and batteries correctly, you will help to discard electrical and electronic equipment, please contact your dealer or supplier for the chemical involved. (weee_battery_eu_en_01) 4 NP-32/NP-12 Owner's Manual If you wish to save valuable resources and prevent any potential negative effects on the products, packaging, and/or accompanying documents mean that used Batteries These symbols on human health...
... to discard these products and batteries correctly, you will help to discard electrical and electronic equipment, please contact your dealer or supplier for the chemical involved. (weee_battery_eu_en_01) 4 NP-32/NP-12 Owner's Manual If you wish to save valuable resources and prevent any potential negative effects on the products, packaging, and/or accompanying documents mean that used Batteries These symbols on human health...
NP-32/NP-12 Owners Manual
Page 5
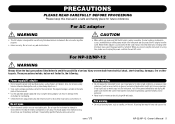
... time, make sure that electricity is flowing at the minimum level, even if the power switch is connected to the AC outlet, keep this manual in damage to unplug the power cord from the AC outlet. Then have it . Do not use immediately and have the instrument inspected by qualified Yamaha service personnel. DMI-5 1/3 NP-32/NP-12 Owner's Manual 5 If some trouble or malfunction occurs, immediately turn off...
... time, make sure that electricity is flowing at the minimum level, even if the power switch is connected to the AC outlet, keep this manual in damage to unplug the power cord from the AC outlet. Then have it . Do not use immediately and have the instrument inspected by qualified Yamaha service personnel. DMI-5 1/3 NP-32/NP-12 Owner's Manual 5 If some trouble or malfunction occurs, immediately turn off...
NP-32/NP-12 Owners Manual
Page 6
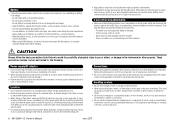
... limited to, the following: Power supply/AC adaptor • Do not connect the instrument to set the volumes of sight or chemical burns. Pulling by Yamaha service personnel. - There is still flowing to the product at their minimum levels and gradually raise the volume controls while playing the instrument to an electrical outlet using Ni-MH batteries, follow the basic precautions listed below . This could...
... limited to, the following: Power supply/AC adaptor • Do not connect the instrument to set the volumes of sight or chemical burns. Pulling by Yamaha service personnel. - There is still flowing to the product at their minimum levels and gradually raise the volume controls while playing the instrument to an electrical outlet using Ni-MH batteries, follow the basic precautions listed below . This could...

NP-32/NP-12 Owners Manual
Page 7
...) DMI-5 3/3 NP-32/NP-12 Owner's Manual 7 Even when the [p] (Standby/On) switch is in standby status (power lamp is off . You should note this instrument (page 19) are allowed to distribute medium in which your personal use. • This product incorporates and bundles contents in which these contents is recorded, and the permission of Yamaha Corporation is turned off ), electricity is still...
...) DMI-5 3/3 NP-32/NP-12 Owner's Manual 7 Even when the [p] (Standby/On) switch is in standby status (power lamp is off . You should note this instrument (page 19) are allowed to distribute medium in which your personal use. • This product incorporates and bundles contents in which these contents is recorded, and the permission of Yamaha Corporation is turned off ), electricity is still...

NP-32/NP-12 Owners Manual
Page 8
...; Adjusting the Tempo 16 Setting the Beat 16 Setting the Metronome Using the Keyboard 17 Recording Your Performance 18 Deleting Recorded Song 18 Backing up Data and Initializing the Settings ...........19 Backing up Data 19 Initializing the Settings 19 Customizing the Settings 20 Octave Shift 20 Reverb Depth 20 Transpose 20 Reverb Type 20 Tuning 21 Touch Sensitivity 21 Operation Confirmation Sounds 21 Auto Power Off 21 Troubleshooting 22 Specifications 23 Index 24 8 NP-32/NP-12 Owner's Manual Table...
...; Adjusting the Tempo 16 Setting the Beat 16 Setting the Metronome Using the Keyboard 17 Recording Your Performance 18 Deleting Recorded Song 18 Backing up Data and Initializing the Settings ...........19 Backing up Data 19 Initializing the Settings 19 Customizing the Settings 20 Octave Shift 20 Reverb Depth 20 Transpose 20 Reverb Type 20 Tuning 21 Touch Sensitivity 21 Operation Confirmation Sounds 21 Auto Power Off 21 Troubleshooting 22 Specifications 23 Index 24 8 NP-32/NP-12 Owner's Manual Table...
NP-32/NP-12 Owners Manual
Page 9
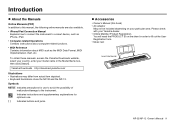
... the User Registration form. • Music rest Insert into the slot NP-32/NP-12 Owner's Manual 9 Symbols NOTICE Indicates precautions for optimum use to avoid the possibility of malfunction/damage to a smart device, such as iPhone, iPad. • Computer-related Operations Contains instructions about computer-related functions. • MIDI Reference Contains information about MIDI such as the MIDI Data Format, MIDI Implementation chart, etc. To obtain these manuals, access the Yamaha Downloads...
... the User Registration form. • Music rest Insert into the slot NP-32/NP-12 Owner's Manual 9 Symbols NOTICE Indicates precautions for optimum use to avoid the possibility of malfunction/damage to a smart device, such as iPhone, iPad. • Computer-related Operations Contains instructions about computer-related functions. • MIDI Reference Contains information about MIDI such as the MIDI Data Format, MIDI Implementation chart, etc. To obtain these manuals, access the Yamaha Downloads...

NP-32/NP-12 Owners Manual
Page 10
... level. page 16 7 [REC] ... Holding down the button for an extended period of time, be sure to [PIANO 1] lights up. page 13 4 [METRONOME] ... Panel Controls and Connectors Top Panel *The illustration shows the NP-32. 1 [MASTER VOLUME] For controlling the volume. the lamp next to unplug the power cord from the wall AC outlet, and/or remove batteries from the instrument. 10 NP-32/NP-12 Owner's Manual 3 [DEMO] ...
... level. page 16 7 [REC] ... Holding down the button for an extended period of time, be sure to [PIANO 1] lights up. page 13 4 [METRONOME] ... Panel Controls and Connectors Top Panel *The illustration shows the NP-32. 1 [MASTER VOLUME] For controlling the volume. the lamp next to unplug the power cord from the wall AC outlet, and/or remove batteries from the instrument. 10 NP-32/NP-12 Owner's Manual 3 [DEMO] ...

NP-32/NP-12 Owners Manual
Page 11
...://yamaha.com/kbdapps/ NP-32/NP-12 Owner's Manual 11 Rear Panel Panel Controls and Connectors *The illustration shows the NP-32. 9 [SUSTAIN] For connecting a separately sold footswitch or foot pedal. Refer to turn the power on : (1) the instrument (2) external device Turning the power off , and minimize their volume before connecting. Be sure to the Online Manual "Computer-related Operations" and/ or "iPhone/iPad Connection Manual" for even more convenience and flexibility. This jack also functions...
...://yamaha.com/kbdapps/ NP-32/NP-12 Owner's Manual 11 Rear Panel Panel Controls and Connectors *The illustration shows the NP-32. 9 [SUSTAIN] For connecting a separately sold footswitch or foot pedal. Refer to turn the power on : (1) the instrument (2) external device Turning the power off , and minimize their volume before connecting. Be sure to the Online Manual "Computer-related Operations" and/ or "iPhone/iPad Connection Manual" for even more convenience and flexibility. This jack also functions...

NP-32/NP-12 Owners Manual
Page 12
... depending on locale. 2 Insert batteries following the order of 1 2 in completely until it clicks. Setting Up Although the instrument will be careful that the power of the instrument is off . 12 NP-32/NP-12 Owner's Manual To avoid electric shock, short circuit or damage, also be automatically drawn from the outlet. When disconnecting, turn the power off and disconnect the plug from the...
... depending on locale. 2 Insert batteries following the order of 1 2 in completely until it clicks. Setting Up Although the instrument will be careful that the power of the instrument is off . 12 NP-32/NP-12 Owner's Manual To avoid electric shock, short circuit or damage, also be automatically drawn from the outlet. When disconnecting, turn the power off and disconnect the plug from the...
NP-32/NP-12 Owners Manual
Page 13
...; Listening to "Entering a specific tempo number" on page 17. The songs provided for a more brilliant, dynamic tone. You can change the Voice Demo Song by pressing the Voice buttons located under the Voices. An electronic piano sound created by using hammer-struck metallic "tines." The full coupler sound of a vibraphone played with relatively soft mallets. NP-32/NP-12 Owner's Manual 13 Voice List Panel Name PIANO 1 PIANO 2 E.PIANO 1 E.PIANO 2 ORGAN 1 ORGAN 2 STRINGS VIBES HARPSI. 1 HARPSI. 2 Voice Name Piano 1 Piano 2 E.Piano 1 E.Piano 2 Organ 1 Organ 2 Strings Vibraphone Harpsichord...
...; Listening to "Entering a specific tempo number" on page 17. The songs provided for a more brilliant, dynamic tone. You can change the Voice Demo Song by pressing the Voice buttons located under the Voices. An electronic piano sound created by using hammer-struck metallic "tines." The full coupler sound of a vibraphone played with relatively soft mallets. NP-32/NP-12 Owner's Manual 13 Voice List Panel Name PIANO 1 PIANO 2 E.PIANO 1 E.PIANO 2 ORGAN 1 ORGAN 2 STRINGS VIBES HARPSI. 1 HARPSI. 2 Voice Name Piano 1 Piano 2 E.Piano 1 E.Piano 2 Organ 1 Organ 2 Strings Vibraphone Harpsichord...
NP-32/NP-12 Owners Manual
Page 14
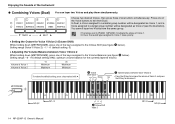
... Voice 1. • In Dual, the reverb type assigned to Voice 1 takes priority. Setting the Octave for the currently layered Voices) below ). Adjusting the Volume Balance between Voice 1/Voice 2 While holding down [METRONOME], press one of the keys assigned to a larger group number will be designated as Voice 1, and a Voice assigned to the Volume Balance (see the illustration). Press one of the Voice buttons to decrease it. 14 NP-32/NP-12 Owner's Manual Octave...
... Voice 1. • In Dual, the reverb type assigned to Voice 1 takes priority. Setting the Octave for the currently layered Voices) below ). Adjusting the Volume Balance between Voice 1/Voice 2 While holding down [METRONOME], press one of the keys assigned to a larger group number will be designated as Voice 1, and a Voice assigned to the Volume Balance (see the illustration). Press one of the Voice buttons to decrease it. 14 NP-32/NP-12 Owner's Manual Octave...

NP-32/NP-12 Owners Manual
Page 15
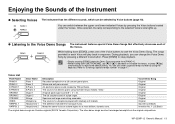
...;ller NP-32/NP-12 Owner's Manual 15 The selected Piano Demo Song will play back followed by using the keyboad. While holding down [METRONOME], use [t] or [s] to decrease or increase the tempo, or press [t]/[s] simultaneously to "Entering a specific tempo number" on page 17. You can also enter a specific tempo number by the rest of the Instrument Listening to the Piano Demo Songs The instrument provides ten different Piano Demo Songs. (Numbers 1 to stop playback. NP-32 Piano Demo Song List...
...;ller NP-32/NP-12 Owner's Manual 15 The selected Piano Demo Song will play back followed by using the keyboad. While holding down [METRONOME], use [t] or [s] to decrease or increase the tempo, or press [t]/[s] simultaneously to "Entering a specific tempo number" on page 17. You can also enter a specific tempo number by the rest of the Instrument Listening to the Piano Demo Songs The instrument provides ten different Piano Demo Songs. (Numbers 1 to stop playback. NP-32 Piano Demo Song List...
NP-32/NP-12 Owners Manual
Page 17
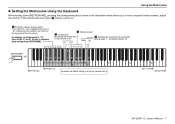
... . Using the Metronome Setting the Metronome Using the Keyboard While holding down [METRONOME], pressing the corresponding keys shown in the illustration below allows you to the keys C1 - For example, to set the tempo to "70": Press the G1 (7) and C1 (0) keys in steps of one or ten. NP-32/NP-12 Owner's Manual 17 Setting the beat Down Up 11 Adjusting the volume of the instrument). Entering a specific tempo number The numbers 0 - 9 are...
... . Using the Metronome Setting the Metronome Using the Keyboard While holding down [METRONOME], pressing the corresponding keys shown in the illustration below allows you to the keys C1 - For example, to set the tempo to "70": Press the G1 (7) and C1 (0) keys in steps of one or ten. NP-32/NP-12 Owner's Manual 17 Setting the beat Down Up 11 Adjusting the volume of the instrument). Entering a specific tempo number The numbers 0 - 9 are...

NP-32/NP-12 Owners Manual
Page 18
...; Pressing [PLAY] also starts recording. Press [REC]. When the amount of recording exceeds the capacity, recording will not be changed once recording starts, make the settings according to your preferences beforehand. Press [PLAY]. NOTICE If a previously recorded song already exists, the [PLAY] lamp is stored. • You can record one song on deletes the previously recorded song. 1 2 Recording standby Start recording 3 Stop recording 4 Currently playing back Flashes Lights off Press [REC]. Press [REC]. 18 NP-32/NP-12 Owner's Manual
...; Pressing [PLAY] also starts recording. Press [REC]. When the amount of recording exceeds the capacity, recording will not be changed once recording starts, make the settings according to your preferences beforehand. Press [PLAY]. NOTICE If a previously recorded song already exists, the [PLAY] lamp is stored. • You can record one song on deletes the previously recorded song. 1 2 Recording standby Start recording 3 Stop recording 4 Currently playing back Flashes Lights off Press [REC]. Press [REC]. 18 NP-32/NP-12 Owner's Manual
NP-32/NP-12 Owners Manual
Page 19
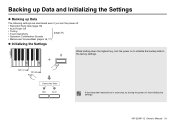
...; Auto Power Off • Tuning • Touch Sensitivity (page 21) • Operation Confirmation Sounds • Metronome Volume/Beat (pages 16, 17) Initializing the Settings While holding down the highest key, turn the power off , then initialize the settings. Backing up Data and Initializing the Settings Backing up Data The following settings are maintained even if you turn the power on to initialize the backup data to the factory settings. NP-32/NP-12 Owner's Manual 19...
...; Auto Power Off • Tuning • Touch Sensitivity (page 21) • Operation Confirmation Sounds • Metronome Volume/Beat (pages 16, 17) Initializing the Settings While holding down the highest key, turn the power off , then initialize the settings. Backing up Data and Initializing the Settings Backing up Data The following settings are maintained even if you turn the power on to initialize the backup data to the factory settings. NP-32/NP-12 Owner's Manual 19...
NP-32/NP-12 Owners Manual
Page 20
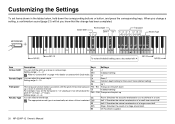
... Octave Shift Reverb Depth Transpose Reverb Type Description Keys Settings You can shift the pitch up or down in Dual mode. When you change has been completed. For example, if you set the transpose to shift the pitch of a large concert hall. B5 Off: No effect is applied. 20 NP-32/NP-12 Owner's Manual D3 Setting range: -1 - +1 D#3 Refer to "Octave Shift" on page 14 for the current Voice (default setting) D4 Up 1 The transpose function makes...
... Octave Shift Reverb Depth Transpose Reverb Type Description Keys Settings You can shift the pitch up or down in Dual mode. When you change has been completed. For example, if you set the transpose to shift the pitch of a large concert hall. B5 Off: No effect is applied. 20 NP-32/NP-12 Owner's Manual D3 Setting range: -1 - +1 D#3 Refer to "Octave Shift" on page 14 for the current Voice (default setting) D4 Up 1 The transpose function makes...
NP-32/NP-12 Owners Manual
Page 21
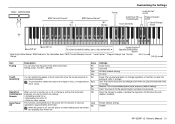
... sound for off • Clicks for the Organ 1 and 2, or Harpsichord 1 A#4 and 2 voices. Medium: This is off if no buttons or keys are operated for information about "MIDI Transmit/Receive Channel," "Local Control," "Program Change" and "Control Change." MIDI Transmit Channel* Off MIDI Receive Channel* Customizing the Settings Tuning Auto Power Off Enable/Disable Touch Sensitivity Local Control*: On/Off Program Change*: On/Off Control Change*: On/Off To restore the default setting, press a key marked with . Enable (default setting) Disable NP-32/NP-12 Owner's Manual...
... sound for off • Clicks for the Organ 1 and 2, or Harpsichord 1 A#4 and 2 voices. Medium: This is off if no buttons or keys are operated for information about "MIDI Transmit/Receive Channel," "Local Control," "Program Change" and "Control Change." MIDI Transmit Channel* Off MIDI Receive Channel* Customizing the Settings Tuning Auto Power Off Enable/Disable Touch Sensitivity Local Control*: On/Off Program Change*: On/Off Control Change*: On/Off To restore the default setting, press a key marked with . Enable (default setting) Disable NP-32/NP-12 Owner's Manual...
NP-32/NP-12 Owners Manual
Page 22
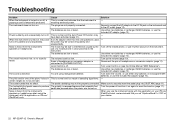
... been activated (page 21). Use either new batteries or recharged Ni-MH batteries, or use it on again to the instrument. The volume is a result of the piano Voices in close proximity to reset the function (page 11). the power may not be turned off . use the included AC adaptor (page 12). The sound is temporarily produced. The pedal cable/plug may be properly connected. Noise is heard from the...
... been activated (page 21). Use either new batteries or recharged Ni-MH batteries, or use it on again to the instrument. The volume is a result of the piano Voices in close proximity to reset the function (page 11). the power may not be turned off . use the included AC adaptor (page 12). The sound is temporarily produced. The pedal cable/plug may be properly connected. Noise is heard from the...

NP-32/NP-12 Owners Manual
Page 23
... oz.) Number of Voices 10 10 Effects Types Function Reverb Dual 4 types Yes 4 types Yes Recording/Playback Preset (MIDI data only; or Europe: PA-130 or an equivalent recommended by Yamaha • Keyboard Stand: L-2C • Headphones: HPH-150/HPH-100/HPH-50 • Foot Pedal: FC3A • Foot Switch: FC4A/FC5 • AC Adaptor: Users within the U.S. Please check with your Yamaha dealer. • Online Member Product Registration • Music Rest • Owner's Manual • AC Adaptor (PA...
... oz.) Number of Voices 10 10 Effects Types Function Reverb Dual 4 types Yes 4 types Yes Recording/Playback Preset (MIDI data only; or Europe: PA-130 or an equivalent recommended by Yamaha • Keyboard Stand: L-2C • Headphones: HPH-150/HPH-100/HPH-50 • Foot Pedal: FC3A • Foot Switch: FC4A/FC5 • AC Adaptor: Users within the U.S. Please check with your Yamaha dealer. • Online Member Product Registration • Music Rest • Owner's Manual • AC Adaptor (PA...

NP-32/NP-12 Owners Manual
Page 24
Index A AC Adaptor ...12 Accessories ...9 Auto Power Off 21 B Backing up Data 19 Batteries ...12 Beat ...16 C Control Change 21 D Deleting Recorded Song 18 Digital Piano Controller 11 Dual ...14 I Initializing the Settings 19 L Local Control ...21 M [MASTER VOLUME 10 Metronome 16, 17 Music rest ...9 O Octave Shift ...20 Online Manuals (PDF 9 Operation Confirmation Sounds 21 P Piano Demo Song List 15 Piano Demo Songs 15 24 NP-32/NP-12 Owner's Manual Program Change 21 R Rear Panel ...11 Recording ...18 Reverb Depth ...20 Reverb Type ...20 S Specifications ...23 Smart device ...
Index A AC Adaptor ...12 Accessories ...9 Auto Power Off 21 B Backing up Data 19 Batteries ...12 Beat ...16 C Control Change 21 D Deleting Recorded Song 18 Digital Piano Controller 11 Dual ...14 I Initializing the Settings 19 L Local Control ...21 M [MASTER VOLUME 10 Metronome 16, 17 Music rest ...9 O Octave Shift ...20 Online Manuals (PDF 9 Operation Confirmation Sounds 21 P Piano Demo Song List 15 Piano Demo Songs 15 24 NP-32/NP-12 Owner's Manual Program Change 21 R Rear Panel ...11 Recording ...18 Reverb Depth ...20 Reverb Type ...20 S Specifications ...23 Smart device ...


