
Owners Manual
Page 34
... Select Device Setup from the driver icon's pop-up menu to display the sample rate dialog box. Start the computer. Please refer to the TOOLS for n Installation Guide for the dedicated software, please refer to the Installation Guide. 1. If the Yamaha Extension dialog box is displayed while...while the driver icon is started, make initial settings. Do you select a sample rate, click OK to close the dialog box. 4. After you wish to retry?" Select Sample Rate from the Devices tab to display the device setup window. 3. English Using the n8/n12 with Cubase 4/Cubase Studio 4/Cubase ...
... Select Device Setup from the driver icon's pop-up menu to display the sample rate dialog box. Start the computer. Please refer to the TOOLS for n Installation Guide for the dedicated software, please refer to the Installation Guide. 1. If the Yamaha Extension dialog box is displayed while...while the driver icon is started, make initial settings. Do you select a sample rate, click OK to close the dialog box. 4. After you wish to retry?" Select Sample Rate from the Devices tab to display the device setup window. 3. English Using the n8/n12 with Cubase 4/Cubase Studio 4/Cubase ...
Owners Manual
Page 48
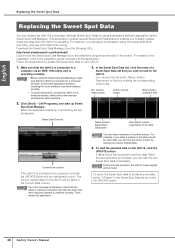
... the name of the data UPDATE button Current Data column If the n8/n12 is operating. For example, you can use other devices connected to a computer directly, without any other data while mixing. NOTE • Before using the Sweet Spot Data Manager, make sure ...that the application software, including the driver software, has been installed correctly. • To avoid malfunction, connect the n8/n12 to either machine. 3. When the load ...
... the name of the data UPDATE button Current Data column If the n8/n12 is operating. For example, you can use other devices connected to a computer directly, without any other data while mixing. NOTE • Before using the Sweet Spot Data Manager, make sure ...that the application software, including the driver software, has been installed correctly. • To avoid malfunction, connect the n8/n12 to either machine. 3. When the load ...
Owners Manual
Page 49
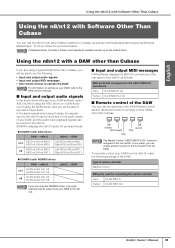
...NOTE If you can assign another function to the foot switch from the DAW. Using the n8/n12 with ASIO driver) DAW → n8/n12 n12 ASIO mLAN mLAN01- In the same way as shown below : NOTE A dedicated driver (Yamaha n Driver) must already be able to do the following settings in the DAW: Type of remote controller... in the DAW Remote Control section (as when using Cubase, the signals input to the n8/n12 can be recorded on the audio tracks of your DAW, and the audio track playback signals can be mixed on setting up your DAW, refer to the DAW owner's manual. ■ Input and output ...
...NOTE If you can assign another function to the foot switch from the DAW. Using the n8/n12 with ASIO driver) DAW → n8/n12 n12 ASIO mLAN mLAN01- In the same way as shown below : NOTE A dedicated driver (Yamaha n Driver) must already be able to do the following settings in the DAW: Type of remote controller... in the DAW Remote Control section (as when using Cubase, the signals input to the n8/n12 can be recorded on the audio tracks of your DAW, and the audio track playback signals can be mixed on setting up your DAW, refer to the DAW owner's manual. ■ Input and output ...
Owners Manual
Page 51
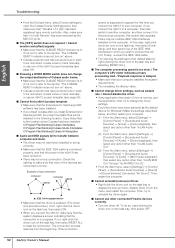
...more information, refer to the owner's manual for the computer, or contact the manufacturer of the driver is appropriate. • Make sure that the sample rate is running in the BIOS. Troubleshooting Troubleshooting... mixer and the external device may be damaged. • Make sure that a signal from the digital reverb is appropriately assigned. • The REVERB [LEVEL] control must not be remotely controlled. ... properly. • Make sure that the n8/n12 is connected to the computer via an IEEE 1394 cable. • You must use Cubase 4, Cubase Studio 4, or Cubase AI 4. Set all faders to...
...more information, refer to the owner's manual for the computer, or contact the manufacturer of the driver is appropriate. • Make sure that the sample rate is running in the BIOS. Troubleshooting Troubleshooting... mixer and the external device may be damaged. • Make sure that a signal from the digital reverb is appropriately assigned. • The REVERB [LEVEL] control must not be remotely controlled. ... properly. • Make sure that the n8/n12 is connected to the computer via an IEEE 1394 cable. • You must use Cubase 4, Cubase Studio 4, or Cubase AI 4. Set all faders to...
Owners Manual
Page 52
...not lit, refer to the location where Cubase has been installed. C:\Program Files\Steinberg\Cubase 4\templates C:\Program Files\Steinberg\Cubase Studio 4\templates C:\Program Files\Steinberg\Cubase AI 4\templates ■ Audio and MIDI signals fail to transfer between computer and mixer. • The...connection is supposed to appear the first time you connect the n8/n12 to your computer. Also, make sure that the system displays a screen indicating that "Yamaha n 12 (n8)" has been registered as sample rate. / Cannot disable the driver. • If any option other than "mLAN MIDI Out" ...
...not lit, refer to the location where Cubase has been installed. C:\Program Files\Steinberg\Cubase 4\templates C:\Program Files\Steinberg\Cubase Studio 4\templates C:\Program Files\Steinberg\Cubase AI 4\templates ■ Audio and MIDI signals fail to transfer between computer and mixer. • The...connection is supposed to appear the first time you connect the n8/n12 to your computer. Also, make sure that the system displays a screen indicating that "Yamaha n 12 (n8)" has been registered as sample rate. / Cannot disable the driver. • If any option other than "mLAN MIDI Out" ...
Owners Manual
Page 53
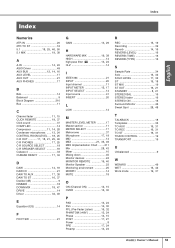
... Numerics 2TR IN 20 2TR TO ST 16 5.1 18, 25, 46, 50 5.1 MIX 19, 38 A A.IN 14, 24 ASIO Driver 49 AUX BUS 12, 14, 16 AUX LEVEL 17 AUX OUT 21 AUX PHONES 17...DAW TO ST 16, 37 Decibel (dB 9 DIMMER 18 DOWN MIX 18, 47 DRIVE 14 Driver 34, 49 E Equalizer (EQ 14 F FOOT SW 21 G GAIN 13, 29 H HARDWARE MIX 19, 38 HIGH 14 high-pass filter 13, 24 Hi-Z 14... 37 Microphone 17, 18 MID 14 MIDI 21, 35, 49 MIDI Implementation Chart ........ 211 Mix 28, 43 Mixer 10 Mixing down 45 Monitor devices 24 MONITOR REMOTE 19, 40 Monitor Speaker 23 Monitoring environment 25 MORPH 14...
... Numerics 2TR IN 20 2TR TO ST 16 5.1 18, 25, 46, 50 5.1 MIX 19, 38 A A.IN 14, 24 ASIO Driver 49 AUX BUS 12, 14, 16 AUX LEVEL 17 AUX OUT 21 AUX PHONES 17...DAW TO ST 16, 37 Decibel (dB 9 DIMMER 18 DOWN MIX 18, 47 DRIVE 14 Driver 34, 49 E Equalizer (EQ 14 F FOOT SW 21 G GAIN 13, 29 H HARDWARE MIX 19, 38 HIGH 14 high-pass filter 13, 24 Hi-Z 14... 37 Microphone 17, 18 MID 14 MIDI 21, 35, 49 MIDI Implementation Chart ........ 211 Mix 28, 43 Mixer 10 Mixing down 45 Monitor devices 24 MONITOR REMOTE 19, 40 Monitor Speaker 23 Monitoring environment 25 MORPH 14...
Owners Manual
Page 58
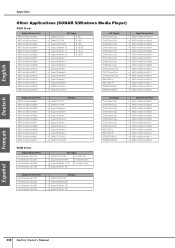
... mLAN mLAN05 ASIO mLAN mLAN06 ASIO mLAN mLAN07 ASIO mLAN mLAN08 ASIO mLAN mLAN09 ASIO mLAN mLAN10 ASIO mLAN mLAN11 ASIO mLAN mLAN12 WDM Driver Output Device Port mLAN Audio Out 1/2 mLAN Audio Out 3/4 mLAN Audio Out 5/6 mLAN Audio Out 7/8 n8 Input → DAW TO...Channel 8 → Input Channel 1 → Input Channel 2 → Input Channel 3 → Input Channel 4 → DAW TO AUX-L → DAW TO AUX-R n12 Input → DAW TO ST-L/R 5.1(L)/5.1(R) → Input Channel 9/10 5.1(C)/5.1(LFE) → Input Channel 11/12 5.1(Ls)/5.1(Rs) → Input Channel 1/2 n8 Output CH1 Direct ...
... mLAN mLAN05 ASIO mLAN mLAN06 ASIO mLAN mLAN07 ASIO mLAN mLAN08 ASIO mLAN mLAN09 ASIO mLAN mLAN10 ASIO mLAN mLAN11 ASIO mLAN mLAN12 WDM Driver Output Device Port mLAN Audio Out 1/2 mLAN Audio Out 3/4 mLAN Audio Out 5/6 mLAN Audio Out 7/8 n8 Input → DAW TO...Channel 8 → Input Channel 1 → Input Channel 2 → Input Channel 3 → Input Channel 4 → DAW TO AUX-L → DAW TO AUX-R n12 Input → DAW TO ST-L/R 5.1(L)/5.1(R) → Input Channel 9/10 5.1(C)/5.1(LFE) → Input Channel 11/12 5.1(Ls)/5.1(Rs) → Input Channel 1/2 n8 Output CH1 Direct ...