

Installation Guide
Page 2
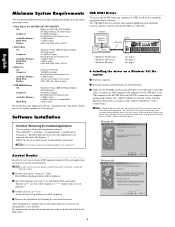
... Editor for MOTIF6/MOTIF7/MOTIF8 File Utility YAMAHA Wave Editor TWE V2.3 YAMAHA USB MIDI Drivesr (for Win 98, Me) YAMAHA USB MIDI Driver (for the MOTIF 2 Enables your computer to communicate with the MOTIF when your computer and the MOTIF are connected using . Refer to the owner's manual of the included... user support for use only with a computer. Never attempt to the MOTIF via its INPUT jacks. Enables you to view each PDF manual for MOTIF6/MOTIF7/MOTIF8 or File Utility as to the MOTIF Owner's manual. Enables you to edit the audio (wave) data on your computer ...
... Editor for MOTIF6/MOTIF7/MOTIF8 File Utility YAMAHA Wave Editor TWE V2.3 YAMAHA USB MIDI Drivesr (for Win 98, Me) YAMAHA USB MIDI Driver (for the MOTIF 2 Enables your computer to communicate with the MOTIF when your computer and the MOTIF are connected using . Refer to the owner's manual of the included... user support for use only with a computer. Never attempt to the MOTIF via its INPUT jacks. Enables you to view each PDF manual for MOTIF6/MOTIF7/MOTIF8 or File Utility as to the MOTIF Owner's manual. Enables you to edit the audio (wave) data on your computer ...
Installation Guide
Page 4
... left of the computer (or the USB hub) to install the appropriate driver software. nFor Windows Me users, check the radio button to the owner's manual of the driver (Advanced)" and specify the CD-ROM drive's "USBdrv_" folder to Step 8. If the system does not detect the driver, select "Specify the...: Display: Windows 95/98/Me 166 MHz or higher; USB MIDI Driver To operate the MOTIF from your PC, you 'll need to use the USB cable to connect the USB terminal of "Automatic search for MOTIF6/MOTIF7/MOTIF8 OS: Windows 95/98/Me/NT4.0/2000/ XP Home Edition/XP Professional Computer...
... left of the computer (or the USB hub) to install the appropriate driver software. nFor Windows Me users, check the radio button to the owner's manual of the driver (Advanced)" and specify the CD-ROM drive's "USBdrv_" folder to Step 8. If the system does not detect the driver, select "Specify the...: Display: Windows 95/98/Me 166 MHz or higher; USB MIDI Driver To operate the MOTIF from your PC, you 'll need to use the USB cable to connect the USB terminal of "Automatic search for MOTIF6/MOTIF7/MOTIF8 OS: Windows 95/98/Me/NT4.0/2000/ XP Home Edition/XP Professional Computer...

Installation Guide
Page 6
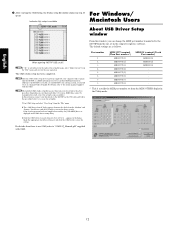
...Utility Tools setup dialog will be displayed. For details, refer to the each PDF owner's manual. 7 Close the Generic Remote Setup window. 6 English ● Installing the driver on operation, refer to the PDF manual provided in the folder. The "VEMOT_" folder, "FU_" folder and "TWE" folder... XP system 1 Start the computer. 2 Select [Start] → [Control Panel]. Remote: Generic Remote Input: YAMAHA USB IN 0-3 Output: YAMAHA USB OUT 0-3 6 Make sure the POWER switch on the MOTIF is turned on the "Tools" folder in the CD-ROM. "setup.exe" file will be displayed. ...
...Utility Tools setup dialog will be displayed. For details, refer to the each PDF owner's manual. 7 Close the Generic Remote Setup window. 6 English ● Installing the driver on operation, refer to the PDF manual provided in the folder. The "VEMOT_" folder, "FU_" folder and "TWE" folder... XP system 1 Start the computer. 2 Select [Start] → [Control Panel]. Remote: Generic Remote Input: YAMAHA USB IN 0-3 Output: YAMAHA USB OUT 0-3 6 Make sure the POWER switch on the MOTIF is turned on the "Tools" folder in the CD-ROM. "setup.exe" file will be displayed. ...

Installation Guide
Page 7
... Plug-in the Toolbar called up is the port that the Key Command settings are using the SONAR), then select "Yamaha MOTIF Synthesizer" from the Option menu to "YAMAHA USB IN 0-3." English ● Preference File for using Pro Tools. from the File menu. You can control SONAR/SONAR2... (Installation) 1 Copy the template file from the CD-ROM to an unused track number, the knobs, buttons, and sliders on -line manual of Aux Busses to select the relevant MIDI port within each software. 7 From this window, set Input Ports to 1 (for the respective software....
... Plug-in the Toolbar called up is the port that the Key Command settings are using the SONAR), then select "Yamaha MOTIF Synthesizer" from the Option menu to "YAMAHA USB IN 0-3." English ● Preference File for using Pro Tools. from the File menu. You can control SONAR/SONAR2... (Installation) 1 Copy the template file from the CD-ROM to an unused track number, the knobs, buttons, and sliders on -line manual of Aux Busses to select the relevant MIDI port within each software. 7 From this window, set Input Ports to 1 (for the respective software....

Installation Guide
Page 8
... track 1 (containing the application software) on the MOTIF6/MOTIF7/MOTIF8. 8 Demo version of the sequence software Logic Audio Platinum 4.6. * Unfortunately, Yamaha makes no guarantee concerning the stability of these programs (marked with online/PDF manuals. • OMS® and are trademarks of applications (with the MOTIF when your CD player/audio speakers. English For...
... track 1 (containing the application software) on the MOTIF6/MOTIF7/MOTIF8. 8 Demo version of the sequence software Logic Audio Platinum 4.6. * Unfortunately, Yamaha makes no guarantee concerning the stability of these programs (marked with online/PDF manuals. • OMS® and are trademarks of applications (with the MOTIF when your CD player/audio speakers. English For...

Installation Guide
Page 10
... To complete the installation, click [Quit]. The "YAMAHA TWE" folder will be displayed. 3 Double-click on -line Help or the PDF owner's manual. 4 The "Install Location" box displays the destination of your computer to edit the voices of the MOTIF as well as the destination. 5 Click the [...refer to automatically quit all other running applications." Execute the installation by following the on the "TWE" folder. For details on the "Motif" folder. "Motif" folder and "TWE" folder will be displayed. 2 Double-click on how to use the [Switch Disk] button and the pop-...
... To complete the installation, click [Quit]. The "YAMAHA TWE" folder will be displayed. 3 Double-click on -line Help or the PDF owner's manual. 4 The "Install Location" box displays the destination of your computer to edit the voices of the MOTIF as well as the destination. 5 Click the [...refer to automatically quit all other running applications." Execute the installation by following the on the "TWE" folder. For details on the "Motif" folder. "Motif" folder and "TWE" folder will be displayed. 2 Double-click on how to use the [Switch Disk] button and the pop-...
Installation Guide
Page 12
... From this situation, connect your Macintosh to the MOTIF via the USB cable and follow the above has been completed, your computer will recognize only the MOTIF as follows. nAfter the OMS studio setup above procedure, depending on -line manual supplied with the OMS. nThe included OMS studio setup... file may not function even if you add a second MOTIF to store the setting. Remove the check ...
... From this situation, connect your Macintosh to the MOTIF via the USB cable and follow the above has been completed, your computer will recognize only the MOTIF as follows. nAfter the OMS studio setup above procedure, depending on -line manual supplied with the OMS. nThe included OMS studio setup... file may not function even if you add a second MOTIF to store the setting. Remove the check ...

Installation Guide
Page 13
...system requirements? • Is any unknown device registered? → If driver installation fails, the MOTIF will be marked as an "Unknown device," and you will allow you may be able to...will not be disabled. n To delete these files using Windows 2000, you to the owner's manual of the tone generator, playback device, and application program set up OMS. Playback response is running ? ... the Control Panel to open the System window. 2 Double-click the "Device Manager" tab, select "YAMAHA USB MIDI Driver" and delete it. 3 Use the MS-DOS prompt or Explorer to delete the following...
...system requirements? • Is any unknown device registered? → If driver installation fails, the MOTIF will be marked as an "Unknown device," and you will allow you may be able to...will not be disabled. n To delete these files using Windows 2000, you to the owner's manual of the tone generator, playback device, and application program set up OMS. Playback response is running ? ... the Control Panel to open the System window. 2 Double-click the "Device Manager" tab, select "YAMAHA USB MIDI Driver" and delete it. 3 Use the MS-DOS prompt or Explorer to delete the following...

Owner's Manual
Page 7
... of the following items have everything listed here. • Synthesizer • AC Power cord • CD-ROM x 3 • Owners Manual (this Owner's Manual are the trademarks or registered trademarks of the Yamaha MOTIF Music Production Synthesizer! We strove to get the most powerful synthesizer and total music production instrument on to any other part...
... of the following items have everything listed here. • Synthesizer • AC Power cord • CD-ROM x 3 • Owners Manual (this Owner's Manual are the trademarks or registered trademarks of the Yamaha MOTIF Music Production Synthesizer! We strove to get the most powerful synthesizer and total music production instrument on to any other part...
Owner's Manual
Page 27
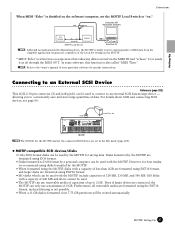
...PART / ZONE 9 10 11 12 13 14 15 16 MUTE NUMBER SOLO MOTIF n The SCSI ID for the MOTIF and for specific instructions. Even if larger drives are set the MOTIF Local Switch to the owner's manual of less than 2GB are formatted using FAT16 format, and larger disks are... formatted using disks formatted by the MOTIF for saving data. Setting Up Connections When MIDI "Echo" is formatted,...
...PART / ZONE 9 10 11 12 13 14 15 16 MUTE NUMBER SOLO MOTIF n The SCSI ID for the MOTIF and for specific instructions. Even if larger drives are set the MOTIF Local Switch to the owner's manual of less than 2GB are formatted using FAT16 format, and larger disks are... formatted using disks formatted by the MOTIF for saving data. Setting Up Connections When MIDI "Echo" is formatted,...

Owner's Manual
Page 55
... types are phrases for use with drum and percussion sounds. ■ Control Creates tonal changes by the control change data sequence. Just like playing Arpeggios manually from the keyboard, this inserts Arpeggios in the Song/Pattern during Song/Pattern playback Also, Arpeggio On/Off can assign the desired Arpeggio Types to...) Arpeggio Performance Performance Each Arpeggio can be set the Arpeggio playback method, Velocity range and Play Effects to each Voice/Performance, and adjust the tempo. MOTIF Basic Structure 55
... types are phrases for use with drum and percussion sounds. ■ Control Creates tonal changes by the control change data sequence. Just like playing Arpeggios manually from the keyboard, this inserts Arpeggios in the Song/Pattern during Song/Pattern playback Also, Arpeggio On/Off can assign the desired Arpeggio Types to...) Arpeggio Performance Performance Each Arpeggio can be set the Arpeggio playback method, Velocity range and Play Effects to each Voice/Performance, and adjust the tempo. MOTIF Basic Structure 55

Owner's Manual
Page 61
... Level (explained in the Sampling Setup display (page 236). Start Pont Key on the keyboard, the Sample plays from beginning to "Manual": Regardless of the Song/Pattern. ■ When Trigger mode is set too low, a soft noise may be in any mode),...When Trigger mode is linked to "Slice + Seq" or "Sample + Note." Song/Pattern start Sampling start sampling. A B C D E As you press a note on End Point MOTIF Basic Structure 61 Sampling also starts regardless of the playback/stop Punch In Punch Out 1 2 3 4 5 6 7 8 1 2 3 4 5 6 7 8 Wave data Sample ...
... Level (explained in the Sampling Setup display (page 236). Start Pont Key on the keyboard, the Sample plays from beginning to "Manual": Regardless of the Song/Pattern. ■ When Trigger mode is set too low, a soft noise may be in any mode),...When Trigger mode is linked to "Slice + Seq" or "Sample + Note." Song/Pattern start Sampling start sampling. A B C D E As you press a note on End Point MOTIF Basic Structure 61 Sampling also starts regardless of the playback/stop Punch In Punch Out 1 2 3 4 5 6 7 8 1 2 3 4 5 6 7 8 Wave data Sample ...

Owner's Manual
Page 66
For details, see the Installation Guide manual. 66 MOTIF Basic Structure n For certain software programs, it may be controlled via the Remote Control function differ depending on page 257. For details on how to ... Plutinum Ver4.6 Cakewalk ProAudio Ver9.0 Pro Tools V5.0 Macintosh Cubase VST 5.0 Logic Audio Plutinum Ver4.6 Pro Tools V5.0 n The parameters to be controlled via the MOTIF's Remote Control function.
For details, see the Installation Guide manual. 66 MOTIF Basic Structure n For certain software programs, it may be controlled via the Remote Control function differ depending on page 257. For details on how to ... Plutinum Ver4.6 Cakewalk ProAudio Ver9.0 Pro Tools V5.0 Macintosh Cubase VST 5.0 Logic Audio Plutinum Ver4.6 Pro Tools V5.0 n The parameters to be controlled via the MOTIF's Remote Control function.
Owner's Manual
Page 77
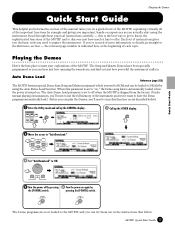
...the Demos Here's the best place to offer. Playing the Demos Quick Start Guide This helpful and informative section of the manual takes you on a guided tour of the MOTIF, explaining virtually all of the important functions by the [POWER] switch. When this is turned on (as you 're...you need to master the instrument. DEC/NO INC/ YES EXIT ENTER EXECUTE 4 Set "AutoDemoLoad" to "AutoDemoLoad." this parameter is set of the MOTIF. If you actually start your explorations of instructions gives you the basic tools you 'll need to turn this function on . pressing the [POWER]...
...the Demos Here's the best place to offer. Playing the Demos Quick Start Guide This helpful and informative section of the manual takes you on a guided tour of the MOTIF, explaining virtually all of the important functions by the [POWER] switch. When this is turned on (as you 're...you need to master the instrument. DEC/NO INC/ YES EXIT ENTER EXECUTE 4 Set "AutoDemoLoad" to "AutoDemoLoad." this parameter is set of the MOTIF. If you actually start your explorations of instructions gives you the basic tools you 'll need to turn this function on . pressing the [POWER]...

Owner's Manual
Page 78
... beginning of the selected song is finished, the song automatically stops. For details about song control, see page 14. 78 MOTIF Quick Start Guide Decreases number Increases number DEC/NO INC/ YES Decreases number Increases number OCTAVE DOWN UP KNOB CONTROL FUNCTION PAN...3 CATEGORY SEARCH A. You can stop the song anytime during playback by pressing the [■] button. SEQ TRANSPORT LOCATE 1 2 REC 6 Stop song playback manually, if you a taste of the song from that point, press the [F] again. Top button SEQ TRANSPORT LOCATE 1 2 REC When playback of the song...
... beginning of the selected song is finished, the song automatically stops. For details about song control, see page 14. 78 MOTIF Quick Start Guide Decreases number Increases number DEC/NO INC/ YES Decreases number Increases number OCTAVE DOWN UP KNOB CONTROL FUNCTION PAN...3 CATEGORY SEARCH A. You can stop the song anytime during playback by pressing the [■] button. SEQ TRANSPORT LOCATE 1 2 REC 6 Stop song playback manually, if you a taste of the song from that point, press the [F] again. Top button SEQ TRANSPORT LOCATE 1 2 REC When playback of the song...

Owner's Manual
Page 101
...start sampling. SEQUENCER SONG PATTERN FILE INTEGRATED SAMPLING MIXING UTILITY SF1 SF2 SF 3 SF4 SF5 INFORMATION F1 F2 F3 F4 F5 F6 MOTIF Quick Start Guide 101 The following display appears after stopping sampling since the sampling type has been set to start the external CD ...recorded sample. Once you've edited the sample so that it loops properly, call up the SOURCE display. For Source, select "A/D." Here, select "manual." Press the [F6] button to "slice+seq" in step #7. Trigger mode Monitor level Input level SF1 SF2 SF 3 SF4 SF5 INFORMATION F1...
...start sampling. SEQUENCER SONG PATTERN FILE INTEGRATED SAMPLING MIXING UTILITY SF1 SF2 SF 3 SF4 SF5 INFORMATION F1 F2 F3 F4 F5 F6 MOTIF Quick Start Guide 101 The following display appears after stopping sampling since the sampling type has been set to start the external CD ...recorded sample. Once you've edited the sample so that it loops properly, call up the SOURCE display. For Source, select "A/D." Here, select "manual." Press the [F6] button to "slice+seq" in step #7. Trigger mode Monitor level Input level SF1 SF2 SF 3 SF4 SF5 INFORMATION F1...

Owner's Manual
Page 114
... by repeating steps #1 - 9. You can adjust the Input level for optimum level by using the GAIN knob on the rear panel. 7 Start sampling. Here, select "manual." Quick Start Guide 114 MOTIF Quick Start Guide
... by repeating steps #1 - 9. You can adjust the Input level for optimum level by using the GAIN knob on the rear panel. 7 Start sampling. Here, select "manual." Quick Start Guide 114 MOTIF Quick Start Guide
Owner's Manual
Page 119
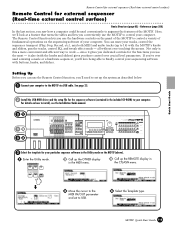
...Guide Remote Control for external sequencer (Real-time external control surface) Remote Control for your particular sequence software in the Utility mode on the MOTIF (above). 1 Enter the Utility mode. The Remote Control function lets you finer control over crucial level parameters. PIANO KEYBOARD ORGAN ...buttons, knobs, and sliders. Not only is this a more convenient and efficient way to install, see the Installation Guide manual. 31 32 33 OCTAVE DOWN UP KNOB CONTROL FUNCTION PAN REVERB CHORUS CUTOFF RESONANCE ATTACK ASSIGN A ASSIGN B ASSIGN 1 TEMPO RELEASE ...
...Guide Remote Control for external sequencer (Real-time external control surface) Remote Control for your particular sequence software in the Utility mode on the MOTIF (above). 1 Enter the Utility mode. The Remote Control function lets you finer control over crucial level parameters. PIANO KEYBOARD ORGAN ...buttons, knobs, and sliders. Not only is this a more convenient and efficient way to install, see the Installation Guide manual. 31 32 33 OCTAVE DOWN UP KNOB CONTROL FUNCTION PAN REVERB CHORUS CUTOFF RESONANCE ATTACK ASSIGN A ASSIGN B ASSIGN 1 TEMPO RELEASE ...

Owner's Manual
Page 153
... see page 35. Reference Voice mode ● [F6] Drum Key EQ (Equalizer) Same as Normal Voice Edit. n For details on page 159. Unlike with the MOTIF. See page 148. See page 129. which NUMBER button you press.) 1 2 3 4 ELEMENT/ PERF.PART / ZONE 5 Select the menu you are unprocessed, unaltered...material" used for editing. ◆ About Plug-in voices and Board voices The voices of a Plug-in Board installed to the relevant owner's manual of available Plug-in boards, see the explanations below. • For details on step #7, refer to "Voice Store mode" on the current ...
... see page 35. Reference Voice mode ● [F6] Drum Key EQ (Equalizer) Same as Normal Voice Edit. n For details on page 159. Unlike with the MOTIF. See page 148. See page 129. which NUMBER button you press.) 1 2 3 4 ELEMENT/ PERF.PART / ZONE 5 Select the menu you are unprocessed, unaltered...material" used for editing. ◆ About Plug-in voices and Board voices The voices of a Plug-in Board installed to the relevant owner's manual of available Plug-in boards, see the explanations below. • For details on step #7, refer to "Voice Store mode" on the current ...
Owner's Manual
Page 156
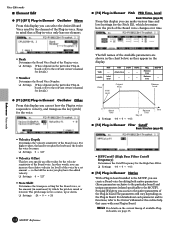
... High Pass Filter. ❏ Settings -64 ~ 0 ~ +63 ● [F4] Plug-in Element Native With a Plug-in board installed to the MOTIF, you can create a Board voice by editing both native parameters (those parameters exclusive to the particular board) and unique parameters (related specifically to... Filter Cutoff Basic Structure (page 46) • Velocity Depth Determines the velocity sensitivity of the Board voice. refer to the relevant owner's manual for details.) ● [F1]-[SF5] Plug-in Element Oscillator Other From this display you can select the desired Board Voice used for the...
... High Pass Filter. ❏ Settings -64 ~ 0 ~ +63 ● [F4] Plug-in Element Native With a Plug-in board installed to the MOTIF, you can create a Board voice by editing both native parameters (those parameters exclusive to the particular board) and unique parameters (related specifically to... Filter Cutoff Basic Structure (page 46) • Velocity Depth Determines the velocity sensitivity of the Board voice. refer to the relevant owner's manual for details.) ● [F1]-[SF5] Plug-in Element Oscillator Other From this display you can select the desired Board Voice used for the...


