

Owner's Manual
Page 2
... methods used , please observe all safety markings and instructions that is operating as regulated by Yamaha. Purchase Date 92-BP (bottom) PLEASE KEEP THIS MANUAL 2 MM6/MM8 Owner's Manual IMPORTANT: The louder the sound, the shorter the time period before requesting service. If a cart, etc., is used... charges incurred due to a lack of knowledge relating to the disposal of products that are both the letter and the spirit of producing sound levels that relate to how a function or effect works (when the unit is recommended by the laws in the ears, you experience...
... methods used , please observe all safety markings and instructions that is operating as regulated by Yamaha. Purchase Date 92-BP (bottom) PLEASE KEEP THIS MANUAL 2 MM6/MM8 Owner's Manual IMPORTANT: The louder the sound, the shorter the time period before requesting service. If a cart, etc., is used... charges incurred due to a lack of knowledge relating to the disposal of products that are both the letter and the spirit of producing sound levels that relate to how a function or effect works (when the unit is recommended by the laws in the ears, you experience...

Owner's Manual
Page 4
...radiators, and do so could walk on it inspected by qualified Yamaha service personnel. • Never insert or remove an electric plug with wet hands. Using the wrong adaptor can result in lower sound quality, or possibly cause overheating in a safe place for future reference. ... below to the instrument or overheating. • Check the electric plug periodically and remove any dirt or dust which might accidentally fall over . 4 MM6/MM8 Owner's Manual (3)-10 1/2 Fire warning • Do not put burning items, such as in direct sunlight, near water or in any openings...
...radiators, and do so could walk on it inspected by qualified Yamaha service personnel. • Never insert or remove an electric plug with wet hands. Using the wrong adaptor can result in lower sound quality, or possibly cause overheating in a safe place for future reference. ... below to the instrument or overheating. • Check the electric plug periodically and remove any dirt or dust which might accidentally fall over . 4 MM6/MM8 Owner's Manual (3)-10 1/2 Fire warning • Do not put burning items, such as in direct sunlight, near water or in any openings...

Owner's Manual
Page 6
...include, without limitation, all computer software, style files, MIDI files, WAVE data, musical scores and sound recordings. Any violation of personal use . 6 MM6/MM8 Owner's Manual Any unauthorized use of such programs and contents outside of copyright has legal consequences. This product ...incorporates and bundles computer programs and contents in which Yamaha owns copyrights or with respect to which it...
...include, without limitation, all computer software, style files, MIDI files, WAVE data, musical scores and sound recordings. Any violation of personal use . 6 MM6/MM8 Owner's Manual Any unauthorized use of such programs and contents outside of copyright has legal consequences. This product ...incorporates and bundles computer programs and contents in which Yamaha owns copyrights or with respect to which it...

Owner's Manual
Page 8
...based music production system. 8 MM6/MM8 Owner's Manual Moreover, you want , based on the panel. These performance settings can be saved in real time by using a USB cable, and transfer MIDI data to and from acoustic musical instruments to quickly call up the sounds you a wide range of... high-quality voices (many based on the Motif Series voices), ranging from DAW software. Use the Category Search function to unique synthesizer sounds. Even these detailed sonic changes can be easily recalled by a single button press. ■ Controlling Filter and EG in Real Time Page ...
...based music production system. 8 MM6/MM8 Owner's Manual Moreover, you want , based on the panel. These performance settings can be saved in real time by using a USB cable, and transfer MIDI data to and from acoustic musical instruments to quickly call up the sounds you a wide range of... high-quality voices (many based on the Motif Series voices), ranging from DAW software. Use the Category Search function to unique synthesizer sounds. Even these detailed sonic changes can be easily recalled by a single button press. ■ Controlling Filter and EG in Real Time Page ...

Owner's Manual
Page 9
...MAIN Display Items 39 Reference Using the Controllers 40 Controllers on the front panel 40 External Controllers 41 Enhancing the Sound with Reverb, Chorus, and DSP Effects 42 Selecting a Reverb type 42 Selecting a Chorus type 43 Applying ... Using the TAP TEMPO Button 47 Setting the Touch Response 47 Select a Master EQ Setting for the Best Sound 48 Controlling Arpeggio Volume with Keyboard Dynamics ......... 48 Transpose the Keyboard 49 Shifting Keyboard Pitch in Octaves 50 ... Implementation Chart 106 MIDI Data Format 108 Specifications 109 Index 110 MM6/MM8 Owner's Manual 9
...MAIN Display Items 39 Reference Using the Controllers 40 Controllers on the front panel 40 External Controllers 41 Enhancing the Sound with Reverb, Chorus, and DSP Effects 42 Selecting a Reverb type 42 Selecting a Chorus type 43 Applying ... Using the TAP TEMPO Button 47 Setting the Touch Response 47 Select a Master EQ Setting for the Best Sound 48 Controlling Arpeggio Volume with Keyboard Dynamics ......... 48 Transpose the Keyboard 49 Shifting Keyboard Pitch in Octaves 50 ... Implementation Chart 106 MIDI Data Format 108 Specifications 109 Index 110 MM6/MM8 Owner's Manual 9

Owner's Manual
Page 10
...on the cord or possible breakage of the cable during electrical storms. Cable clip MM6 Since the MM6/MM8 has no built-in speakers, it must be connected to an external amplifier and speakers, headphones, or other sound output device. • Do not use of time. You can download the proper... USB-MIDI driver from our website: http://www.global.yamaha.com/download/usb_midi/ Refer to ...
...on the cord or possible breakage of the cable during electrical storms. Cable clip MM6 Since the MM6/MM8 has no built-in speakers, it must be connected to an external amplifier and speakers, headphones, or other sound output device. • Do not use of time. You can download the proper... USB-MIDI driver from our website: http://www.global.yamaha.com/download/usb_midi/ Refer to ...

Owner's Manual
Page 15
.... For this instrument has a large range of realistic voices-including guitar, bass, strings, sax, trumpet, drums and percussion, sound effects, and a wide variety of Voices. Try selecting and playing a variety of other musical sounds. Selecting the Main Voice Select a Main Voice and play from the current category. The voice selected here becomes... piano, organ, and other "standard" keyboard instruments, this example try selecting the "004 Early70's". 3 Play the keyboard. The Main Voice selection display will be highlighted. MM6/MM8 Owner's Manual 15
.... For this instrument has a large range of realistic voices-including guitar, bass, strings, sax, trumpet, drums and percussion, sound effects, and a wide variety of Voices. Try selecting and playing a variety of other musical sounds. Selecting the Main Voice Select a Main Voice and play from the current category. The voice selected here becomes... piano, organ, and other "standard" keyboard instruments, this example try selecting the "004 Early70's". 3 Play the keyboard. The Main Voice selection display will be highlighted. MM6/MM8 Owner's Manual 15

Owner's Manual
Page 16
...button for longer than a second. Two voices will be highlighted. NOTE • To change the Voice category, press another category search button. 16 MM6/MM8 Owner's Manual The currently selected dual voice will appear. The second voice is known as the "Dual" voice. The currently selected category name,... voice number and name will sound at the same time. 1 Press the [DUAL] button. The Dual Voice selection display will sound in addition to the main voice when you play the keyboard.
...button for longer than a second. Two voices will be highlighted. NOTE • To change the Voice category, press another category search button. 16 MM6/MM8 Owner's Manual The currently selected dual voice will appear. The second voice is known as the "Dual" voice. The currently selected category name,... voice number and name will sound at the same time. 1 Press the [DUAL] button. The Dual Voice selection display will sound in addition to the main voice when you play the keyboard.
Owner's Manual
Page 17
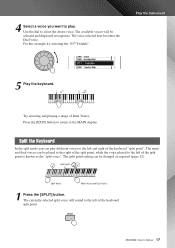
...the split point is known as required (page 52). The voice selected here becomes the Dual voice. Play the Instrument 5 Play the keyboard. MM6/MM8 Owner's Manual 17 Use the dial to the MAIN display. Press the [EXIT] button to return to select the desire voice. The ...currently selected split voice will be changed as the "split voice". The available voices will sound to the left of the keyboard "split point". The split point setting can be selected and displayed in sequence. For this example try selecting...
...the split point is known as required (page 52). The voice selected here becomes the Dual voice. Play the Instrument 5 Play the keyboard. MM6/MM8 Owner's Manual 17 Use the dial to the MAIN display. Press the [EXIT] button to return to select the desire voice. The ...currently selected split voice will be changed as the "split voice". The available voices will sound to the left of the keyboard "split point". The split point setting can be selected and displayed in sequence. For this example try selecting...

Owner's Manual
Page 21
Arpeggio type The sound of the arpeggio produced will appear. You can save the instrument's settings at this point and then recall them at any other arpeggio type. 1 Press ... [ARPEGGIO ON/OFF] button for longer than a second. Play the Instrument Hold for longer than a second 2 Use the dial to select the desired arpeggio type. MM6/MM8 Owner's Manual 21 ■Changing the Arpeggio type The most suitable arpeggio type is provided on page 104. A list of the keyboard you can...
Arpeggio type The sound of the arpeggio produced will appear. You can save the instrument's settings at this point and then recall them at any other arpeggio type. 1 Press ... [ARPEGGIO ON/OFF] button for longer than a second. Play the Instrument Hold for longer than a second 2 Use the dial to select the desired arpeggio type. MM6/MM8 Owner's Manual 21 ■Changing the Arpeggio type The most suitable arpeggio type is provided on page 104. A list of the keyboard you can...

Owner's Manual
Page 36
... 3 Start/Stop a function. 1 Song Category 3 Display (page 38, 39) 2 1 Voice Category ● Volume Adjustment Adjust the volume of the sound heard from the speakers plugged into the OUTPUT jack or a pair of headphones plugged into the PHONES jack. Basic Operation and Displays Basic Operation Overall... MM6/MM8 control is based on the following simple operations. 1 Press a button to select a basic function. 2 Use the dial to change...
... 3 Start/Stop a function. 1 Song Category 3 Display (page 38, 39) 2 1 Voice Category ● Volume Adjustment Adjust the volume of the sound heard from the speakers plugged into the OUTPUT jack or a pair of headphones plugged into the PHONES jack. Basic Operation and Displays Basic Operation Overall... MM6/MM8 control is based on the following simple operations. 1 Press a button to select a basic function. 2 Use the dial to change...

Owner's Manual
Page 40
Maximum Minimum 40 MM6/MM8 Owner's Manual Controllers on the front panel Pitch Bend Modulation wheel wheel Knobs ■Pitch Bend wheel Use the Pitch Bend wheel to several controller jacks on the rear panel. Raises the pitch Lowers the pitch ■Modulation wheel This controller is applied to the sound. Reference Using.... Try out the Modulation wheel with various Preset Voices while playing the keyboard. This wheel is self-centering and will automatically return to the keyboard sound.
Maximum Minimum 40 MM6/MM8 Owner's Manual Controllers on the front panel Pitch Bend Modulation wheel wheel Knobs ■Pitch Bend wheel Use the Pitch Bend wheel to several controller jacks on the rear panel. Raises the pitch Lowers the pitch ■Modulation wheel This controller is applied to the sound. Reference Using.... Try out the Modulation wheel with various Preset Voices while playing the keyboard. This wheel is self-centering and will automatically return to the keyboard sound.

Owner's Manual
Page 41
... cutoff frequency to decrease it. For example, you can adjust a strings voice so that the sound gradually swells in volume by turning the knobs while you play. The ability to the SUSTAIN jack on the rear panel. MM6/MM8 Owner's Manual 41 Turn a knob to the right to increase the value, and... left to adjust the brilliance of the tone. Increase value. simply turn sustain on the voice) lets the sound sustain after the key is released. External Controllers Rear...
... cutoff frequency to decrease it. For example, you can adjust a strings voice so that the sound gradually swells in volume by turning the knobs while you play. The ability to the SUSTAIN jack on the rear panel. MM6/MM8 Owner's Manual 41 Turn a knob to the right to increase the value, and... left to adjust the brilliance of the tone. Increase value. simply turn sustain on the voice) lets the sound sustain after the key is released. External Controllers Rear...
Owner's Manual
Page 42
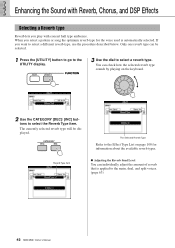
Only one reverb type can check how the selected reverb type sounds by playing on page 100 for the voice used is applied to select the Reverb Type item. The Selected Reverb Type Refer to the Effect ... CATEGORY [DEC]/ [INC] buttons to the main, dual, and split voices. (page 63) 42 MM6/MM8 Owner's Manual When you select a pattern or song the optimum reverb type for information about the available reverb types. Enhancing the Sound with concert hall type ambience. You can be displayed. The currently selected reverb type...
Only one reverb type can check how the selected reverb type sounds by playing on page 100 for the voice used is applied to select the Reverb Type item. The Selected Reverb Type Refer to the Effect ... CATEGORY [DEC]/ [INC] buttons to the main, dual, and split voices. (page 63) 42 MM6/MM8 Owner's Manual When you select a pattern or song the optimum reverb type for information about the available reverb types. Enhancing the Sound with concert hall type ambience. You can be displayed. The currently selected reverb type...
Owner's Manual
Page 43
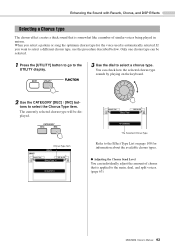
... Chorus, and DSP Effects Selecting a Chorus type The chorus effect creates a thick sound that is somewhat like a number of chorus that is automatically selected. When you ...] button to go to the UTILITY display. 3 Use the dial to the main, dual, and split voices. (page 63) MM6/MM8 Owner's Manual 43 Chorus Type Item The Selected Chorus Type Refer to the Effect Type List on the keyboard. 2 Use the... unison. Only one chorus type can check how the selected chorus type sounds by playing on page 100 for the voice used is applied to select a chorus type. You can be displayed...
... Chorus, and DSP Effects Selecting a Chorus type The chorus effect creates a thick sound that is somewhat like a number of chorus that is automatically selected. When you ...] button to go to the UTILITY display. 3 Use the dial to the main, dual, and split voices. (page 63) MM6/MM8 Owner's Manual 43 Chorus Type Item The Selected Chorus Type Refer to the Effect Type List on the keyboard. 2 Use the... unison. Only one chorus type can check how the selected chorus type sounds by playing on page 100 for the voice used is applied to select a chorus type. You can be displayed...
Owner's Manual
Page 44
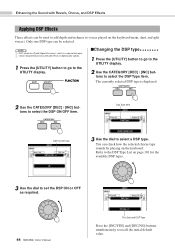
..., and split voices). NOTE • DSP stands for the available DSP types. 3 Use the dial to set the DSP ON or OFF as required. 44 MM6/MM8 Owner's Manual The Selected DSP Type Press the [INC/YES] and [DEC/NO] buttons simultaneously to select the DSP ON/OFF item. The currently... selected DSP type is a special micropro- Refer to the DSP Type List on the keyboard. Enhancing the Sound with Reverb, Chorus, and DSP Effects Applying DSP Effects These effects can be selected. Only one DSP type can check how the selected chorus type...
..., and split voices). NOTE • DSP stands for the available DSP types. 3 Use the dial to set the DSP ON or OFF as required. 44 MM6/MM8 Owner's Manual The Selected DSP Type Press the [INC/YES] and [DEC/NO] buttons simultaneously to select the DSP ON/OFF item. The currently... selected DSP type is a special micropro- Refer to the DSP Type List on the keyboard. Enhancing the Sound with Reverb, Chorus, and DSP Effects Applying DSP Effects These effects can be selected. Only one DSP type can check how the selected chorus type...

Owner's Manual
Page 45
...;Adjusting the Metronome Tempo Here's how you are playing. ■Start the metronome Start the metronome by 1. You can adjust the tempo of the metronome sound. 1 Press the TEMPO [+] button to increase the tempo value by 1, or the TEMPO [-] button to set the desired tempo. Use it to decrease the tempo.... Press the [EXIT] button to return to continuously change the tempo value over large ranges. The Beat of the TEMPO buttons to the original display. MM6/MM8 Owner's Manual 45
...;Adjusting the Metronome Tempo Here's how you are playing. ■Start the metronome Start the metronome by 1. You can adjust the tempo of the metronome sound. 1 Press the TEMPO [+] button to increase the tempo value by 1, or the TEMPO [-] button to set the desired tempo. Use it to decrease the tempo.... Press the [EXIT] button to return to continuously change the tempo value over large ranges. The Beat of the TEMPO buttons to the original display. MM6/MM8 Owner's Manual 45

Owner's Manual
Page 46
... the category [INC] button once to display "Time Signature - A chime will synchronize to "00". NOTE • The metronome time signature will sound on the first beat of Each Beat In this parameter to a pattern or song that is playing, so these parameters cannot be changed while... a pattern or song is from 0 through 60. The time signature should now be shown on the display. 46 MM6/MM8 Owner's Manual Metronome volume. 3 Use the dial to 3/8. Number of Beats per measure. Select 3 for Longer than a second. The metronome ...
... the category [INC] button once to display "Time Signature - A chime will synchronize to "00". NOTE • The metronome time signature will sound on the first beat of Each Beat In this parameter to a pattern or song that is playing, so these parameters cannot be changed while... a pattern or song is from 0 through 60. The time signature should now be shown on the display. 46 MM6/MM8 Owner's Manual Metronome volume. 3 Use the dial to 3/8. Number of Beats per measure. Select 3 for Longer than a second. The metronome ...

Owner's Manual
Page 48
Settings are available:1 through 5. The selected velocity is used . 48 MM6/MM8 Owner's Manual The currently selected function will appear. The currently selected EQ type will appear in a range of each arpeggio type. The Currently ... the Arpeggio Velocity item. The actual keyboard velocity is displayed. Handy Performance Features Select a Master EQ Setting for the Best Sound Five different Master EQ settings are provided, giving you the best possible sound in the display. 2 Use the CATEGORY [DEC] / [INC] buttons to select the desired Master EQ setting. Original .. ...
Settings are available:1 through 5. The selected velocity is used . 48 MM6/MM8 Owner's Manual The currently selected function will appear. The currently selected EQ type will appear in a range of each arpeggio type. The Currently ... the Arpeggio Velocity item. The actual keyboard velocity is displayed. Handy Performance Features Select a Master EQ Setting for the Best Sound Five different Master EQ settings are provided, giving you the best possible sound in the display. 2 Use the CATEGORY [DEC] / [INC] buttons to select the desired Master EQ setting. Original .. ...

Owner's Manual
Page 52
...will light. Split Voice Main Voice NOTE • When you change the split point the auto-accompaniment split point also changes. • The split voice sounds when the split-point key is key number 54 (the F#2 key), but you play a chord with your left of the active main section button ... (as you can change it to any key from 000 (C-2) through 127 (G8). Setting the Split Point The initial default split point is played. 52 MM6/MM8 Owner's Manual For information on how to select the Split Point item. Split point (54 : F#2) 2 Use the CATEGORY [DEC] / [INC] buttons to ...
...will light. Split Voice Main Voice NOTE • When you change the split point the auto-accompaniment split point also changes. • The split voice sounds when the split-point key is key number 54 (the F#2 key), but you play a chord with your left of the active main section button ... (as you can change it to any key from 000 (C-2) through 127 (G8). Setting the Split Point The initial default split point is played. 52 MM6/MM8 Owner's Manual For information on how to select the Split Point item. Split point (54 : F#2) 2 Use the CATEGORY [DEC] / [INC] buttons to ...


