
MLC-200 Base - Quick Set Up Guide
Page 2
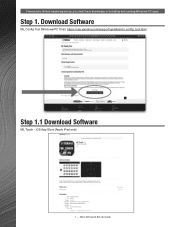
MLC-200 Quick Set Up Guide Download Software ML Config Tool (Windows/PC Only): https://usa.yamaha.com/support/updates/ml_config_tool.html Step 1.1 Download Software ML Touch - iOS App Store (Apple iPad only) 1 - Step 1. Prerequisite: Before beginning set up, you must have knowledge of installing and running Windows PC apps.
MLC-200 Quick Set Up Guide Download Software ML Config Tool (Windows/PC Only): https://usa.yamaha.com/support/updates/ml_config_tool.html Step 1.1 Download Software ML Touch - iOS App Store (Apple iPad only) 1 - Step 1. Prerequisite: Before beginning set up, you must have knowledge of installing and running Windows PC apps.
MLC-200 Base - Quick Set Up Guide
Page 4
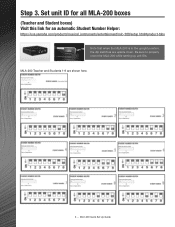
MLC-200 Quick Set Up Guide Step 3. Set unit ID for all MLA-200 boxes (Teacher and Student boxes) Visit this link for an automatic Student Number Helper: https://usa.yamaha.com/products/musical_instruments/entertainment/mlc-200/setup.html#product-tabs Note that when the MLA-200 is in the upright position, the dip switches are shown here. 3 - MLA-200 Teacher and Students 1-9 are upside down. Be sure to properly orient the MLA-200 while setting up unit IDs.
MLC-200 Quick Set Up Guide Step 3. Set unit ID for all MLA-200 boxes (Teacher and Student boxes) Visit this link for an automatic Student Number Helper: https://usa.yamaha.com/products/musical_instruments/entertainment/mlc-200/setup.html#product-tabs Note that when the MLA-200 is in the upright position, the dip switches are shown here. 3 - MLA-200 Teacher and Students 1-9 are upside down. Be sure to properly orient the MLA-200 while setting up unit IDs.
MLC-200 Base - Quick Set Up Guide
Page 5
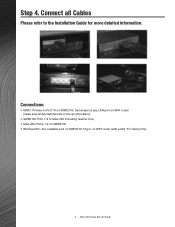
Connect all dip switches are in the up/off position) • SWR2100: Port 1-9 to the Installation Guide for more detailed information. Step 4. Connections: • MRX7: Primary to Port 10 on SWR2100, Secondary to any LAN port on WIFI router (make sure all Cables Please refer to MLA-200 (including teacher box) • MLA-200: Ports 1-9 on SWR2100 • Windows/PC: Any available port on SWR2100-10g or on WIFI router (LAN ports) *For Setup Only 4 - MLC-200 Quick Set Up Guide
Connect all dip switches are in the up/off position) • SWR2100: Port 1-9 to the Installation Guide for more detailed information. Step 4. Connections: • MRX7: Primary to Port 10 on SWR2100, Secondary to any LAN port on WIFI router (make sure all Cables Please refer to MLA-200 (including teacher box) • MLA-200: Ports 1-9 on SWR2100 • Windows/PC: Any available port on SWR2100-10g or on WIFI router (LAN ports) *For Setup Only 4 - MLC-200 Quick Set Up Guide
MLC-200 Base - Quick Set Up Guide
Page 6
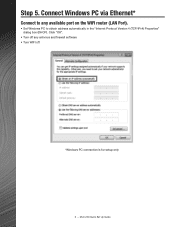
MLC-200 Quick Set Up Guide Connect Windows PC via Ethernet* Connect to any antivirus and firewall software • Turn WIFI off any available port on the WIFI router (LAN Port). • Set Windows PC to obtain address automatically in the "Internet Protocol Version 4 (TCP/IPv4) Properties" dialog box (DHCP). Click "OK". • Turn off *Windows PC connection is for setup only 5 - Step 5.
MLC-200 Quick Set Up Guide Connect Windows PC via Ethernet* Connect to any antivirus and firewall software • Turn WIFI off any available port on the WIFI router (LAN Port). • Set Windows PC to obtain address automatically in the "Internet Protocol Version 4 (TCP/IPv4) Properties" dialog box (DHCP). Click "OK". • Turn off *Windows PC connection is for setup only 5 - Step 5.
MLC-200 Base - Quick Set Up Guide
Page 7
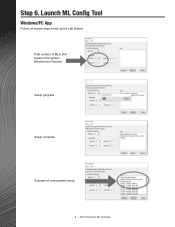
MLC-200 Quick Set Up Guide Launch ML Config Tool Windows/PC App Follow on-screen steps to set up the Lab System Total number of MLA-200 boxes in the system (Student and Teacher) Setup progress Setup complete Example of unsuccessful setup 6 - Step 6.
MLC-200 Quick Set Up Guide Launch ML Config Tool Windows/PC App Follow on-screen steps to set up the Lab System Total number of MLA-200 boxes in the system (Student and Teacher) Setup progress Setup complete Example of unsuccessful setup 6 - Step 6.
MLC-200 Base - Quick Set Up Guide
Page 9
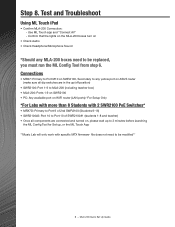
...the lights on the MLA-200 boxes turn on • Check Audio • Check Headphone/Microphone Sound *Should any yellow port on ASUS router (make sure all dip switches are in the up , or the ML Touch App **Music Lab will only work with 2 SWR2100 PoE Switches*...all components are connected and turned on SWR2100, Secondary to any MLA-200 boxes need to be replaced, you must run the ML Config Tool from step 6. Use ML Touch app and "Connect All" - Test and Troubleshoot Using ML Touch iPad • Confirm MLA-200 Connection: - MLC-200 Quick Set Up Guide Connections • MRX7...
...the lights on the MLA-200 boxes turn on • Check Audio • Check Headphone/Microphone Sound *Should any yellow port on ASUS router (make sure all dip switches are in the up , or the ML Touch App **Music Lab will only work with 2 SWR2100 PoE Switches*...all components are connected and turned on SWR2100, Secondary to any MLA-200 boxes need to be replaced, you must run the ML Config Tool from step 6. Use ML Touch app and "Connect All" - Test and Troubleshoot Using ML Touch iPad • Confirm MLA-200 Connection: - MLC-200 Quick Set Up Guide Connections • MRX7...
MLC-200 Installation Guide
Page 2
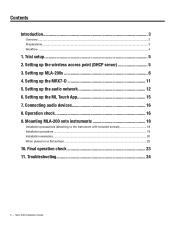
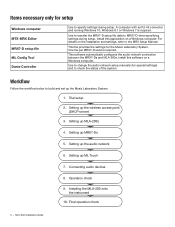
... MRX7-D 11 5. MLC-200 Installation Guide Setting up the audio network 12 6. Operation check 16 9. Mounting MLA-200 onto instruments 18 Installation precautions (attaching to the instrument with included screws 18 Installation procedure...18 Installation examples...20 When placed on a flat surface...22 10. Trial setup 5 2. Setting up MLA-200s 6 4. Connecting audio devices 16 8. Setting up the wireless access point (DHCP server 5 3. Setting up the ML Touch App...
... MRX7-D 11 5. MLC-200 Installation Guide Setting up the audio network 12 6. Operation check 16 9. Mounting MLA-200 onto instruments 18 Installation precautions (attaching to the instrument with included screws 18 Installation procedure...18 Installation examples...20 When placed on a flat surface...22 10. Trial setup 5 2. Setting up MLA-200s 6 4. Connecting audio devices 16 8. Setting up the wireless access point (DHCP server 5 3. Setting up the ML Touch App...
MLC-200 Installation Guide
Page 3
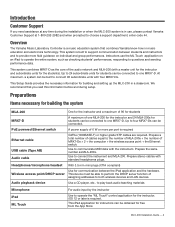
... MLA-200s + the number of one MRX7-D. Instructors use , please contact Yamaha Customer Support at any time during setup. Up to 24 subordinate units for students can be connected to operate the entire system, such as MLA-200s. Use to provide more per port is in a classroom. Audio playback device Use a CD player, etc., to play back audio teaching materials Microphone iPad ML Touch For audio input...
... MLA-200s + the number of one MRX7-D. Instructors use , please contact Yamaha Customer Support at any time during setup. Up to 24 subordinate units for students can be connected to operate the entire system, such as MLA-200s. Use to provide more per port is in a classroom. Audio playback device Use a CD player, etc., to play back audio teaching materials Microphone iPad ML Touch For audio input...
MLC-200 Installation Guide
Page 4
... Config Tool Dante Controller Use to the MRX Setup Manual. This software automatically configures the audio network connection between the MRX7-Ds and MLA-200s. Final operation check 4 - MLC-200 Installation Guide For details on the installation and settings, refer to specify settings during setup. Trial setup 2. Installing the MLA-200 onto the instrument 10. Install this application on a Windows computer. This file provides the settings for special settings) and to check...
... Config Tool Dante Controller Use to the MRX Setup Manual. This software automatically configures the audio network connection between the MRX7-Ds and MLA-200s. Final operation check 4 - MLC-200 Installation Guide For details on the installation and settings, refer to specify settings during setup. Trial setup 2. Installing the MLA-200 onto the instrument 10. Install this application on a Windows computer. This file provides the settings for special settings) and to check...
MLC-200 Installation Guide
Page 5
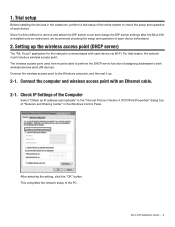
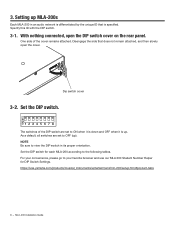
...an Ethernet cable. 2-1. MLC-200 Installation Guide - 5 For that reason, the network must be difficult to perform the DHCP server function of each device. This completes the network setup of each device via Wi-Fi. After selecting the setting, click the "OK" button. Connect the computer ...attach the DIP switch cover and change the DIP switch settings after the MLA-200 is installed onto an instrument, we recommend checking the setup and operation of the PC. Setting up . 2-1. 1. The wireless access point used here must include a wireless access point. Connect the wireless ...
...an Ethernet cable. 2-1. MLC-200 Installation Guide - 5 For that reason, the network must be difficult to perform the DHCP server function of each device. This completes the network setup of each device via Wi-Fi. After selecting the setting, click the "OK" button. Connect the computer ...attach the DIP switch cover and change the DIP switch settings after the MLA-200 is installed onto an instrument, we recommend checking the setup and operation of the PC. Setting up . 2-1. 1. The wireless access point used here must include a wireless access point. Connect the wireless ...
MLC-200 Installation Guide
Page 6
... switch cover on the rear panel. Dip switch cover 3-2. NOTE Be sure to OFF (up . https://usa.yamaha.com/products/musical_instruments/entertainment/mlc-200/setup.html#product-tabs 6 - Specify this ID with the DIP switch. 3-1. The switches of the cover remains attached. MLC-200 Installation Guide Set the DIP switch for each MLA-200... Set the DIP switch. One side of the DIP switch are set to ON when it is down and OFF when it is specified. With nothing connected, open the cover. For your favorite browser and use our MLA 200 Student Number Helper for DIP Switch Settings....
... switch cover on the rear panel. Dip switch cover 3-2. NOTE Be sure to OFF (up . https://usa.yamaha.com/products/musical_instruments/entertainment/mlc-200/setup.html#product-tabs 6 - Specify this ID with the DIP switch. 3-1. The switches of the cover remains attached. MLC-200 Installation Guide Set the DIP switch for each MLA-200... Set the DIP switch. One side of the DIP switch are set to ON when it is down and OFF when it is specified. With nothing connected, open the cover. For your favorite browser and use our MLA 200 Student Number Helper for DIP Switch Settings....
MLC-200 Installation Guide
Page 11
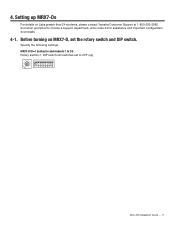
Specify the following settings. Before turning on Labs greater than 24 students, please contact Yamaha Customer Support at 1-800-292-2982 and when prompted to OFF (up MRX7-Ds For details on MRX7-D, set to choose a support department, enter code 44 for assistance and important configuration downloads. 4-1. Setting up ) MLC-200 Installation Guide - 11 MRX7-D ID=1 (instructor and students 1 to 24) Rotary switch=1, DIP switch=All switches set the rotary switch and DIP switch. 4.
Specify the following settings. Before turning on Labs greater than 24 students, please contact Yamaha Customer Support at 1-800-292-2982 and when prompted to OFF (up MRX7-Ds For details on MRX7-D, set to choose a support department, enter code 44 for assistance and important configuration downloads. 4-1. Setting up ) MLC-200 Installation Guide - 11 MRX7-D ID=1 (instructor and students 1 to 24) Rotary switch=1, DIP switch=All switches set the rotary switch and DIP switch. 4.
MLC-200 Installation Guide
Page 12
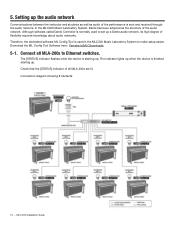
.... MLC-200 Installation Guide 5. The [STATUS] indicator flashes while the device is sent and received through the audio network. Connection diagram showing 8 students. Kramer to set up . Although software called Dante Controller is normally used in the MLC200 Music Laboratory System to Ethernet switches. Setting up the audio network Communications between the instructor and students as well as the structure of all MLA-200s to make setup...
.... MLC-200 Installation Guide 5. The [STATUS] indicator flashes while the device is sent and received through the audio network. Connection diagram showing 8 students. Kramer to set up . Although software called Dante Controller is normally used in the MLC200 Music Laboratory System to Ethernet switches. Setting up the audio network Communications between the instructor and students as well as the structure of all MLA-200s to make setup...

MLC-200 Installation Guide
Page 13
5. Setting up MLA-200s" (Page 6). The changes to complete the procedure in "3. continued Connection diagram showing 16 students. NOTE • Before making connections, be sure to the DIP switch settings are applied when the Ethernet cable is connected and the MLA-200 is turned on. Before changing the settings, unplug the Ethernet cable from the MLA-200. Setting up the audio network - MLC-200 Installation Guide - 13
5. Setting up MLA-200s" (Page 6). The changes to complete the procedure in "3. continued Connection diagram showing 16 students. NOTE • Before making connections, be sure to the DIP switch settings are applied when the Ethernet cable is connected and the MLA-200 is turned on. Before changing the settings, unplug the Ethernet cable from the MLA-200. Setting up the audio network - MLC-200 Installation Guide - 13
MLC-200 Installation Guide
Page 14
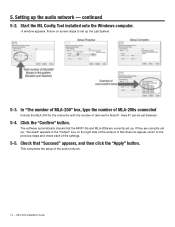
... and MLA-200s are correctly set between 5-4. This completes the setup of devices for Area #1. A window appears. Click the "Confirm" button. If they are correctly set up , "Succeed" appears in the "Output" box on screen steps to the previous steps and check each of the window. MLC-200 Installation Guide If this does not appear, return to set up the audio network - Setting up...
... and MLA-200s are correctly set between 5-4. This completes the setup of devices for Area #1. A window appears. Click the "Confirm" button. If they are correctly set up , "Succeed" appears in the "Output" box on screen steps to the previous steps and check each of the window. MLC-200 Installation Guide If this does not appear, return to set up the audio network - Setting up...
MLC-200 Installation Guide
Page 15
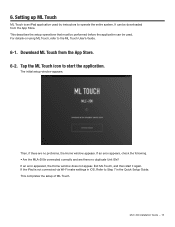
... are there no problems, the Home window appears. If an error appears, check the following. • Are the MLA-200s connected correctly and are no duplicate Unit IDs? If the iPad is an iPad application used . MLC-200 Installation Guide - 15 Setting up ML Touch ML Touch is not connected via Wi-Fi make settings in the Quick Setup Guide. For details on using ML Touch, refer...
... are there no problems, the Home window appears. If an error appears, check the following. • Are the MLA-200s connected correctly and are no duplicate Unit IDs? If the iPad is an iPad application used . MLC-200 Installation Guide - 15 Setting up ML Touch ML Touch is not connected via Wi-Fi make settings in the Quick Setup Guide. For details on using ML Touch, refer...
MLC-200 Installation Guide
Page 16
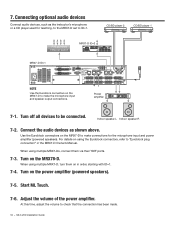
... teaching, to the MRX7-D set to make the microphone input and speaker output connections. Turn on the power amplifier (powered speakers). 7-5. Start ML Touch. 7-6. At this time, adjust the volume to be connected. Power amplifier 7-1. Connect the audio devices as the instructor's microphone or a CD player used for the microphone input and power amplifier (powered speakers). Turn on the MRX78-D. MLC-200 Installation Guide Use the Euroblock connectors on using the Euroblock connectors, refer to "Euroblock plug connection" in order, starting with ID=1. 7-4. When...
... teaching, to the MRX7-D set to make the microphone input and speaker output connections. Turn on the power amplifier (powered speakers). 7-5. Start ML Touch. 7-6. At this time, adjust the volume to be connected. Power amplifier 7-1. Connect the audio devices as the instructor's microphone or a CD player used for the microphone input and power amplifier (powered speakers). Turn on the MRX78-D. MLC-200 Installation Guide Use the Euroblock connectors on using the Euroblock connectors, refer to "Euroblock plug connection" in order, starting with ID=1. 7-4. When...
MLC-200 Installation Guide
Page 17
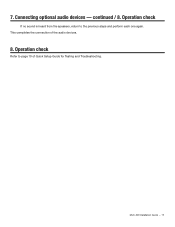
Operation check If no sound is heard from the speakers, return to page 10 of the audio devices. 8. MLC-200 Installation Guide - 17 7. Operation check Refer to the previous steps and perform each one again. Connecting optional audio devices - This completes the connection of Quick Setup Guide for Testing and Troubleshooting. continued / 8.
Operation check If no sound is heard from the speakers, return to page 10 of the audio devices. 8. MLC-200 Installation Guide - 17 7. Operation check Refer to the previous steps and perform each one again. Connecting optional audio devices - This completes the connection of Quick Setup Guide for Testing and Troubleshooting. continued / 8.

MLC-200 Installation Guide
Page 18
... included rubber feet Installation precautions (attaching to use the included screws for installing the product. MLC-200 Installation Guide Attach the mounting bracket to the MLA-200s, and then install the MLA-200 onto the instrument. Mounting bracket Mounting bracket 18 - Use the included mounting screws for the installation • In order to prevent wood parts of the instrument from cracking, install the screws at...
... included rubber feet Installation precautions (attaching to use the included screws for installing the product. MLC-200 Installation Guide Attach the mounting bracket to the MLA-200s, and then install the MLA-200 onto the instrument. Mounting bracket Mounting bracket 18 - Use the included mounting screws for the installation • In order to prevent wood parts of the instrument from cracking, install the screws at...
MLC-200 Installation Guide
Page 24
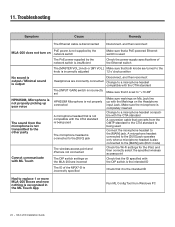
... A conversion cable that converts from the OMTP standard to the CTIA standard is being used The PoE power supplied by the network switch is insufficient Check the power supply specifications of the Ethernet switch The [MASTER VOL.] knob or [MY VOL.] Make sure that both knobs are turned to the knob is incorrectly adjusted 12 o'clock position No sound is output./ Minimal sound is output HPH250M...
... A conversion cable that converts from the OMTP standard to the CTIA standard is being used The PoE power supplied by the network switch is insufficient Check the power supply specifications of the Ethernet switch The [MASTER VOL.] knob or [MY VOL.] Make sure that both knobs are turned to the knob is incorrectly adjusted 12 o'clock position No sound is output./ Minimal sound is output HPH250M...