MCXSP10 Manual
Page 5
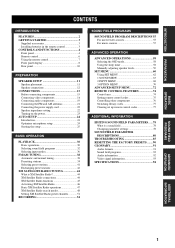
... Optimizer microphone setup 24 Starting the setup 25 BASIC OPERATION PLAYBACK 30 Basic operations 30 Selecting sound field programs 32 Selecting input modes 36 FM/AM TUNING 38 Automatic and manual tuning 38 Presetting stations 39 Selecting preset stations 41 Exchanging preset stations 42 XM SATELLITE RADIO TUNING 44 What is XM Satellite Radio...
... Optimizer microphone setup 24 Starting the setup 25 BASIC OPERATION PLAYBACK 30 Basic operations 30 Selecting sound field programs 32 Selecting input modes 36 FM/AM TUNING 38 Automatic and manual tuning 38 Presetting stations 39 Selecting preset stations 41 Exchanging preset stations 42 XM SATELLITE RADIO TUNING 44 What is XM Satellite Radio...

MCXSP10 Manual
Page 6
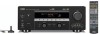
... printed prior to 20 kHz, 8 Ω) Front: 95 W + 95 W Center: 95 W Surround: 95 W + 95 W Surround back: 95 W + 95 W Sound field features ◆ Proprietary YAMAHA technology for the creation of sound fields ◆ Dolby Digital/Dolby Digital EX decoder ◆ DTS/DTS...; Preset station shifting capability (preset editing) XM Satellite Radio ◆ XM Satellite Radio programming (using the "XM Connect and Play digital antenna accessory", sold separately) Other features ◆ YPAO: YAMAHA Parametric Room Acoustic Optimizer for automatic speaker setup ◆ 192-kHz/24-bit D/A converter...
... printed prior to 20 kHz, 8 Ω) Front: 95 W + 95 W Center: 95 W Surround: 95 W + 95 W Surround back: 95 W + 95 W Sound field features ◆ Proprietary YAMAHA technology for the creation of sound fields ◆ Dolby Digital/Dolby Digital EX decoder ◆ DTS/DTS...; Preset station shifting capability (preset editing) XM Satellite Radio ◆ XM Satellite Radio programming (using the "XM Connect and Play digital antenna accessory", sold separately) Other features ◆ YPAO: YAMAHA Parametric Room Acoustic Optimizer for automatic speaker setup ◆ 192-kHz/24-bit D/A converter...
MCXSP10 Manual
Page 9
...45). F PROGRAM Use to select sound field programs or adjust the bass/treble balance (in the XM Satellite Radio mode (see pages 31). J MULTI CH INPUT Selects the source connected to the speakers... VIDEO AUX jacks Input audio and video signals from the supplied microphone for private listening with the AUTO SETUP function (see page 36). G TONE CONTROL Use to adjust the bass/treble balance for the type ... input jacks (see page 24). When STRAIGHT is connected to two or more of signals received when one component is selected, input signals (2-channel or multi-channel) are output to the...
...45). F PROGRAM Use to select sound field programs or adjust the bass/treble balance (in the XM Satellite Radio mode (see pages 31). J MULTI CH INPUT Selects the source connected to the speakers... VIDEO AUX jacks Input audio and video signals from the supplied microphone for private listening with the AUTO SETUP function (see page 36). G TONE CONTROL Use to adjust the bass/treble balance for the type ... input jacks (see page 24). When STRAIGHT is connected to two or more of signals received when one component is selected, input signals (2-channel or multi-channel) are output to the...

MCXSP10 Manual
Page 12
...the current volume level. D PCM indicator Lights up when this unit is receiving a strong signal for an FM stereo broadcast while the AUTO indicator is...select a CINEMA DSP sound field program. 7 YPAO indicator Lights up during the auto setup procedure and when the auto setup speaker settings are used without any of this unit's decoders function, the respective indicator lights...to the set of front speakers selected. Presence DSP sound field Left surround DSP sound field Listening position Right surround DSP sound field Surround back DSP sound field 6 CINEMA DSP indicator Lights up when you...
...the current volume level. D PCM indicator Lights up when this unit is receiving a strong signal for an FM stereo broadcast while the AUTO indicator is...select a CINEMA DSP sound field program. 7 YPAO indicator Lights up during the auto setup procedure and when the auto setup speaker settings are used without any of this unit's decoders function, the respective indicator lights...to the set of front speakers selected. Presence DSP sound field Left surround DSP sound field Listening position Right surround DSP sound field Surround back DSP sound field 6 CINEMA DSP indicator Lights up when you...

MCXSP10 Manual
Page 15
... SBR 30 cm (12 in order to the monitor as possible, such as the YAMAHA Active Servo Processing Subwoofer System, is not so critical, because low bass sounds are ... speakers. If for effect and surround sounds. You can do without it. Surround back speakers (SBR and SBL) The surround back speakers supplement the surround speakers and provide for the main... front speakers are used for more theater-like ambience. But it . 11 PREPARATION SPEAKER SETUP SPEAKER SETUP Speaker placement The speaker layout below shows the standard ITU-R* speaker setting. Center speaker ...
... SBR 30 cm (12 in order to the monitor as possible, such as the YAMAHA Active Servo Processing Subwoofer System, is not so critical, because low bass sounds are ... speakers. If for effect and surround sounds. You can do without it. Surround back speakers (SBR and SBL) The surround back speakers supplement the surround speakers and provide for the main... front speakers are used for more theater-like ambience. But it . 11 PREPARATION SPEAKER SETUP SPEAKER SETUP Speaker placement The speaker layout below shows the standard ITU-R* speaker setting. Center speaker ...
MCXSP10 Manual
Page 16
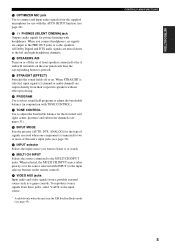
... with the monitor, place the speakers away from the monitor. Do not attempt to connect the left channel (L), right channel (R), "+" (red) and "-" (black) properly. SPEAKER SETUP Speaker connections Be sure to close the tabs after connecting the banana plugs. 12 If this unit. A speaker cord is off. • Do not let...
... with the monitor, place the speakers away from the monitor. Do not attempt to connect the left channel (L), right channel (R), "+" (red) and "-" (black) properly. SPEAKER SETUP Speaker connections Be sure to close the tabs after connecting the banana plugs. 12 If this unit. A speaker cord is off. • Do not let...

MCXSP10 Manual
Page 17
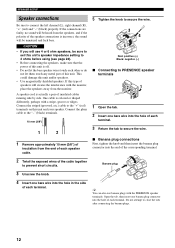
PREPARATION SPEAKER SETUP Subwoofer system Presence speakers Right Left Surround speakers Right Left 1 2 34 5 SYSTEM CONNECTOR PRESENCE SPEAKERS A SURROUND B FRONT CENTER SURROUND BACK 6 7 Front 8 speakers (B) Center speaker Right Left Front speakers (A) 9 10 Right Left Surround back speakers You can connect both surround back and...sound when other sound fields are selected. 13 They do not output sound simultaneously. • The surround back speakers output the surround back channel included in Dolby Digital EX and DTS-ES software and only operate when the Dolby ...
PREPARATION SPEAKER SETUP Subwoofer system Presence speakers Right Left Surround speakers Right Left 1 2 34 5 SYSTEM CONNECTOR PRESENCE SPEAKERS A SURROUND B FRONT CENTER SURROUND BACK 6 7 Front 8 speakers (B) Center speaker Right Left Front speakers (A) 9 10 Right Left Surround back speakers You can connect both surround back and...sound when other sound fields are selected. 13 They do not output sound simultaneously. • The surround back speakers output the surround back channel included in Dolby Digital EX and DTS-ES software and only operate when the Dolby ...

MCXSP10 Manual
Page 18
... CONNECTOR jack Use this jack to control the power of your YAMAHA subwoofer if a system connector jack is available on the subwoofer. 2 3 6 8 7 1 4 9 10 5 Speaker layout 14 If you only connect one surround back speaker, connect it to the FRONT A or B terminals.... ■ CENTER terminals Connect a center speaker (8) to these terminals. ■ SURROUND terminals Connect surround speakers (4, 5) to these terminals. ■ SURROUND BACK terminals Connect surround back speakers (9, 10) to these terminals. SPEAKER SETUP...
... CONNECTOR jack Use this jack to control the power of your YAMAHA subwoofer if a system connector jack is available on the subwoofer. 2 3 6 8 7 1 4 9 10 5 Speaker layout 14 If you only connect one surround back speaker, connect it to the FRONT A or B terminals.... ■ CENTER terminals Connect a center speaker (8) to these terminals. ■ SURROUND terminals Connect surround speakers (4, 5) to these terminals. ■ SURROUND BACK terminals Connect surround back speakers (9, 10) to these terminals. SPEAKER SETUP...
MCXSP10 Manual
Page 28
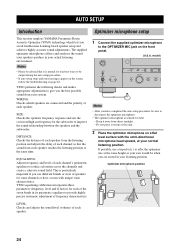
.... - model) STANDBY /ON PURE DIRECT OPTIMIZER MIC PHONES SPEAKERS A B SILENT CINEMA PRESET/TUNING SEARCH MODE EDIT FM/AM XM A/B/C/D/E CATEGORY NEXT PRESET/TUNING/CH LEVEL + STRAIGHT PROGRAM TONE CONTROL INPUT MODE EFFECT Notes • After you the best possible...your ears would be output during the auto setup procedure. • If auto setup stops and error messages appear on the screen, follow the troubleshooting on the front panel. (U.S.A. AUTO SETUP AUTO SETUP Introduction This receiver employs YAMAHA Parametric Room Acoustic Optimizer (YPAO) technology which...
.... - model) STANDBY /ON PURE DIRECT OPTIMIZER MIC PHONES SPEAKERS A B SILENT CINEMA PRESET/TUNING SEARCH MODE EDIT FM/AM XM A/B/C/D/E CATEGORY NEXT PRESET/TUNING/CH LEVEL + STRAIGHT PROGRAM TONE CONTROL INPUT MODE EFFECT Notes • After you the best possible...your ears would be output during the auto setup procedure. • If auto setup stops and error messages appear on the screen, follow the troubleshooting on the front panel. (U.S.A. AUTO SETUP AUTO SETUP Introduction This receiver employs YAMAHA Parametric Room Acoustic Optimizer (YPAO) technology which...

MCXSP10 Manual
Page 29
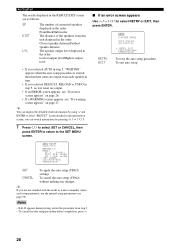
...much ambient noise, the results may not be satisfactory. y If your video monitor. To undo the last auto setup (YPAO) and restore the previous settings. p p SET MENU . ;AUTO SETUP ;MANUAL SETUP ;SIGNAL INFO. [ ]/[ ]:Up/Down [ENTER]:Enter p 2 AUTO:CHECK INITIALZING . LEVEL CHECK CH=CENTER [...10.0/ 12.0ft LVL : -9.0/ +6.5dB . >SET CANCEL [ ]/[ ]:Up/Down [ENTER]:Enter 25 If there is as quiet as follows. 1 AUTO:MENU SETUP;;;;;;;AUTO . AMP 3 Press SET MENU. ENTER A-E/CAT. WIRING . p p RESULT:EXIT . EQUALIZING . Make sure the OSD is set the crossover/high cut ...
...much ambient noise, the results may not be satisfactory. y If your video monitor. To undo the last auto setup (YPAO) and restore the previous settings. p p SET MENU . ;AUTO SETUP ;MANUAL SETUP ;SIGNAL INFO. [ ]/[ ]:Up/Down [ENTER]:Enter p 2 AUTO:CHECK INITIALZING . LEVEL CHECK CH=CENTER [...10.0/ 12.0ft LVL : -9.0/ +6.5dB . >SET CANCEL [ ]/[ ]:Up/Down [ENTER]:Enter 25 If there is as quiet as follows. 1 AUTO:MENU SETUP;;;;;;;AUTO . AMP 3 Press SET MENU. ENTER A-E/CAT. WIRING . p p RESULT:EXIT . EQUALIZING . Make sure the OSD is set the crossover/high cut ...
MCXSP10 Manual
Page 30
...SP : 5/4/0.1 DIST: 10.0/ 12.0ft LVL : -9.0/ +6.5dB . >SET CANCEL [ ]/[ ]:Up/Down [ENTER]:Enter SET CANCEL To apply the auto setup (YPAO) settings. To exit auto setup. 7 Press j / i to select SET or CANCEL, then press ENTER to return to select "RESULT". y If you selected DEFAULT, RELOAD or UNDO in...you are not satisfied with the result or want to select RETRY or EXIT, then press ENTER. Don't operate . E-9:USER CANCEL . . p p p p AUTO SETUP The results displayed in the RESULT:EXIT screen are as follows: SP DIST LVL The number of connected speakers displayed in the order: Front/Back...
...SP : 5/4/0.1 DIST: 10.0/ 12.0ft LVL : -9.0/ +6.5dB . >SET CANCEL [ ]/[ ]:Up/Down [ENTER]:Enter SET CANCEL To apply the auto setup (YPAO) settings. To exit auto setup. 7 Press j / i to select SET or CANCEL, then press ENTER to return to select "RESULT". y If you selected DEFAULT, RELOAD or UNDO in...you are not satisfied with the result or want to select RETRY or EXIT, then press ENTER. Don't operate . E-9:USER CANCEL . . p p p p AUTO SETUP The results displayed in the RESULT:EXIT screen are as follows: SP DIST LVL The number of connected speakers displayed in the order: Front/Back...
MCXSP10 Manual
Page 31
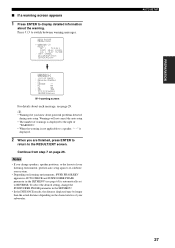
...you change the SUBWOOFER PHASE parameter in the SETMENU (see page 29. Press j / i to display detailed information about potential problems detected during auto setup. To select the desired setting, change speakers, speaker positions, or the layout of "WARNING". • When the warning is not applicable to ...finished, press ENTER to return to REVERSE. Warnings will not cancel the auto setup. • The number of warnings is displayed to the right of your listening environment, perform auto setup again to re-calibrate your subwoofer. SBL SBR []:Select [ENTER]:Return W-1 warning...
...you change the SUBWOOFER PHASE parameter in the SETMENU (see page 29. Press j / i to display detailed information about potential problems detected during auto setup. To select the desired setting, change speakers, speaker positions, or the layout of "WARNING". • When the warning is not applicable to ...finished, press ENTER to return to REVERSE. Warnings will not cancel the auto setup. • The number of warnings is displayed to the right of your listening environment, perform auto setup again to re-calibrate your subwoofer. SBL SBR []:Select [ENTER]:Return W-1 warning...

MCXSP10 Manual
Page 32
...:INTERNAL ERROR Cause Remedy Front L/R channel signal(s) is detected. • Check the surround speaker connections. Background noise is detected. • Connect the surround back speaker to • Perform the auto setup procedure again. tones. • Check the speaker connections and placement. Do not adjust...front panel. • Unplug the headphones. SP E-4:SBR->SBL E-5:NOISY E-6:CHECK SUR. Only right surround back channel signal is too loud. • Try the auto setup procedure in a quiet environment. • Turn off noisy electric equipment like air conditioners (etc.) or...
...:INTERNAL ERROR Cause Remedy Front L/R channel signal(s) is detected. • Check the surround speaker connections. Background noise is detected. • Connect the surround back speaker to • Perform the auto setup procedure again. tones. • Check the speaker connections and placement. Do not adjust...front panel. • Unplug the headphones. SP E-4:SBR->SBL E-5:NOISY E-6:CHECK SUR. Only right surround back channel signal is too loud. • Try the auto setup procedure in a quiet environment. • Turn off noisy electric equipment like air conditioners (etc.) or...

MCXSP10 Manual
Page 33
... check the cause of the problem, then perform the auto setup procedure again. • If warning W-1 appears, corrections are made . • If error E-10 occurs repeatedly, please contact a qualified YAMAHA service center. The difference of volume level among speakers is ...excessive. (No level correction is not correct. AUTO SETUP Warnings after auto setup Press j / i to the listening position. • Check the speaker connections for...
... check the cause of the problem, then perform the auto setup procedure again. • If warning W-1 appears, corrections are made . • If error E-10 occurs repeatedly, please contact a qualified YAMAHA service center. The difference of volume level among speakers is ...excessive. (No level correction is not correct. AUTO SETUP Warnings after auto setup Press j / i to the listening position. • Check the speaker connections for...

MCXSP10 Manual
Page 63
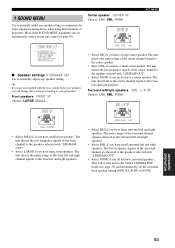
... FRONT R SUR.R SUR.B.R SUR.B.L SUR.L SWFR PRES.L PRES.R Front left speaker level Center speaker level Front right speaker level Surround right speaker level Surround back right speaker level Surround back left speaker level Surround left speaker level Subwoofer level Presence left speaker level Presence right speaker level y Once you press LEVEL, you have completed... to select the speaker you want to adjust the output level. ■ Canceling the sleep timer Press SLEEP repeatedly until "SLEEP OFF" appears in "AUTO SETUP" (page 24), "SPEAKER LEVEL" (page 65).
... FRONT R SUR.R SUR.B.R SUR.B.L SUR.L SWFR PRES.L PRES.R Front left speaker level Center speaker level Front right speaker level Surround right speaker level Surround back right speaker level Surround back left speaker level Surround left speaker level Subwoofer level Presence left speaker level Presence right speaker level y Once you press LEVEL, you have completed... to select the speaker you want to adjust the output level. ■ Canceling the sleep timer Press SLEEP repeatedly until "SLEEP OFF" appears in "AUTO SETUP" (page 24), "SPEAKER LEVEL" (page 65).

MCXSP10 Manual
Page 64
... system settings and customize the way this unit operates. You can use SOUND MENU to make further adjustments, but we recommend running auto setup first. Item Features A)I/O ASSIGNMENT Assigns jacks according to the component to manually adjust any speaker setting, alter the quality and tone of ...reassign digital input/outputs, select the input mode or rename your listening environment. ■ AUTO SETUP Use to specify which speaker parameters auto setup will adjust, and to activate the auto setup procedure (see page 24). y Most of the parameters described in SOUND MENU are set ...
... system settings and customize the way this unit operates. You can use SOUND MENU to make further adjustments, but we recommend running auto setup first. Item Features A)I/O ASSIGNMENT Assigns jacks according to the component to manually adjust any speaker setting, alter the quality and tone of ...reassign digital input/outputs, select the input mode or rename your listening environment. ■ AUTO SETUP Use to specify which speaker parameters auto setup will adjust, and to activate the auto setup procedure (see page 24). y Most of the parameters described in SOUND MENU are set ...

MCXSP10 Manual
Page 66
EFFECT SET MENU MENU SRCH MODE A-E/CAT. PRESET/CH A-E/CAT. ENTER A-E/CAT. p p SET MENU ;AUTO SETUP . ;MANUAL SETUP . ;SIGNAL INFO. [ ]/[ ]:Up/Down [ENTER]:Enter 4 Press ENTER to enter the selected menu. p p ;MANUAL SETUP . 1 SOUND MENU 2 INPUT MENU 3 OPTION MENU [ ]/[ ]:Up/Down [ENTER]:Enter 5 Press u / d ...to select the desired menu. 6 Press ENTER to enter MANUAL SETUP. 1 SOUND MENU appears on the front panel display. A)SPEAKER SET B)SPEAKER LEVEL C)SP DISTANCE D)EQUALIZER [ ]/[ ]:Up/Down [ENTER]:Enter 7 Press ...
EFFECT SET MENU MENU SRCH MODE A-E/CAT. PRESET/CH A-E/CAT. ENTER A-E/CAT. p p SET MENU ;AUTO SETUP . ;MANUAL SETUP . ;SIGNAL INFO. [ ]/[ ]:Up/Down [ENTER]:Enter 4 Press ENTER to enter the selected menu. p p ;MANUAL SETUP . 1 SOUND MENU 2 INPUT MENU 3 OPTION MENU [ ]/[ ]:Up/Down [ENTER]:Enter 5 Press u / d ...to select the desired menu. 6 Press ENTER to enter MANUAL SETUP. 1 SOUND MENU appears on the front panel display. A)SPEAKER SET B)SPEAKER LEVEL C)SP DISTANCE D)EQUALIZER [ ]/[ ]:Up/Down [ENTER]:Enter 7 Press ...
MCXSP10 Manual
Page 67
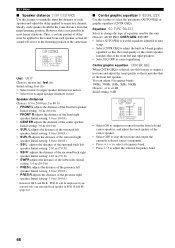
.... The unit directs the low-frequency signals of the center channel signal to the center speaker. • Select SML if you have small front speakers. Surround left and right speakers. NONE )SML LRG • Select LRG if you have a large center speaker. B L/R SP) to the Virtual CINEMA DSP ...range of the center channel to the speakers selected with "LFE/BASS OUT". • Select NONE if you run auto setup (see page 35) and automatically set the surround back speaker setting (SUR. The unit directs the entire range of the front channel to the speakers selected with the ...
.... The unit directs the low-frequency signals of the center channel signal to the center speaker. • Select SML if you have small front speakers. Surround left and right speakers. NONE )SML LRG • Select LRG if you have a large center speaker. B L/R SP) to the Virtual CINEMA DSP ...range of the center channel to the speakers selected with "LFE/BASS OUT". • Select NONE if you run auto setup (see page 35) and automatically set the surround back speaker setting (SUR. The unit directs the entire range of the front channel to the speakers selected with the ...
MCXSP10 Manual
Page 70
...R adjusts the distance of delay must be applied to adjust the built-in auto setup. • Select CNTR GEQ to the sound from each speaker should be displayed if you selected only one surround back speaker in most home situations. Choices: AUTO PEQ, CNTR GEQ, EQ OFF ... ft) • SB L* adjusts the distance of the presence left speaker. Initial setting: 3.0 m (10.0 ft) • PRES L adjusts the distance of the surround back left speaker. Initial setting: 3.0 m (10.0 ft) • FRONT R adjusts the distance of equalizer used by this feature to output a test tone and adjust ...
...R adjusts the distance of delay must be applied to adjust the built-in auto setup. • Select CNTR GEQ to the sound from each speaker should be displayed if you selected only one surround back speaker in most home situations. Choices: AUTO PEQ, CNTR GEQ, EQ OFF ... ft) • SB L* adjusts the distance of the presence left speaker. Initial setting: 3.0 m (10.0 ft) • PRES L adjusts the distance of the surround back left speaker. Initial setting: 3.0 m (10.0 ft) • FRONT R adjusts the distance of equalizer used by this feature to output a test tone and adjust ...

MCXSP10 Manual
Page 76
... and STRAIGHT (EFFECT) buttons, and PROGRAM selector buttons on , and the ADVANCED SETUP menu appears in the front panel display. model) VOLUME PRESET/TUNING SEARCH MODE EDIT FM/AM XM A/B/C/D/E CATEGORY NEXT PRESET/TUNING/CH LEVEL + STRAIGHT PROGRAM TONE CONTROL INPUT MODE EFFECT... this unit, and while holding down STRAIGHT (EFFECT), press STANDBY/ON. STANDBY /ON This completes the advanced setup procedure. ADVANCED SETUP MENU ADVANCED SETUP MENU The ADVANCED SETUP menu is displayed in the front panel display. STRAIGHT EFFECT While holding down , press STANDBY /ON 4 Press...
... and STRAIGHT (EFFECT) buttons, and PROGRAM selector buttons on , and the ADVANCED SETUP menu appears in the front panel display. model) VOLUME PRESET/TUNING SEARCH MODE EDIT FM/AM XM A/B/C/D/E CATEGORY NEXT PRESET/TUNING/CH LEVEL + STRAIGHT PROGRAM TONE CONTROL INPUT MODE EFFECT... this unit, and while holding down STRAIGHT (EFFECT), press STANDBY/ON. STANDBY /ON This completes the advanced setup procedure. ADVANCED SETUP MENU ADVANCED SETUP MENU The ADVANCED SETUP menu is displayed in the front panel display. STRAIGHT EFFECT While holding down , press STANDBY /ON 4 Press...

