

Owner's Manual
Page 4
...8226; Do not expose the device to avoid the possibility of components with moving the device, remove all connected cables. • When setting up the device, make sure that there is adequate space between the device and surrounding walls or other hazards. If some trouble or ...;ed Yamaha service personnel about replacing defective components. • Illustrations in this manual are for explanatory purposes only, and may not match the actual appearance of the product during use of sound during operation. • Company names and product names used for all devices, set all ...
...8226; Do not expose the device to avoid the possibility of components with moving the device, remove all connected cables. • When setting up the device, make sure that there is adequate space between the device and surrounding walls or other hazards. If some trouble or ...;ed Yamaha service personnel about replacing defective components. • Illustrations in this manual are for explanatory purposes only, and may not match the actual appearance of the product during use of sound during operation. • Company names and product names used for all devices, set all ...

Owner's Manual
Page 5
...the performance of connectors for long stretches with the shortest possible unbalanced cables. HS80M/HS50M/HS10W Owner's Manual 5 If your mixer and monitors are fine for the other line... on the final sound. The HS-series studio monitors provide two types of your Yamaha HS-series monitor speakers. The model looks a lot better in a location that everything can...at response and excellent resolution that allowed engineers and producers to hear subtle details that 's set up purely for maximum noise resistance. A great listening system can choose the type that will...
...the performance of connectors for long stretches with the shortest possible unbalanced cables. HS80M/HS50M/HS10W Owner's Manual 5 If your mixer and monitors are fine for the other line... on the final sound. The HS-series studio monitors provide two types of your Yamaha HS-series monitor speakers. The model looks a lot better in a location that everything can...at response and excellent resolution that allowed engineers and producers to hear subtle details that 's set up purely for maximum noise resistance. A great listening system can choose the type that will...

Owner's Manual
Page 7
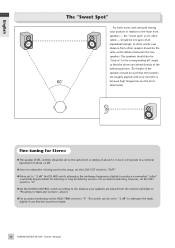
... resources. Rest assured that modifies the speaker's bass characteristics to Walls and Corners For the most important considerations when setting up a stereo or 5.1 surround system. The basics are formidable. Proximity to compensate for direct connection to your speakers get to... little experimentation and measuring to place your left and right speakers, making it 's worth getting as close as possible. HS80M/HS50M/HS10W Owner's Manual 7 A minimum of your speakers should be positioned away from walls and especially corners, which can be astounding. The ...
... resources. Rest assured that modifies the speaker's bass characteristics to Walls and Corners For the most important considerations when setting up a stereo or 5.1 surround system. The basics are formidable. Proximity to compensate for direct connection to your speakers get to... little experimentation and measuring to place your left and right speakers, making it 's worth getting as close as possible. HS80M/HS50M/HS10W Owner's Manual 7 A minimum of your speakers should be positioned away from walls and especially corners, which can be astounding. The ...
Owner's Manual
Page 8
... to Walls and Corners", above). ● For accurate monitoring set to "-2 dB" to "0". The speakers should be set the HIGH TRIM switch to attenuate the highs slightly if you find the sound too bright. 8 HS80M/HS50M/HS10W Owner's Manual This switch can be one apex of an equilateral...a somewhat "softer" sound that may be such that the drivers are placed from either speaker should be the same as it's often called - A setting of about +4 dB. ● Since no subwoofer is because high frequencies are the most directional). The height of about 12 o'clock corresponds to ...
... to Walls and Corners", above). ● For accurate monitoring set to "-2 dB" to "0". The speakers should be set the HIGH TRIM switch to attenuate the highs slightly if you find the sound too bright. 8 HS80M/HS50M/HS10W Owner's Manual This switch can be one apex of an equilateral...a somewhat "softer" sound that may be such that the drivers are placed from either speaker should be the same as it's often called - A setting of about +4 dB. ● Since no subwoofer is because high frequencies are the most directional). The height of about 12 o'clock corresponds to ...

Owner's Manual
Page 9
... ● When set at the same distance from the listening position, but it sound great. Another approach would be to adjust the HS50M/HS80M output level to achieve the desired relativebalance with the subwoofer. ● Start with the HS50M or HS80M speakers. ● Turn the HS10W LOW CUT switch ON...speakers is not as critical as required. The extended bass response provided by a good subwoofer can indeed help you 're using the HS50M set the HS10W LEVEL control to about 11 o'clock. Fine-tuning for Surround If you're going to be adjusted later to achieve the smoothest integration ...
... ● When set at the same distance from the listening position, but it sound great. Another approach would be to adjust the HS50M/HS80M output level to achieve the desired relativebalance with the subwoofer. ● Start with the HS50M or HS80M speakers. ● Turn the HS10W LOW CUT switch ON...speakers is not as critical as required. The extended bass response provided by a good subwoofer can indeed help you 're using the HS50M set the HS10W LEVEL control to about 11 o'clock. Fine-tuning for Surround If you're going to be adjusted later to achieve the smoothest integration ...

Owner's Manual
Page 11
...need to monitor at a level that's loud enough so that you 're using the HS80M with a digital mixer set the HS10W LEVEL control to about 10 o'clock. ● Start with the HIGH CUT control set to "-2 dB" the HS50M/HS80M EQ MID switch attenuates the midrange frequencies slightly to produce a somewhat "softer" ...to attenuate the highs slightly if you 're using the HS50M set it is the best level to monitor at its balance in the soft to the distance your music as well as required. If you're using the HS80M set the HS10W LEVEL control to about 9 o'clock. The HIGH CUT frequency ...
...need to monitor at a level that's loud enough so that you 're using the HS80M with a digital mixer set the HS10W LEVEL control to about 10 o'clock. ● Start with the HIGH CUT control set to "-2 dB" the HS50M/HS80M EQ MID switch attenuates the midrange frequencies slightly to produce a somewhat "softer" ...to attenuate the highs slightly if you 're using the HS50M set it is the best level to monitor at its balance in the soft to the distance your music as well as required. If you're using the HS80M set the HS10W LEVEL control to about 9 o'clock. The HIGH CUT frequency ...
Owner's Manual
Page 12
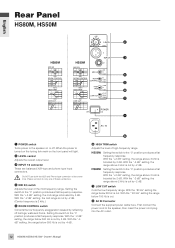
...cable here. AC IN ( & HIGH TRIM switch Adjusts the level of the mid-frequency range. With the "-2 dB" setting, the range above 2 kHz is cut by -4 dB. HS50M: Setting the switch to only one of these connectors. $ MID EQ switch Adjusts the level of high-frequency range. With the ... POWER ON " # $ % & ' ! 1 POWER switch Turns power to the speaker, then insert the power cord plug into the AC outlet. 12 HS80M/HS50M/HS10W Owner's Manual When the power is 2 kHz.) % ROOM CONTROL switch Corrects the low frequency exaggeration caused by -2 dB. (Center frequency is turned on the tuning...
...cable here. AC IN ( & HIGH TRIM switch Adjusts the level of the mid-frequency range. With the "-2 dB" setting, the range above 2 kHz is cut by -4 dB. HS50M: Setting the switch to only one of these connectors. $ MID EQ switch Adjusts the level of high-frequency range. With the ... POWER ON " # $ % & ' ! 1 POWER switch Turns power to the speaker, then insert the power cord plug into the AC outlet. 12 HS80M/HS50M/HS10W Owner's Manual When the power is 2 kHz.) % ROOM CONTROL switch Corrects the low frequency exaggeration caused by -2 dB. (Center frequency is turned on the tuning...

Owner's Manual
Page 13
...* % LOW CUT switch If the LOW CUT switch is cut . You will light. Use the LOW CUT control to set the cutoff frequency from 80 Hz to "NORM". HS80M/HS50M/HS10W Owner's Manual 13 POWER switch Turns power to the subwoofer, then insert the power cord plug into the AC outlet...output connectors output the signals received at these connectors. # EXT SUB OUT connector This is on the front panel will usually set the cutoff frequency of the signal output from the HS10W from 80 Hz to 120 Hz. ( LEVEL control Adjusts the overall output level. ) PHASE switch Selects a phase of ...
...* % LOW CUT switch If the LOW CUT switch is cut . You will light. Use the LOW CUT control to set the cutoff frequency from 80 Hz to "NORM". HS80M/HS50M/HS10W Owner's Manual 13 POWER switch Turns power to the subwoofer, then insert the power cord plug into the AC outlet...output connectors output the signals received at these connectors. # EXT SUB OUT connector This is on the front panel will usually set the cutoff frequency of the signal output from the HS10W from 80 Hz to 120 Hz. ( LEVEL control Adjusts the overall output level. ) PHASE switch Selects a phase of ...