

Owner's Manual
Page 2
... cabinet damaged. 16 Servicing - An outdoor antenna should be used only with arrowhead symbol, within an equilateral triangle, is operated. 2 Retain Instructions - NO USER-SERVICEABLE PARTS INSIDE. The exclamation point within the product's enclosure that objects do not fall into the unit; All operating and other appliances that may block the...
... cabinet damaged. 16 Servicing - An outdoor antenna should be used only with arrowhead symbol, within an equilateral triangle, is operated. 2 Retain Instructions - NO USER-SERVICEABLE PARTS INSIDE. The exclamation point within the product's enclosure that objects do not fall into the unit; All operating and other appliances that may block the...

Owner's Manual
Page 3
...-in all installation instructions. The above statements apply ONLY to grounding electrodes, and requirements for proper grounding and, in FCC Regulations, Part 15 for Class "B" digital devices. Article 810 of radio or TV interference, relocate/reorient the antenna. Compliance with other electronic devices...IMPORTANT NOTICE : DO NOT MODIFY THIS UNIT! Cable/s supplied with this unit, be used according to eliminate the problem by Yamaha may void your FCC authorization to use only high quality shielded cables. Utilize power outlets that are on different branch (circuit ...
...-in all installation instructions. The above statements apply ONLY to grounding electrodes, and requirements for proper grounding and, in FCC Regulations, Part 15 for Class "B" digital devices. Article 810 of radio or TV interference, relocate/reorient the antenna. Compliance with other electronic devices...IMPORTANT NOTICE : DO NOT MODIFY THIS UNIT! Cable/s supplied with this unit, be used according to eliminate the problem by Yamaha may void your FCC authorization to use only high quality shielded cables. Utilize power outlets that are on different branch (circuit ...
Owner's Manual
Page 4
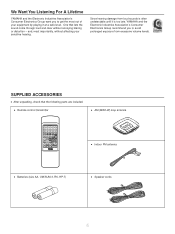
...affecting your equipment by playing it at a safe level. We Want You Listening For A Lifetime YAMAHA and the Electronic Industries Association's Consumer Electronics Group want you to avoid prolonged exposure from loud sounds... is often undetectable until it is too late, YAMAHA and the Electronic Industries Association's Consumer Electronics Group recommend you to get the most importantly, without...(size AA, UM/SUM-3, R6, HP-7) q Speaker cords 4 One that the following parts are included. and, most out of your sensitive hearing.
...affecting your equipment by playing it at a safe level. We Want You Listening For A Lifetime YAMAHA and the Electronic Industries Association's Consumer Electronics Group want you to avoid prolonged exposure from loud sounds... is often undetectable until it is too late, YAMAHA and the Electronic Industries Association's Consumer Electronics Group recommend you to get the most importantly, without...(size AA, UM/SUM-3, R6, HP-7) q Speaker cords 4 One that the following parts are included. and, most out of your sensitive hearing.
Owner's Manual
Page 12
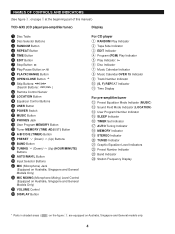
NAMES OF CONTROLS AND INDICATORS (See figure 1 on page 5 at the beginning part of this manual.) TCD-GX5 (CD player/pre-amplifier/tuner) Display 1 Disc Table 2 Disc Selector Buttons 3 RANDOM Button 4 REPEAT Button 5 TIME Button 6 EDIT Button 7 Stop ... Indicator F TIMER Set Indicator G AUTO Tuning Indicator H MEMORY Indicator I STEREO Indicator J TUNED Indicator K Graphic Equalizer Level Indicators L Preset Number Indicator M Band Indicator N Station Frequency Display * Parts in shaded areas ( ) on the figure 1 are equipped on Australia, Singapore and General models only. 4
NAMES OF CONTROLS AND INDICATORS (See figure 1 on page 5 at the beginning part of this manual.) TCD-GX5 (CD player/pre-amplifier/tuner) Display 1 Disc Table 2 Disc Selector Buttons 3 RANDOM Button 4 REPEAT Button 5 TIME Button 6 EDIT Button 7 Stop ... Indicator F TIMER Set Indicator G AUTO Tuning Indicator H MEMORY Indicator I STEREO Indicator J TUNED Indicator K Graphic Equalizer Level Indicators L Preset Number Indicator M Band Indicator N Station Frequency Display * Parts in shaded areas ( ) on the figure 1 are equipped on Australia, Singapore and General models only. 4
Owner's Manual
Page 13
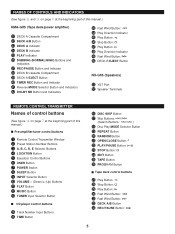
NAMES OF CONTROLS AND INDICATORS (See figure 2 and 3 on page 6 at the beginning part of this manual.) KMA-GX5 (Tape deck/power amplifier) U DECK A Cassette Compartment V DECK A/B Button W DECK A Indicator X DECK B Indicator Y PLAY Indicator Z...: j DECK B EJECT Button NX-GX5 (Speakers) k YST Port l Speaker Terminals REMOTE CONTROL TRANSMITTER Names of control buttons (See figure 4 on page 7 at the beginning part of this manual.) s Pre-amplifier/tuner control buttons 1 Remote Control Transmitter Window 2 Preset Station Number Buttons 3 A, B, C, D, E Selector Buttons 4 LOCATION Button 5 Equalizer...
NAMES OF CONTROLS AND INDICATORS (See figure 2 and 3 on page 6 at the beginning part of this manual.) KMA-GX5 (Tape deck/power amplifier) U DECK A Cassette Compartment V DECK A/B Button W DECK A Indicator X DECK B Indicator Y PLAY Indicator Z...: j DECK B EJECT Button NX-GX5 (Speakers) k YST Port l Speaker Terminals REMOTE CONTROL TRANSMITTER Names of control buttons (See figure 4 on page 7 at the beginning part of this manual.) s Pre-amplifier/tuner control buttons 1 Remote Control Transmitter Window 2 Preset Station Number Buttons 3 A, B, C, D, E Selector Buttons 4 LOCATION Button 5 Equalizer...

Owner's Manual
Page 16
... supply lead is still present inside the system. Automatic power-off if there is not to be sure to the red socket on the control parts of this system will be automatically turned off function The power of time. Connecting the AC supply lead (See figure 0 on page 8.) • After connecting...
... supply lead is still present inside the system. Automatic power-off if there is not to be sure to the red socket on the control parts of this system will be automatically turned off function The power of time. Connecting the AC supply lead (See figure 0 on page 8.) • After connecting...

Owner's Manual
Page 30
..., this unit will then function as described below, according to the setting of the reverse mode. : The tape stops at the first or the last part of a selection, the desired selection may not work for the beginning of a desired selection Carry out the following operation during playback, first press the stop...
..., this unit will then function as described below, according to the setting of the reverse mode. : The tape stops at the first or the last part of a selection, the desired selection may not work for the beginning of a desired selection Carry out the following operation during playback, first press the stop...

Owner's Manual
Page 31
... DECK A and DECK B cassette compartments. 2 If the reverse mode " " is not played at both on record and play button for side B. Dolby noise reduction is a 2 part process that the noise reduction button is high frequency hiss. be reduced with the switch provided. Tape A Side A → B → Tape B Side A → B (Repeats 8 times...
... DECK A and DECK B cassette compartments. 2 If the reverse mode " " is not played at both on record and play button for side B. Dolby noise reduction is a 2 part process that the noise reduction button is high frequency hiss. be reduced with the switch provided. Tape A Side A → B → Tape B Side A → B (Repeats 8 times...

Owner's Manual
Page 32
... by pressing the DOLBY NR button. When the tape is suitable for listening to load a tape into the DECK B cassette compartment. * Wind past the beginning part of the Dolby B or C position, refer to the selected reverse mode.
... by pressing the DOLBY NR button. When the tape is suitable for listening to load a tape into the DECK B cassette compartment. * Wind past the beginning part of the Dolby B or C position, refer to the selected reverse mode.

Owner's Manual
Page 34
... compartment. 4 When recording with the Dolby NR system, select the Dolby NR B or C position by pressing the DOLBY NR button. Recording starts from the first part of the tape on which recording is being carried out. * When the recording on side A finishes while a track is being played back, the sound is...
... compartment. 4 When recording with the Dolby NR system, select the Dolby NR B or C position by pressing the DOLBY NR button. Recording starts from the first part of the tape on which recording is being carried out. * When the recording on side A finishes while a track is being played back, the sound is...

Owner's Manual
Page 35
... FLAT REC/PAUSE DECK A/B POWER SLEEP INPUT VOLUME - + 7 1 → Automatic tape-editing This convenient feature can check the process by watching the display. 2)The end part of the tape on which recording cannot be done is wound. 3)CD playback and recording starts.
... FLAT REC/PAUSE DECK A/B POWER SLEEP INPUT VOLUME - + 7 1 → Automatic tape-editing This convenient feature can check the process by watching the display. 2)The end part of the tape on which recording cannot be done is wound. 3)CD playback and recording starts.

Owner's Manual
Page 50
...cords of the external unit to the AUX 1 terminals. * Its audio source can cause poor sound and tape jams. Clean these parts once every 30 hours of this system. Read the demagnetizer's instructions carefully before use chemically treated cleaning cloths or other chemicals. (See...commercially available cleaning tape. • After long use, the deck's heads and capstans may become magnetized, causing poor sound. Demagnetize these parts with a cotton swab moistened with commercially available head/pinch roller cleaner or isopropyl alcohol, or with an optical terminal to this system....
...cords of the external unit to the AUX 1 terminals. * Its audio source can cause poor sound and tape jams. Clean these parts once every 30 hours of this system. Read the demagnetizer's instructions carefully before use chemically treated cleaning cloths or other chemicals. (See...commercially available cleaning tape. • After long use, the deck's heads and capstans may become magnetized, causing poor sound. Demagnetize these parts with a cotton swab moistened with commercially available head/pinch roller cleaner or isopropyl alcohol, or with an optical terminal to this system....
Owner's Manual
Page 52
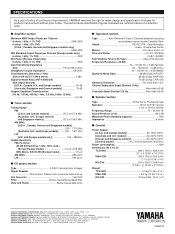
... 6660 ORANGETHORPE AVE., BUENA PARK, CALIF. 90620, U.S.A. RUE AMBROISE CROIZAT BP70 CROISSY-BEAUBOURG 77312 MARNE-LA-VALLEE CEDEX02, FRANCE YAMAHA ELECTRONICS (UK) LTD. YAMAHA HOUSE, 200 RICKMANSWORTH ROAD WATFORD, HERTS WD1 7JS, ENGLAND YAMAHA SCANDINAVIA A.B. SPECIFICATIONS As a part of policy of production units. The performance specification figures indicated are nominal values of continuous improvement...
... 6660 ORANGETHORPE AVE., BUENA PARK, CALIF. 90620, U.S.A. RUE AMBROISE CROIZAT BP70 CROISSY-BEAUBOURG 77312 MARNE-LA-VALLEE CEDEX02, FRANCE YAMAHA ELECTRONICS (UK) LTD. YAMAHA HOUSE, 200 RICKMANSWORTH ROAD WATFORD, HERTS WD1 7JS, ENGLAND YAMAHA SCANDINAVIA A.B. SPECIFICATIONS As a part of policy of production units. The performance specification figures indicated are nominal values of continuous improvement...